Linux 下获查看某个进程(PID)所属的目录

在维护服务器的过程中,有时候会出现一些进程没人认领,这个时候会影响资源的合理分配,也担心系统被人入侵。使用nvidia-smi 以及htop,top也只能知道是哪个进程(PID)占用的资源,但是并不能知道是谁的程序。此时可以通过ll /proc/PID 指令来查看进程所属的目录从而就可以知道是谁的程序了。

nvidia-smi
Thu Feb 22 09:16:48 2024 
+---------------------------------------------------------------------------------------+
| NVIDIA-SMI 535.154.05 Driver Version: 535.154.05 CUDA Version: 12.2 |
|-----------------------------------------+----------------------+----------------------+
| GPU Name Persistence-M | Bus-Id Disp.A | Volatile Uncorr. ECC |
| Fan Temp Perf Pwr:Usage/Cap | Memory-Usage | GPU-Util Compute M. |
| | | MIG M. |
|=========================================+======================+======================|
| 0 NVIDIA GeForce RTX 4090 Off | 00000000:01:00.0 On | Off |
| 31% 59C P2 347W / 450W | 8845MiB / 24564MiB | 98% Default |
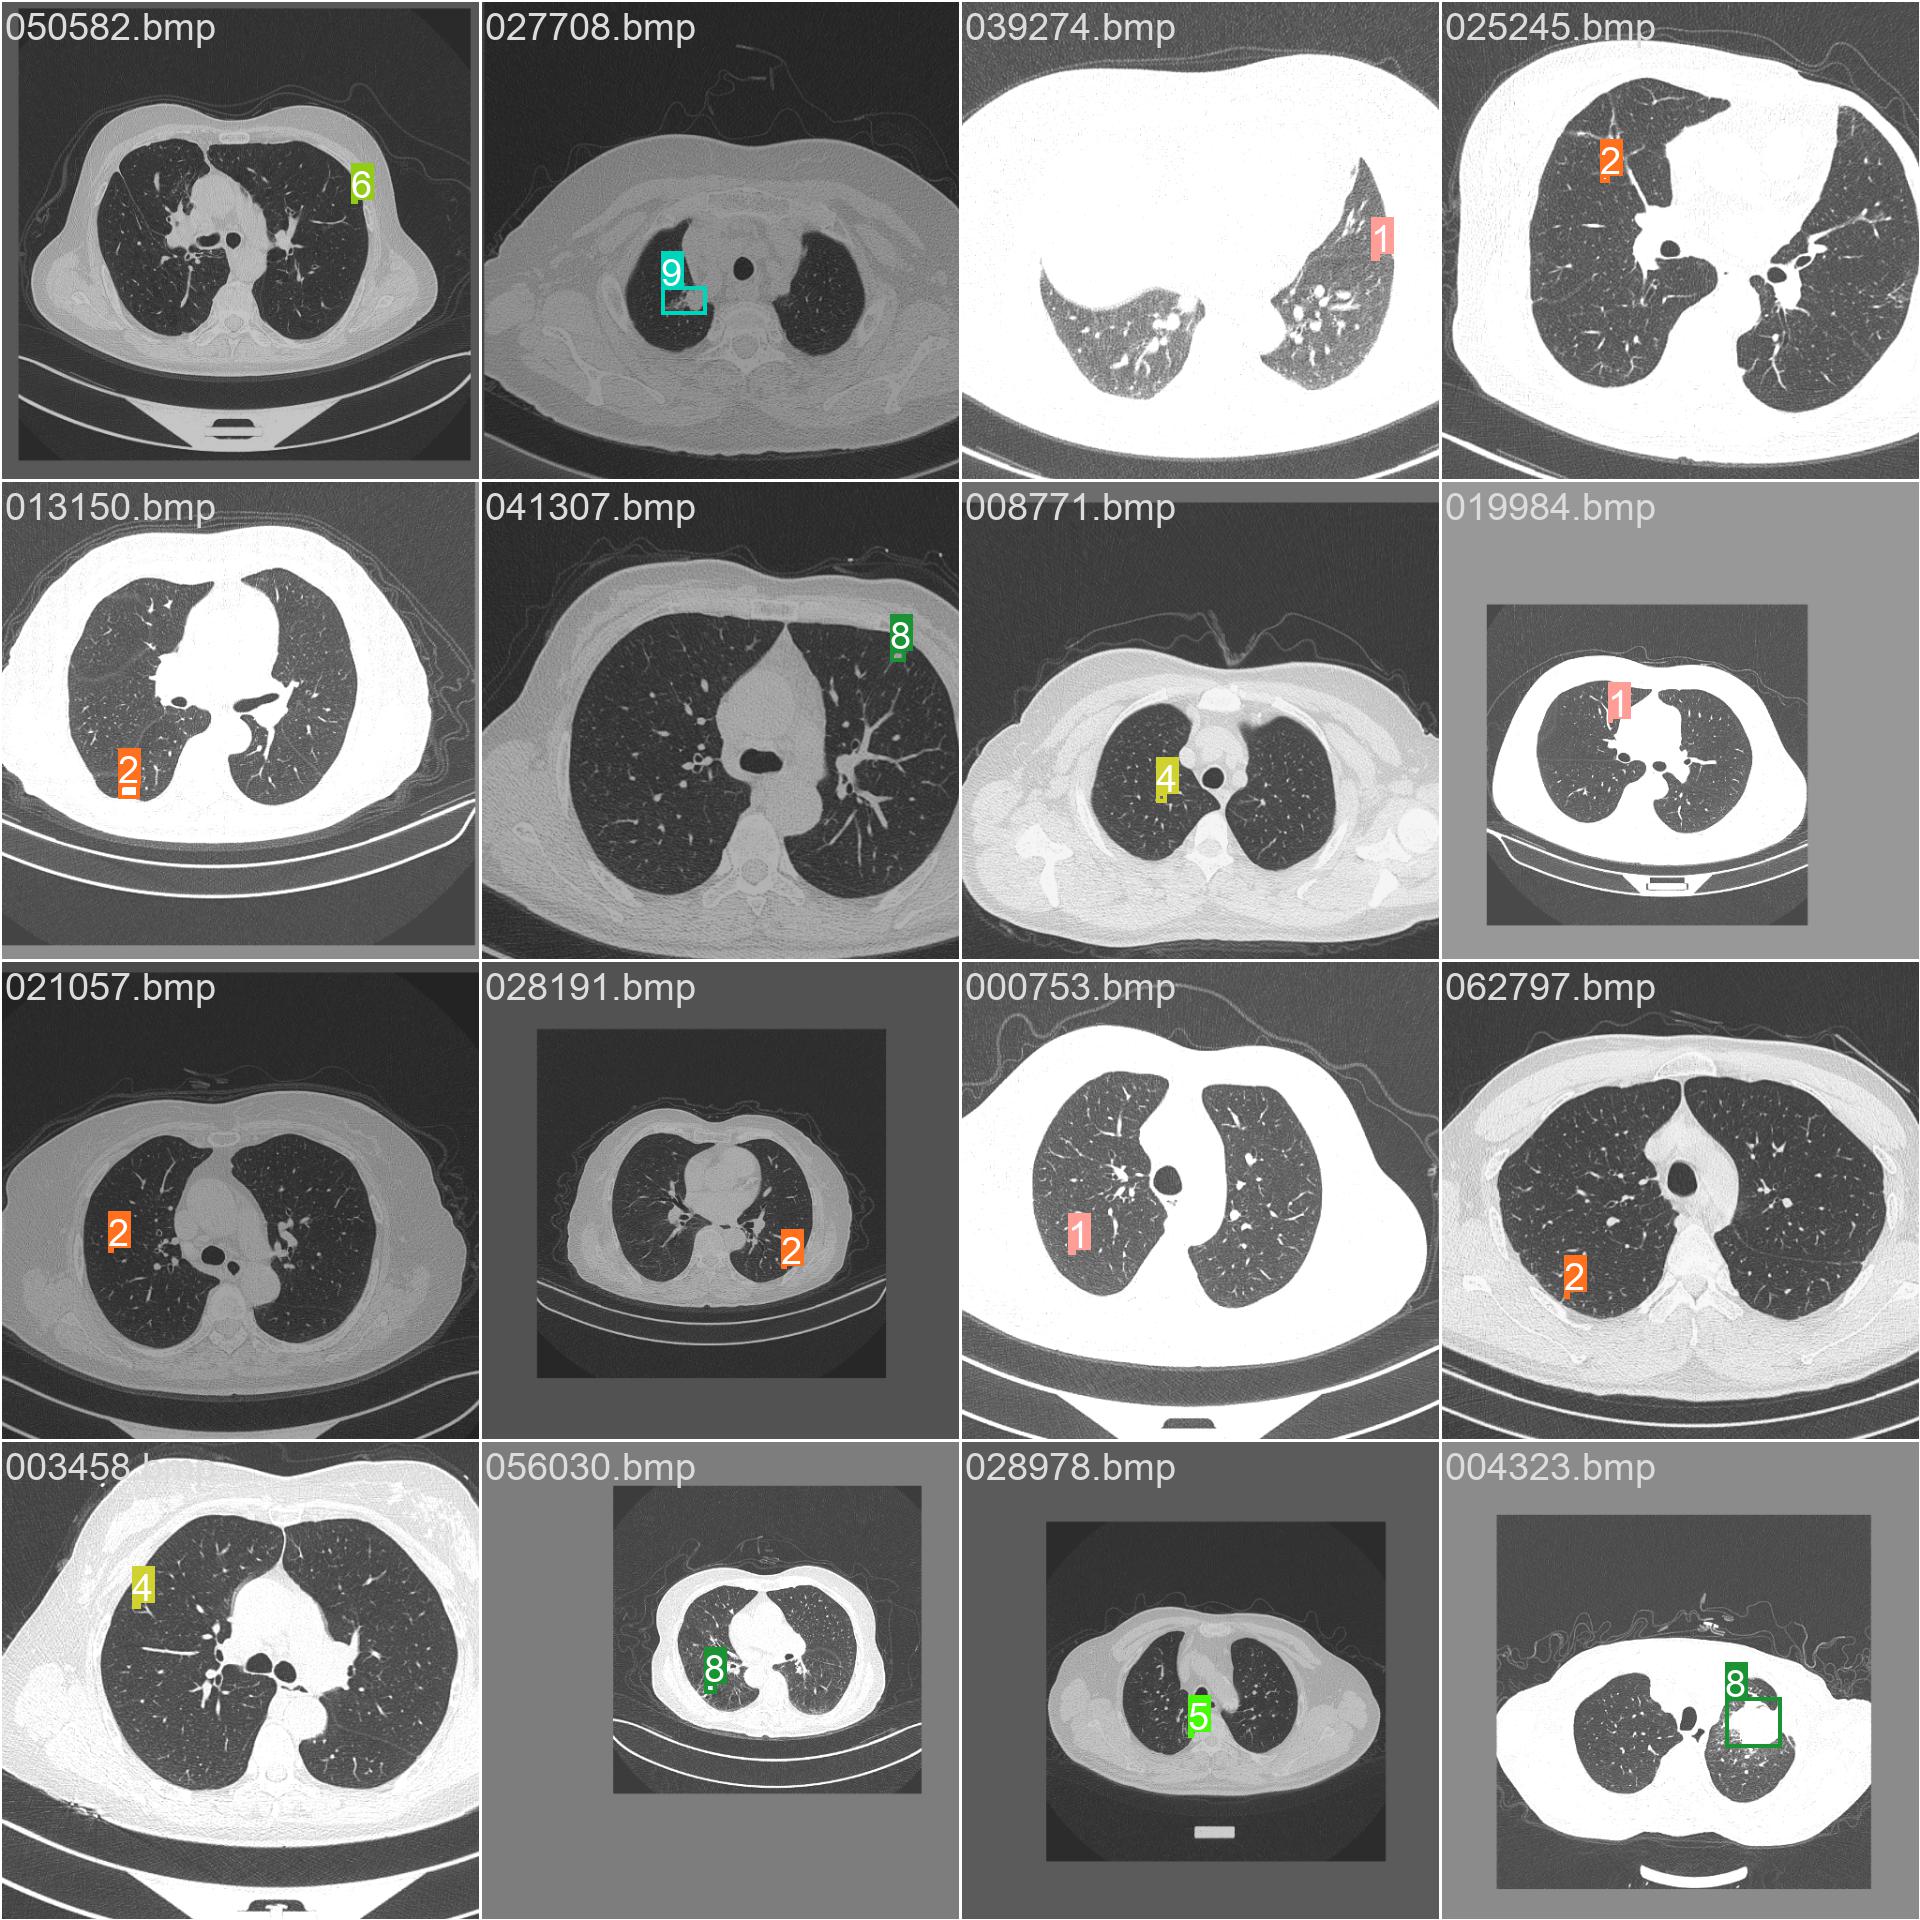
| | | N/A |
+-----------------------------------------+----------------------+----------------------+

+---------------------------------------------------------------------------------------+
| Processes: |
| GPU GI CI PID Type Process name GPU Memory |
| ID ID Usage |
|=======================================================================================|
| 0 N/A N/A 2178 G /usr/lib/xorg/Xorg 116MiB |
| 0 N/A N/A 2410 G /usr/bin/gnome-shell 69MiB |
| 0 N/A N/A 2017416 C python 8642MiB |
+---------------------------------------------------------------------------------------+
top
2017416 ai        20   0   27.1g   4.2g   2.0g S 113.3  13.6 783:50.75 python                                                                                                                                                             
2018057 ai        20   0   14.7g   2.0g  96436 S  40.0   6.4  61:15.49 python                                                                                                                                                             
      1 root      20   0  166760   8448   5632 S   0.0   0.0   0:03.58 systemd                                                                                                                                                            
      2 root      20   0       0      0      0 S   0.0   0.0   0:00.07 kthreadd                                                                                                                                                           
      3 root       0 -20       0      0      0 I   0.0   0.0   0:00.00 rcu_gp                                                                                                                                                             
      4 root       0 -20       0      0      0 I   0.0   0.0   0:00.00 rcu_par_gp                                                                                                                                                         
      5 root       0 -20       0      0      0 I   0.0   0.0   0:00.00 slub_flushwq                                                                                                                                                       
      6 root       0 -20       0      0      0 I   0.0   0.0   0:00.00 netns                                                                                                                                                              
      8 root       0 -20       0      0      0 I   0.0   0.0   0:00.00 kworker/0:0H-events_highpri                                                                                                                                        
     11 root       0 -20       0      0      0 I   0.0   0.0   0:00.00 mm_percpu_wq                                                                                                                                                       
     12 root      20   0       0      0      0 I   0.0   0.0   0:00.00 rcu_tasks_kthread                                                                                                                                                  
     13 root      20   0       0      0      0 I   0.0   0.0   0:00.00 rcu_tasks_rude_kthread                                                                                                                                             
     14 root      20   0       0      0      0 I   0.0   0.0   0:00.00 rcu_tasks_trace_kthread                                                                                                                                            
     15 root      20   0       0      0      0 S   0.0   0.0   0:05.19 ksoftirqd/0                                                                                                                                                        
     16 root      20   0       0      0      0 I   0.0   0.0   3:19.23 rcu_preempt                                                                                                                                                        
     17 root      rt   0       0      0      0 S   0.0   0.0   0:01.70 migration/0                                                                                                                                                        
     18 root     -51   0       0      0      0 S   0.0   0.0   0:00.00 idle_inject/0                                                                                                                                                      
     19 root      20   0       0      0      0 S   0.0   0.0   0:00.00 cpuhp/0                                                                                                                                                            
     20 root      20   0       0      0      0 S   0.0   0.0   0:00.00 cpuhp/2                                                                                                                                                            
     21 root     -51   0       0      0      0 S   0.0   0.0   0:00.00 idle_inject/2                                                                                                                                                      
     22 root      rt   0       0      0      0 S   0.0   0.0   0:01.61 migration/2                                                                                                                                                        
     23 root      20   0       0      0      0 S   0.0   0.0   0:03.92 ksoftirqd/2                                                                                                                                                        
     25 root       0 -20       0      0      0 I   0.0   0.0   0:00.00 kworker/2:0H-events_highpri                                                                                                                                        
     26 root      20   0       0      0      0 S   0.0   0.0   0:00.00 cpuhp/4                                                                                                                                                            
     27 root     -51   0       0      0      0 S   0.0   0.0   0:00.00 idle_inject/4                                                                                                                                                      
     28 root      rt   0       0      0      0 S   0.0   0.0   0:01.69 migration/4                                                                                                                                                        
     29 root      20   0       0      0      0 S   0.0   0.0   0:04.04 ksoftirqd/4                                                                                                                                                        
     31 root       0 -20       0      0      0 I   0.0   0.0   0:00.00 kworker/4:0H-events_highpri                                                                                                                                        
     32 root      20   0       0      0      0 S   0.0   0.0   0:00.00 cpuhp/6                                                                                                                                                            
     33 root     -51   0       0      0      0 S   0.0   0.0   0:00.00 idle_inject/6  
htop

0[|| 1.3%] 4[|| 2.6%] 8[|||||| 20.3%] 12[||| 7.7%] 16[| 0.7%] 20[ 0.0%] 24[ 0.0%] 28[ 0.0%]
1[| 0.7%] 5[ 0.0%] 9[||||||||| 36.8%] 13[ 0.0%] 17[ 0.0%] 21[ 0.0%] 25[ 0.0%] 29[ 0.0%]
2[| 2.6%] 6[||| 5.8%] 10[|||||||||||||| 54.6%] 14[||| 7.1%] 18[| 0.7%] 22[ 0.0%] 26[ 0.0%] 30[ 0.0%]
3[|| 1.3%] 7[ 0.0%] 11[|| 3.3%] 15[ 0.0%] 19[ 0.0%] 23[ 0.0%] 27[ 0.0%] 31[ 0.0%]
Mem[||||||||||||||||||||||||||||||||||||||||||||||||||||||||||||||||||||||||||||||||||||||||||||||||||18.0G/31.1G] Tasks: 166, 511 thr, 349 kthr; 0 running
Swp[ 0K/0K] Load average: 1.36 2.26 11.68
Uptime: 2 days, 21:36:55

[Main] [I/O]
PID USER PRI NI VIRT RES SHR S CPU%▽MEM% TIME+ Command
2017416 ai 20 0 27.1G 4315M 2063M R 75.0 13.6 10h20:48 python train.py
2018408 ai 20 0 27.1G 4315M 2063M S 26.1 13.6 1h47:53 python train.py
2017993 ai 20 0 14.6G 1954M 96436 S 6.5 6.1 1h02:37 python train.py
2018025 ai 20 0 14.5G 1894M 96436 S 5.9 5.9 56:29.18 python train.py
2018057 ai 20 0 14.7G 2014M 96436 R 4.6 6.3 57:31.94 python train.py
2017929 ai 20 0 14.5G 1894M 96436 S 3.3 5.9 58:48.62 python train.py
2018089 ai 20 0 14.8G 2159M 97460 S 3.3 6.8 59:42.36 python train.py
2018121 ai 20 0 14.5G 1896M 97204 S 3.3 6.0 1h00:38 python train.py
2018153 ai 20 0 14.8G 2173M 97204 S 3.3 6.8 58:03.87 python train.py
2017961 ai 20 0 14.5G 1895M 97460 S 2.6 6.0 1h01:09 python train.py
2018154 ai 20 0 27.1G 4315M 2063M S 2.0 13.6 27:33.90 python train.py
2051932 ai 20 0 7264 5376 3072 R 2.0 0.0 0:00.13 /snap/htop/4079/usr/local/bin/htop
47203 ai 20 0 703M 10132 6656 S 0.7 0.0 0:30.88 ./natapp -authtoken=6067e3183f0dba3e
2018225 ai 20 0 14.7G 2014M 96436 S 0.7 6.3 3:32.35 python train.py
2018226 ai 20 0 14.8G 2173M 97204 S 0.7 6.8 3:40.85 python train.py
2018227 ai 20 0 14.5G 1894M 96436 S 0.7 5.9 3:53.54 python train.py
2018228 ai 20 0 14.6G 1954M 96436 S 0.7 6.1 3:32.01 python train.py
2018229 ai 20 0 14.5G 1894M 96436 S 0.7 5.9 3:44.15 python train.py
2018230 ai 20 0 14.5G 1896M 97204 S 0.7 6.0 3:33.56 python train.py
2018236 ai 20 0 14.8G 2159M 97460 S 0.7 6.8 3:47.90 python train.py
2018238 ai 20 0 14.5G 1895M 97460 S 0.7 6.0 3:35.48 python train.py
2023173 ai 20 0 18236 8120 5632 S 0.7 0.0 0:05.17 sshd: ai@pts/1,pts/2
2023241 ai 20 0 17644 4864 2816 S 0.7 0.0 0:02.69 top
2024703 ai 20 0 18076 8376 5632 S 0.7 0.0 0:03.87 sshd: ai@pts/3,pts/4
1 root 20 0 162M 8448 5632 S 0.0 0.0 0:03.57 /sbin/init splash
F1Help F2Setup F3SearchF4FilterF5Tree F6SortByF7Nice -F8Nice +F9Kill F10Quit

一、应用层

1.1 /proc/pid/exe

以top进程为例:

[root@localhost ~]# ps -ef | grep top
root     31386 15859  0 14:58 pts/2    00:00:00 top

top进程的pid为31386 ,可以通过查看 /proc/pid/exe:

在Linux系统中,每个进程都有一个/proc/pid/exe文件,它是一个符号链接文件,指向当前进程的可执行文件。

更具体地说,/proc/pid/exe文件是一个符号链接文件,它的内容是一个指向当前进程可执行文件的绝对路径的符号链接。例如,如果当前进程的可执行文件是/usr/bin/myprogram,那么/proc/pid/exe文件的内容将是/usr/bin/myprogram的绝对路径。

通过访问/proc/pid/exe文件,可以快速获取当前进程的可执行文件路径。

[root@localhost ~]# ls -l /proc/31386/exe
lrwxrwxrwx. 1 root root 0 5月  18 14:59 /proc/31386/exe -> /usr/bin/top

其中/usr/bin/top为top进程可执行文件所在的绝对文件路径。

由于/proc/31386/exe是符号链接,直接调用 readlink 命令获取该进程可执行文件所在的绝对文件路径:

[root@localhost ~]# readlink /proc/31386/exe
/usr/bin/top

其中/usr/bin/top为top进程可执行文件所在的绝对文件路径。

由于/proc/31386/exe是符号链接,直接调用 readlink 命令获取该进程可执行文件所在的绝对文件路径:

[root@localhost ~]# readlink /proc/31386/exe
/usr/bin/top
NAME
       readlink - print resolved symbolic links or canonical file names
       
        Print value of a symbolic link or canonical file name
#include 
#include <linux/limits.h>

int main()
{
    char task_absolute_path[PATH_MAX];
 
    int cnt = readlink( "/proc/self/exe", task_absolute_path, PATH_MAX);
    if (cnt < 0){
        printf("readlink is error\n");
        return -1;
    }
    task_absolute_path[cnt] = '\0';
    printf("task absolute path:%s\n", task_absolute_path);

    return 0;
}

readlink()函数用于读取符号链接文件的内容,符号链接文件的内容就是一个路径,即解析符号链接。使用 readlink 读取符号链接,获取的就是符号链接的内容,符号链接的内容的就是目标文件的路径。

当然对于top这种系统shell命令,可以用which和whereis查看:

[root@localhost ~]# which top
/usr/bin/top
[root@localhost ~]# whereis top
top: /usr/bin/top /usr/share/man/man1/top.1.gz

对于普通程序通常用 /proc/pid/exe进行查看。

1.2 /proc/pid/cwd
在Linux系统中,每个进程都有一个/proc/pid/cwd文件,它是一个符号链接文件,指向当前进程的工作目录。
如下所示,我在 /root/link/test1/ 目录下运行 top 命令。

[root@localhost ~]# ls -l /proc/31386/cwd
lrwxrwxrwx. 1 root root 0 5月  18 15:02 /proc/31386/cwd -> /root/link/test1
[root@localhost ~]# readlink /proc/31386/cwd
/root/link/test1

更具体地说,/proc/pid/cwd文件是一个符号链接文件,它的内容是一个指向进程号为 pid 工作目录的绝对路径的符号链接。例如,如果当前进程的工作目录是/home/user,那么/proc/pid/cwd文件的内容将是/home/user的绝对路径。

通过访问/proc/pid/cwd文件,可以快速获取当前进程的工作目录路径,而无需在程序中调用getcwd()函数等获取当前工作目录的系统调用。

需要注意的是,/proc/pid/cwd文件是一个符号链接文件,它指向的路径可能会随着进程的工作目录的变化而变化,因此在读取它的内容时,应该对返回值进行错误检查,以确保它确实指向当前进程的工作目录。

比如函数 getcwd():

NAME
       getcwd, getwd, get_current_dir_name - get current working directory

SYNOPSIS
       #include 

       char *getcwd(char *buf, size_t size);

1.3 代码示例

接下来给出一段代码,根据输入的参数进程pid号,开获取该进程可执行程序的绝对路径和当前在哪个目录执行:

#include 
#include 
#include 
#include 
#include <linux/limits.h>

#define PROC_PATH_LEN 64

int main(int argc, char *argv[]) {
    if (argc != 2) {
        fprintf(stderr, "Usage: %s \n", argv[0]);
        exit(EXIT_FAILURE);
    }

    char proc_path[PROC_PATH_LEN] = {0};
    snprintf(proc_path, sizeof(proc_path), "/proc/%s/exe", argv[1]);

    char exe_path[PATH_MAX] = {0};
    ssize_t len = readlink(proc_path, exe_path, sizeof(exe_path));
    if (len == -1) {
        perror("readlink");
        exit(EXIT_FAILURE);
    }
    exe_path[len] = '\0';
    printf("Executable path: %s\n", exe_path);

    memset(proc_path, 0, PROC_PATH_LEN);
    snprintf(proc_path, sizeof(proc_path), "/proc/%s/cwd", argv[1]);
    char cwd_path[PATH_MAX] = {0};
    len = readlink(proc_path, cwd_path, sizeof(cwd_path));
    if (len == -1) {
        perror("readlink");
        exit(EXIT_FAILURE);
    }
    cwd_path[len] = '\0';
    printf("pid current path: %s\n", cwd_path);

    return 0;
}

二、内核态获取

2.1 相对应的函数与结构体

struct fs_struct *fs 描述了文件系统和进程相关的信息:

// linux-3.10/include/linux/sched.h

struct task_struct {
	......
	/* filesystem information */
	struct fs_struct *fs;
	......
}
// linux-3.10/include/linux/fs_struct.h

struct fs_struct {
	int users;
	spinlock_t lock;
	seqcount_t seq;
	int umask;
	int in_exec;
	struct path root, pwd;
};

其中 struct path root 表示根目录路径,通常都是 / 目录,但是通过chroot系统调用后,对于进程来说会将 / 目录变成了某个子目录,那么相应的进程就是使用该子目录而不是全局的根目录,该进程会将该子目录当作其根目录。

chroot - run command or interactive shell with special root directory

Run COMMAND with root directory set to NEWROOT.

struct path pwd就是当前工作目录。

// linux-3.10/include/linux/path.h

struct path {
	struct vfsmount *mnt;
	struct dentry *dentry;
};
// linux-3.10/include/linux/dcache.h

/*
 * "quick string" -- eases parameter passing, but more importantly
 * saves "metadata" about the string (ie length and the hash).
 *
 * hash comes first so it snuggles against d_parent in the
 * dentry.
 */
struct qstr {
	......
	const unsigned char *name;
};

struct dentry {
	......
	struct qstr d_name;
	......
}

// linux-3.10/include/linux/sched.h

struct task_struct {
	......
	struct mm_struct *mm;
	......
}

从task_struct获取路径基本通过mm_struct这个结构,从中可以获取进程全路径。

// 获取进程全路径
task_struct->mm->exe_file->f_path

将进程的所在的文件路径存储到 /proc//exe symlink中:

// linux-3.10/include/linux/mm_types.h

struct mm_struct {
	......
	/* store ref to file /proc//exe symlink points to */
	struct file *exe_file;
	......
}
// linux-3.10/include/linux/fs.h

struct file {
	......
	struct path		f_path;
	......
}

(1) 通过dentry_path_raw获取文件的全路径,低版本比如2.6.32没有该API

// linux-3.10/fs/dcache.c

static int prepend(char **buffer, int *buflen, const char *str, int namelen)
{
	*buflen -= namelen;
	if (*buflen < 0) return -ENAMETOOLONG; *buffer -= namelen; memcpy(*buffer, str, namelen); return 0; } static int prepend_name(char **buffer, int *buflen, struct qstr *name) { return prepend(buffer, buflen, name->name, name->len);
}

/*
 * Write full pathname from the root of the filesystem into the buffer.
 */
static char *__dentry_path(struct dentry *dentry, char *buf, int buflen)
{
	char *end = buf + buflen;
	char *retval;

	prepend(&end, &buflen, "\0", 1);
	if (buflen < 1) goto Elong; /* Get '/' right */ retval = end-1; *retval = '/'; while (!IS_ROOT(dentry)) { struct dentry *parent = dentry->d_parent;
		int error;

		prefetch(parent);
		spin_lock(&dentry->d_lock);
		error = prepend_name(&end, &buflen, &dentry->d_name);
		spin_unlock(&dentry->d_lock);
		if (error != 0 || prepend(&end, &buflen, "/", 1) != 0)
			goto Elong;

		retval = end;
		dentry = parent;
	}
	return retval;
Elong:
	return ERR_PTR(-ENAMETOOLONG);
}

char *dentry_path_raw(struct dentry *dentry, char *buf, int buflen)
{
	char *retval;

	write_seqlock(&rename_lock);
	retval = __dentry_path(dentry, buf, buflen);
	write_sequnlock(&rename_lock);

	return retval;
}
EXPORT_SYMBOL(dentry_path_raw);

struct file *filp;
dentry_path_raw(filp->f_path.dentry,buf,buflen);

(2)通过d_path获取文件的全路径

// linux-3.10/fs/dcache.c

/**
 * d_path - return the path of a dentry
 * @path: path to report
 * @buf: buffer to return value in
 * @buflen: buffer length
 *
 * Convert a dentry into an ASCII path name. If the entry has been deleted
 * the string " (deleted)" is appended. Note that this is ambiguous.
 *
 * Returns a pointer into the buffer or an error code if the path was
 * too long. Note: Callers should use the returned pointer, not the passed
 * in buffer, to use the name! The implementation often starts at an offset
 * into the buffer, and may leave 0 bytes at the start.
 *
 * "buflen" should be positive.
 */
char *d_path(const struct path *path, char *buf, int buflen)
{
	char *res = buf + buflen;
	struct path root;
	int error;

	/*
	 * We have various synthetic filesystems that never get mounted.  On
	 * these filesystems dentries are never used for lookup purposes, and
	 * thus don't need to be hashed.  They also don't need a name until a
	 * user wants to identify the object in /proc/pid/fd/.  The little hack
	 * below allows us to generate a name for these objects on demand:
	 */
	if (path->dentry->d_op && path->dentry->d_op->d_dname)
		return path->dentry->d_op->d_dname(path->dentry, buf, buflen);

	get_fs_root(current->fs, &root);
	br_read_lock(&vfsmount_lock);
	write_seqlock(&rename_lock);
	error = path_with_deleted(path, &root, &res, &buflen);
	write_sequnlock(&rename_lock);
	br_read_unlock(&vfsmount_lock);
	if (error < 0)
		res = ERR_PTR(error);
	path_put(&root);
	return res;
}
EXPORT_SYMBOL(d_path);

调用d_path函数文件的路径时,应该使用返回的指针而不是转递进去的参数 buf 。
原因是该函数的实现通常从缓冲区的偏移量开始。

内核中用到d_path的例子:

// linux-3.10/include/linux/mm_types.h

/*
 * This struct defines a memory VMM memory area. There is one of these
 * per VM-area/task.  A VM area is any part of the process virtual memory
 * space that has a special rule for the page-fault handlers (ie a shared
 * library, the executable area etc).
 */
struct vm_area_struct {
	......
	struct file * vm_file;		/* File we map to (can be NULL). */
	......
}
// linux-3.10/include/linux/fs.h

struct file {
	......
	struct path		f_path;
	......
}
// linux-3.10/mm/memory.c

/*
 * Print the name of a VMA.
 */
void print_vma_addr(char *prefix, unsigned long ip)
{
	struct mm_struct *mm = current->mm;
	struct vm_area_struct *vma;

	/*
	 * Do not print if we are in atomic
	 * contexts (in exception stacks, etc.):
	 */
	if (preempt_count())
		return;

	down_read(&mm->mmap_sem);
	vma = find_vma(mm, ip);
	if (vma && vma->vm_file) {
		struct file *f = vma->vm_file;
		//使用伙伴系统接口,分配一个物理页,返回一个内核虚拟地址
		char *buf = (char *)__get_free_page(GFP_KERNEL);
		if (buf) {
			char *p;

			p = d_path(&f->f_path, buf, PAGE_SIZE);
			if (IS_ERR(p))
				p = "?";
			printk("%s%s[%lx+%lx]", prefix, kbasename(p),
					vma->vm_start,
					vma->vm_end - vma->vm_start);
			free_page((unsigned long)buf);
		}
	}
	up_read(&mm->mmap_sem);
}

2.2 API演示
在这里只是简单的给出怎么在内核态获取进程所在文件的路径,详细的话请参考内核源码,在第三节给出内核源码获取进程所在文件的路径的方法。

#include <linux/init.h>
#include <linux/kernel.h>
#include <linux/module.h>
#include <linux/sched.h>
#include <linux/pid.h>
#include <linux/fs.h>
#include <linux/fs_struct.h>
#include <linux/path.h>

#define TASK_PATH_MAX_LENGTH 512

//内核模块初始化函数
static int __init lkm_init(void)
{
    struct qstr root_task_path;
    struct qstr current_task_path;

    char buf_1[TASK_PATH_MAX_LENGTH] = {0};
    char *task_path_1 = NULL;

    char buf_2[TASK_PATH_MAX_LENGTH] = {0};
    char *task_path_2 = NULL;

	//获取当前目录名
    current_task_path = current->fs->pwd.dentry->d_name;
    //获取根目录
    root_task_path = current->fs->root.dentry->d_name;

	//内核线程的 mm 成员为空,这里没做判断
	
    //2.6.32 没有dentry_path_raw API
    //获取文件全路径
    task_path_1 = dentry_path_raw(current->mm->exe_file->f_path.dentry, buf_1, TASK_PATH_MAX_LENGTH);

	//获取文件全路径
	//调用d_path函数文件的路径时,应该使用返回的指针:task_path_2 ,而不是转递进去的参数buf:buf_2
    task_path_2 = d_path(&current->mm->exe_file->f_path, buf_2, TASK_PATH_MAX_LENGTH);
    if (IS_ERR(task_path_2)) {
        printk("Get path failed\n");
        return -1;
    }

    printk("current path = %s\n", current_task_path.name);
    printk("root path = %s\n", root_task_path.name);
    printk("task_path_1 = %s\n", task_path_1);
    printk("task_path_2 = %s\n", task_path_2);

	return -1;
}

module_init(lkm_init);

MODULE_LICENSE("GPL");

结果展示:

[root@localhost task_path]# dmesg -c
[415299.952165] current path = task_path
[415299.952172] root path = /
[415299.952176] task_path_1 = /usr/bin/kmod
[415299.952179] task_path_2 = /usr/bin/kmod

三、内核源码实现

// linux-3.10/fs/proc/base.c

/* NOTE:
 *	Implementing inode permission operations in /proc is almost
 *	certainly an error.  Permission checks need to happen during
 *	each system call not at open time.  The reason is that most of
 *	what we wish to check for permissions in /proc varies at runtime.
 *
 *	The classic example of a problem is opening file descriptors
 *	in /proc for a task before it execs a suid executable.
 */

struct pid_entry {
	char *name;
	int len;
	umode_t mode;
	const struct inode_operations *iop;
	const struct file_operations *fop;
	union proc_op op;
};

static int proc_exe_link(struct dentry *dentry, struct path *exe_path)
{
	struct task_struct *task;
	struct mm_struct *mm;
	struct file *exe_file;

	task = get_proc_task(dentry->d_inode);
	if (!task)
		return -ENOENT;
	mm = get_task_mm(task);
	put_task_struct(task);
	if (!mm)
		return -ENOENT;
	exe_file = get_mm_exe_file(mm);
	mmput(mm);
	if (exe_file) {
		*exe_path = exe_file->f_path;
		path_get(&exe_file->f_path);
		fput(exe_file);
		return 0;
	} else
		return -ENOENT;
}

/*
 * Tasks
 */
static const struct pid_entry tid_base_stuff[] = {
	DIR("fd",        S_IRUSR|S_IXUSR, proc_fd_inode_operations, proc_fd_operations),
	......
	REG("comm",      S_IRUGO|S_IWUSR, proc_pid_set_comm_operations),
	......
	LNK("cwd",       proc_cwd_link),
	LNK("root",      proc_root_link),
	LNK("exe",       proc_exe_link),

// linux-3.10/fs/proc/base.c

static int do_proc_readlink(struct path *path, char __user *buffer, int buflen)
{
	//由于这里申请的是一个页大小,便没有使用 kmalloc接口,调用伙伴系统接口分配一个物理页,返回内核虚拟地址
	char *tmp = (char*)__get_free_page(GFP_TEMPORARY);
	char *pathname;
	int len;

	if (!tmp)
		return -ENOMEM;

	//获取进程所在文件的路径
	pathname = d_path(path, tmp, PAGE_SIZE);
	len = PTR_ERR(pathname);
	if (IS_ERR(pathname))
		goto out;
	len = tmp + PAGE_SIZE - 1 - pathname;

	if (len > buflen)
		len = buflen;
		
	//把进程所在文件的路径拷贝到用户空间:char __user *buffer
	//用户空间调用 readlink /proc/pid/
	if (copy_to_user(buffer, pathname, len))
		len = -EFAULT;
 out:
	free_page((unsigned long)tmp);
	return len;
}

static int proc_pid_readlink(struct dentry * dentry, char __user * buffer, int buflen)
{
	int error = -EACCES;
	struct inode *inode = dentry->d_inode;
	struct path path;

	/* Are we allowed to snoop on the tasks file descriptors? */
	if (!proc_fd_access_allowed(inode))
		goto out;

	error = PROC_I(inode)->op.proc_get_link(dentry, &path);
	if (error)
		goto out;

	error = do_proc_readlink(&path, buffer, buflen);
	path_put(&path);
out:
	return error;
}

const struct inode_operations proc_pid_link_inode_operations = {
	.readlink	= proc_pid_readlink,
	.follow_link	= proc_pid_follow_link,
	.setattr	= proc_setattr,
};


// linux-3.10/fs/proc/internal.h
union proc_op {
	int (*proc_get_link)(struct dentry *, struct path *);
	int (*proc_read)(struct task_struct *task, char *page);
	int (*proc_show)(struct seq_file *m,
		struct pid_namespace *ns, struct pid *pid,
		struct task_struct *task);
};

struct proc_inode {
	struct pid *pid;
	int fd;
	union proc_op op;
	struct proc_dir_entry *pde;
	struct ctl_table_header *sysctl;
	struct ctl_table *sysctl_entry;
	struct proc_ns ns;
	struct inode vfs_inode;
};

/*
 * General functions
 */
static inline struct proc_inode *PROC_I(const struct inode *inode)
{
	return container_of(inode, struct proc_inode, vfs_inode);
}


其中:

proc_pid_readlink()
	-->do_proc_readlink(){
			char __user *buffer;
			copy_to_user(buffer, pathname, len);
		}

比如:当用户调用 readlink /proc/pid/exe,将该文件内容拷贝到用户空间:char __user *buffer中。

Yolov8医学肺影像CT模型训练结果可视化图分析与评估训练结果

前言

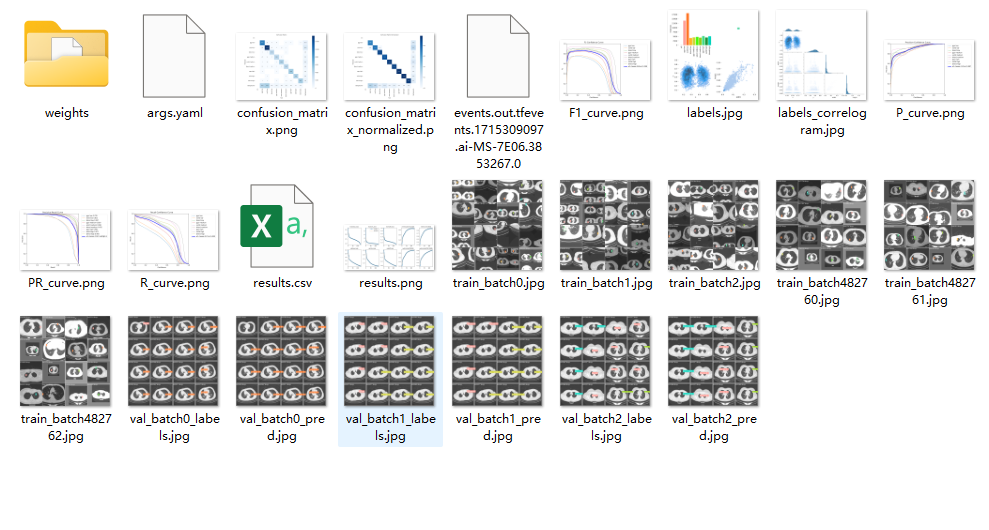
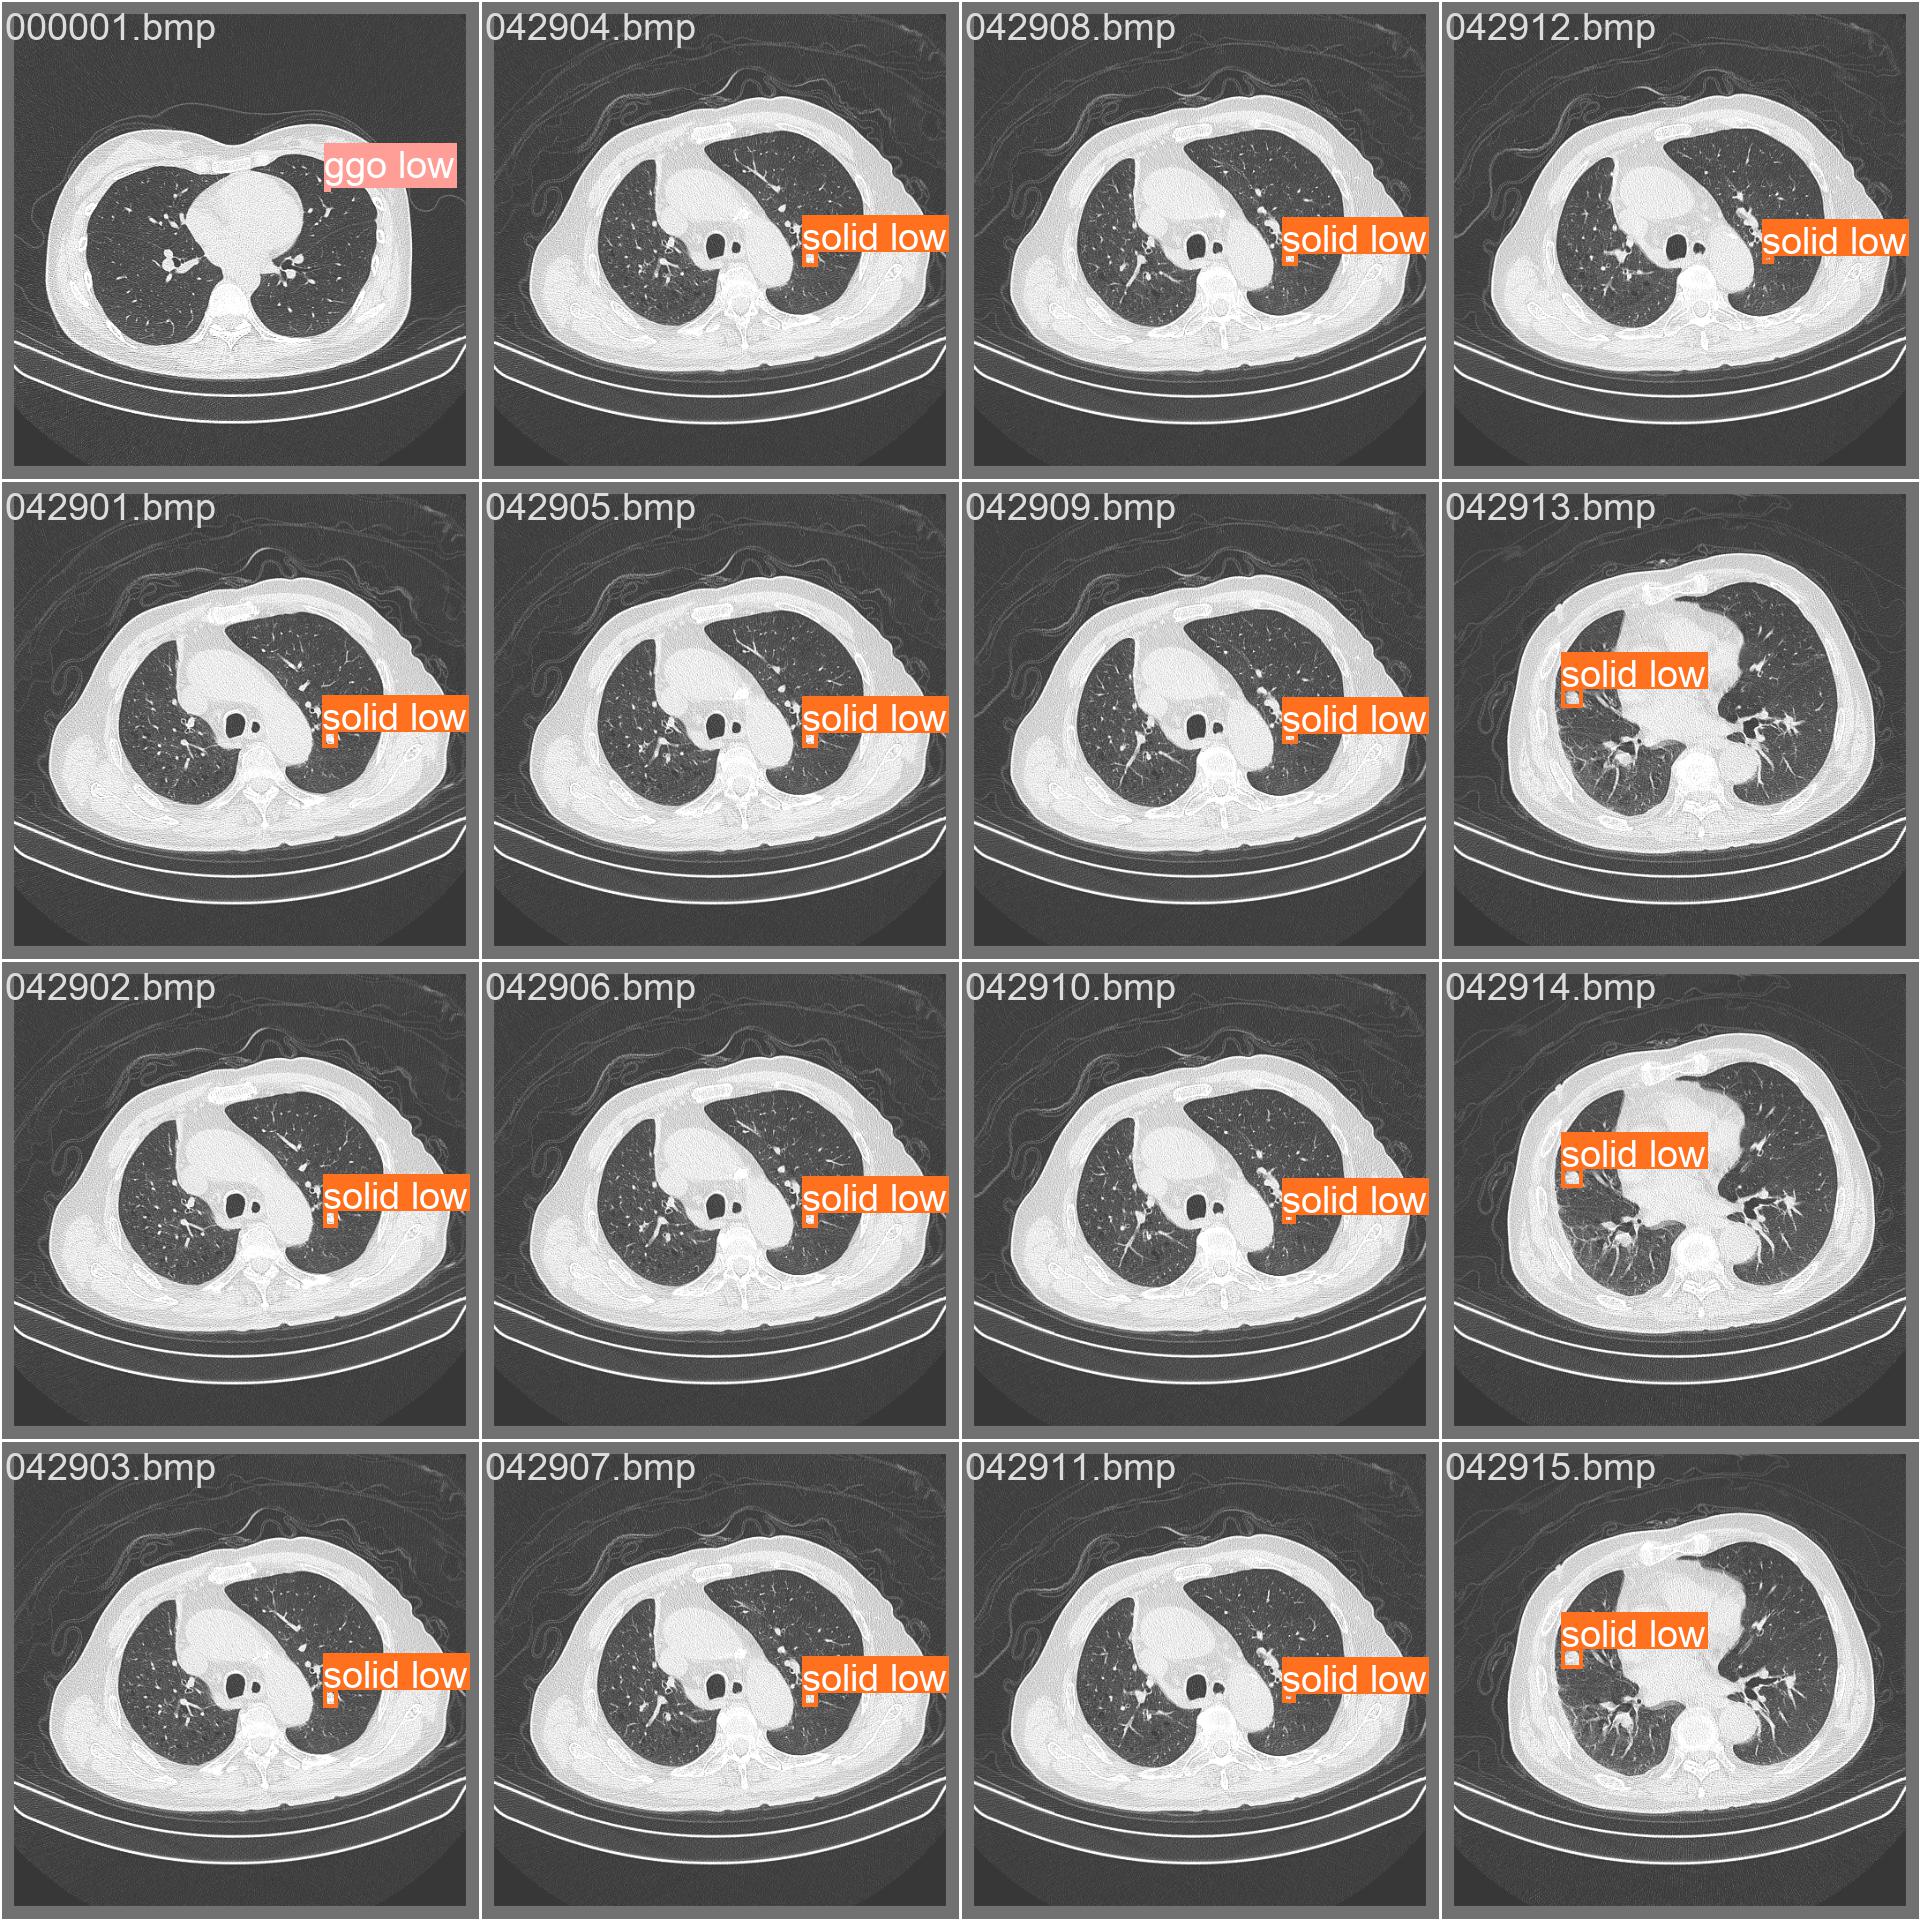
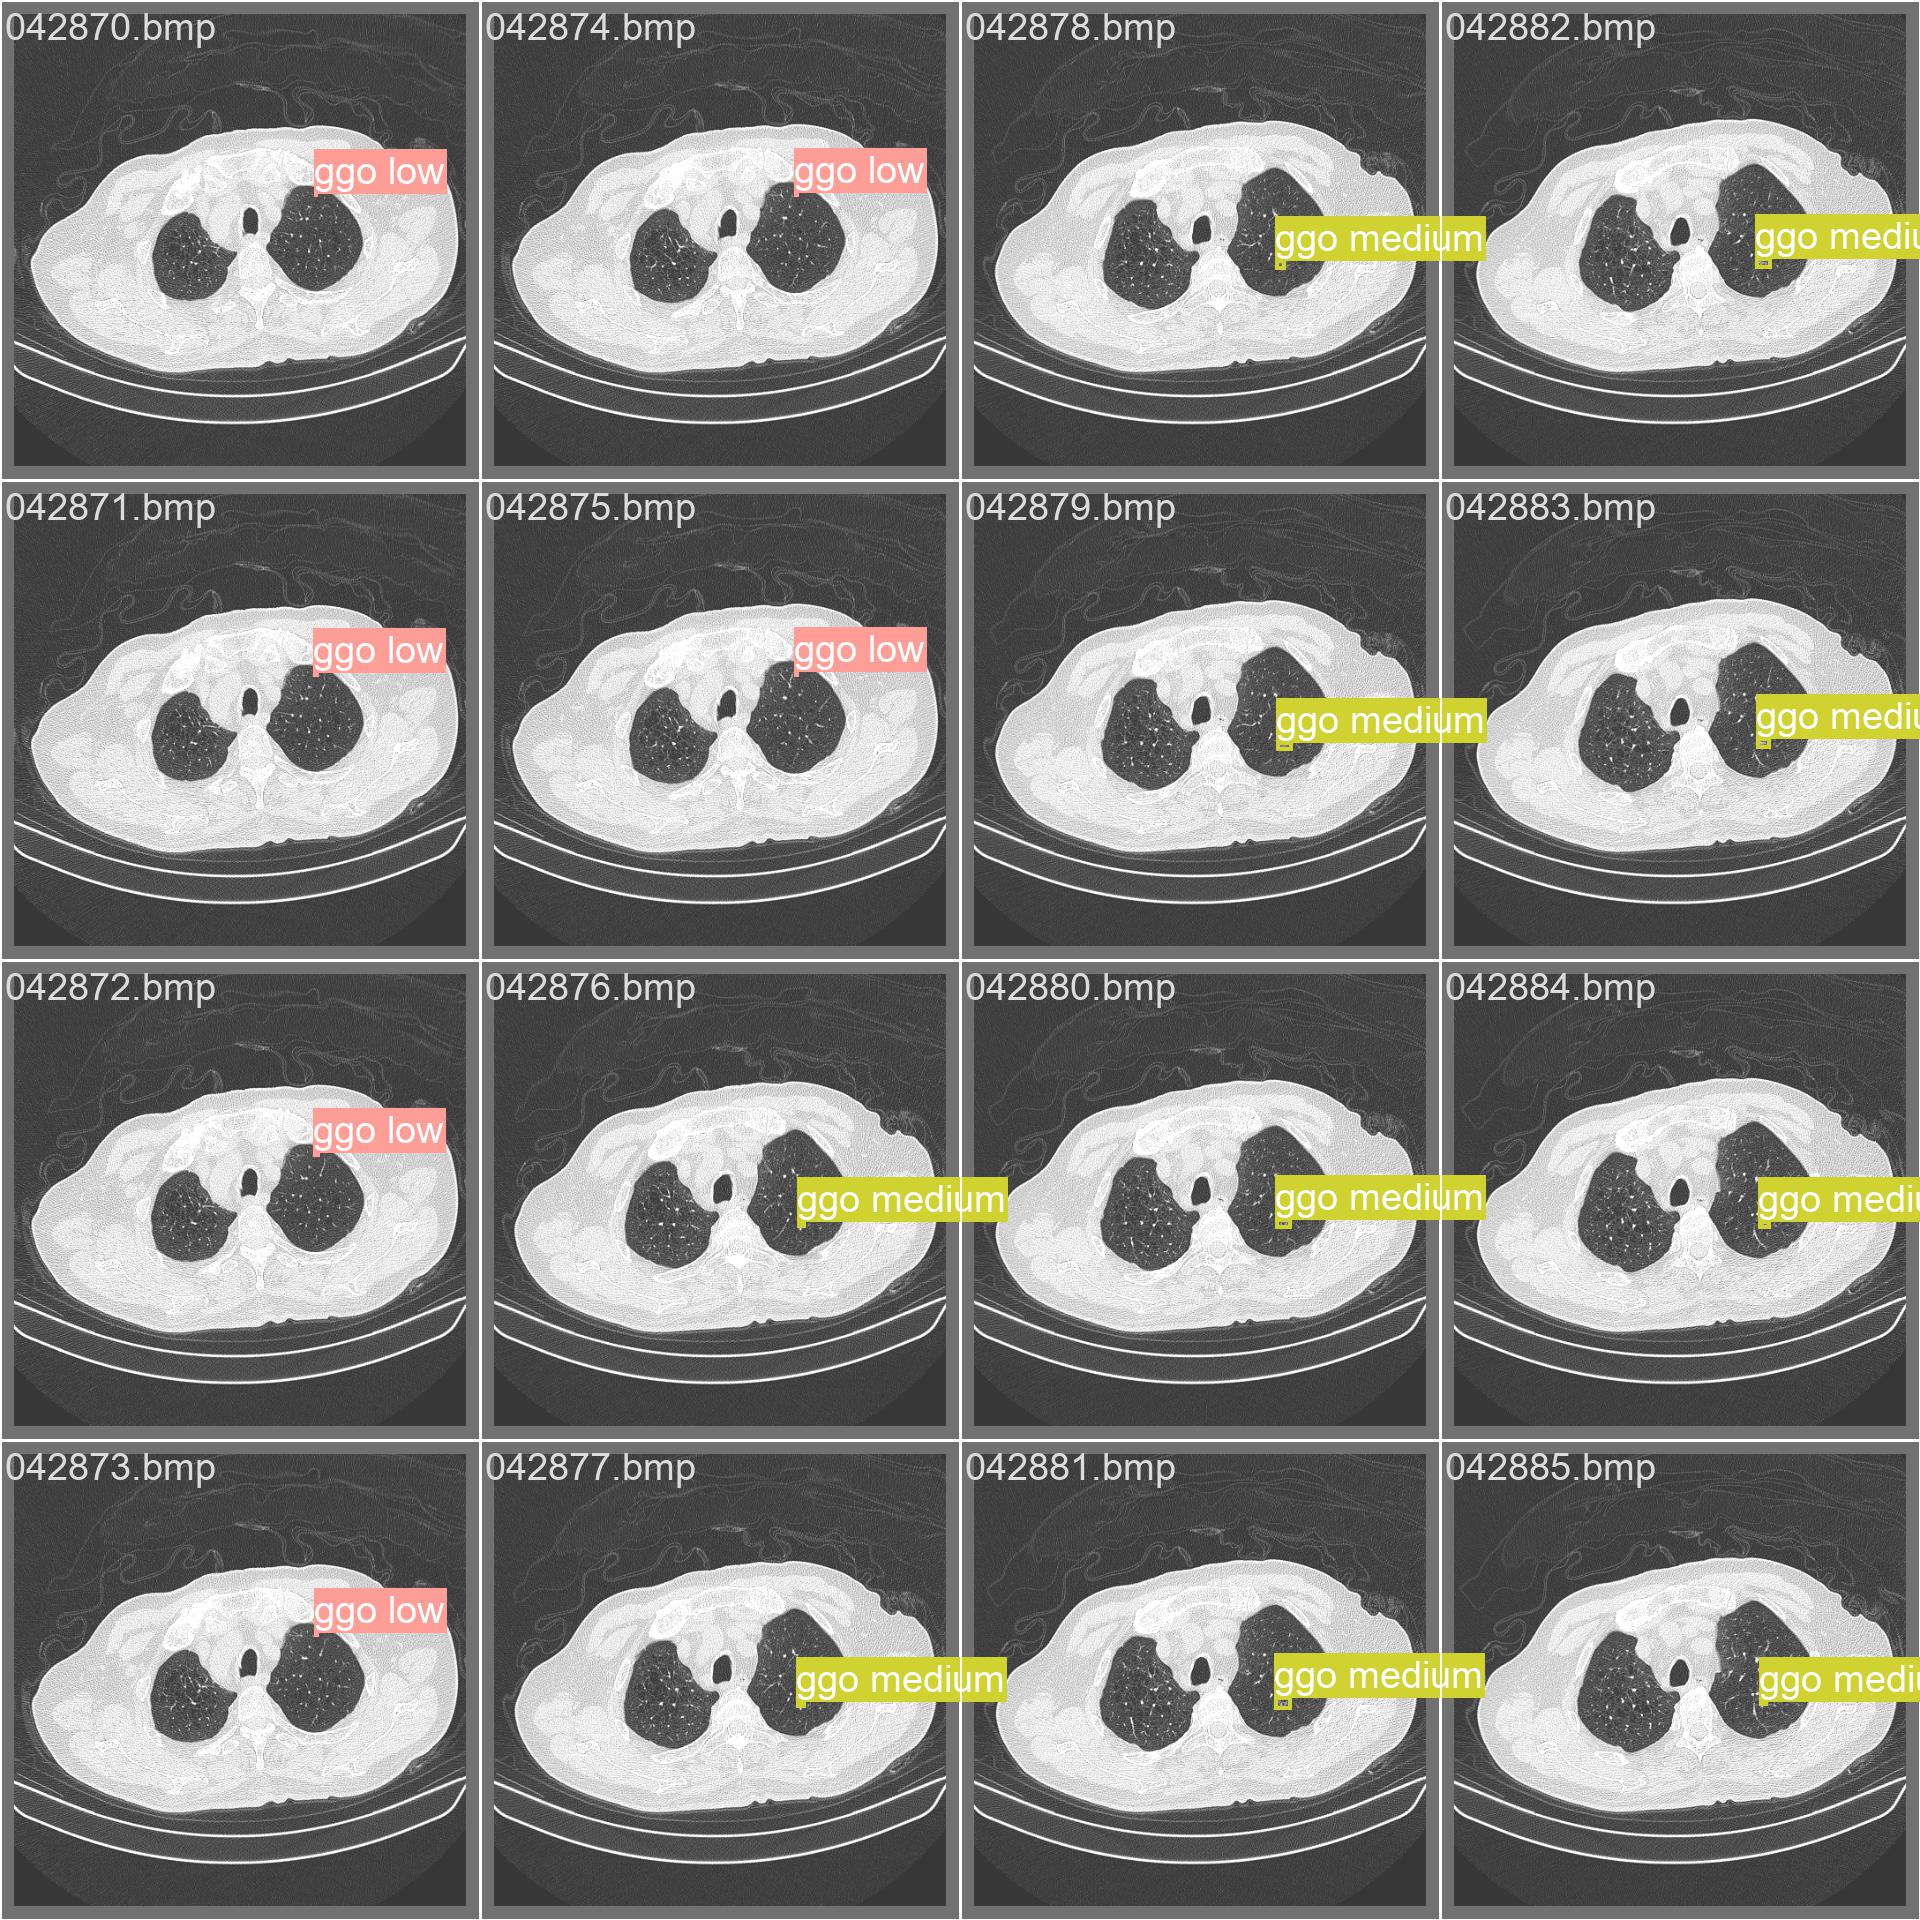
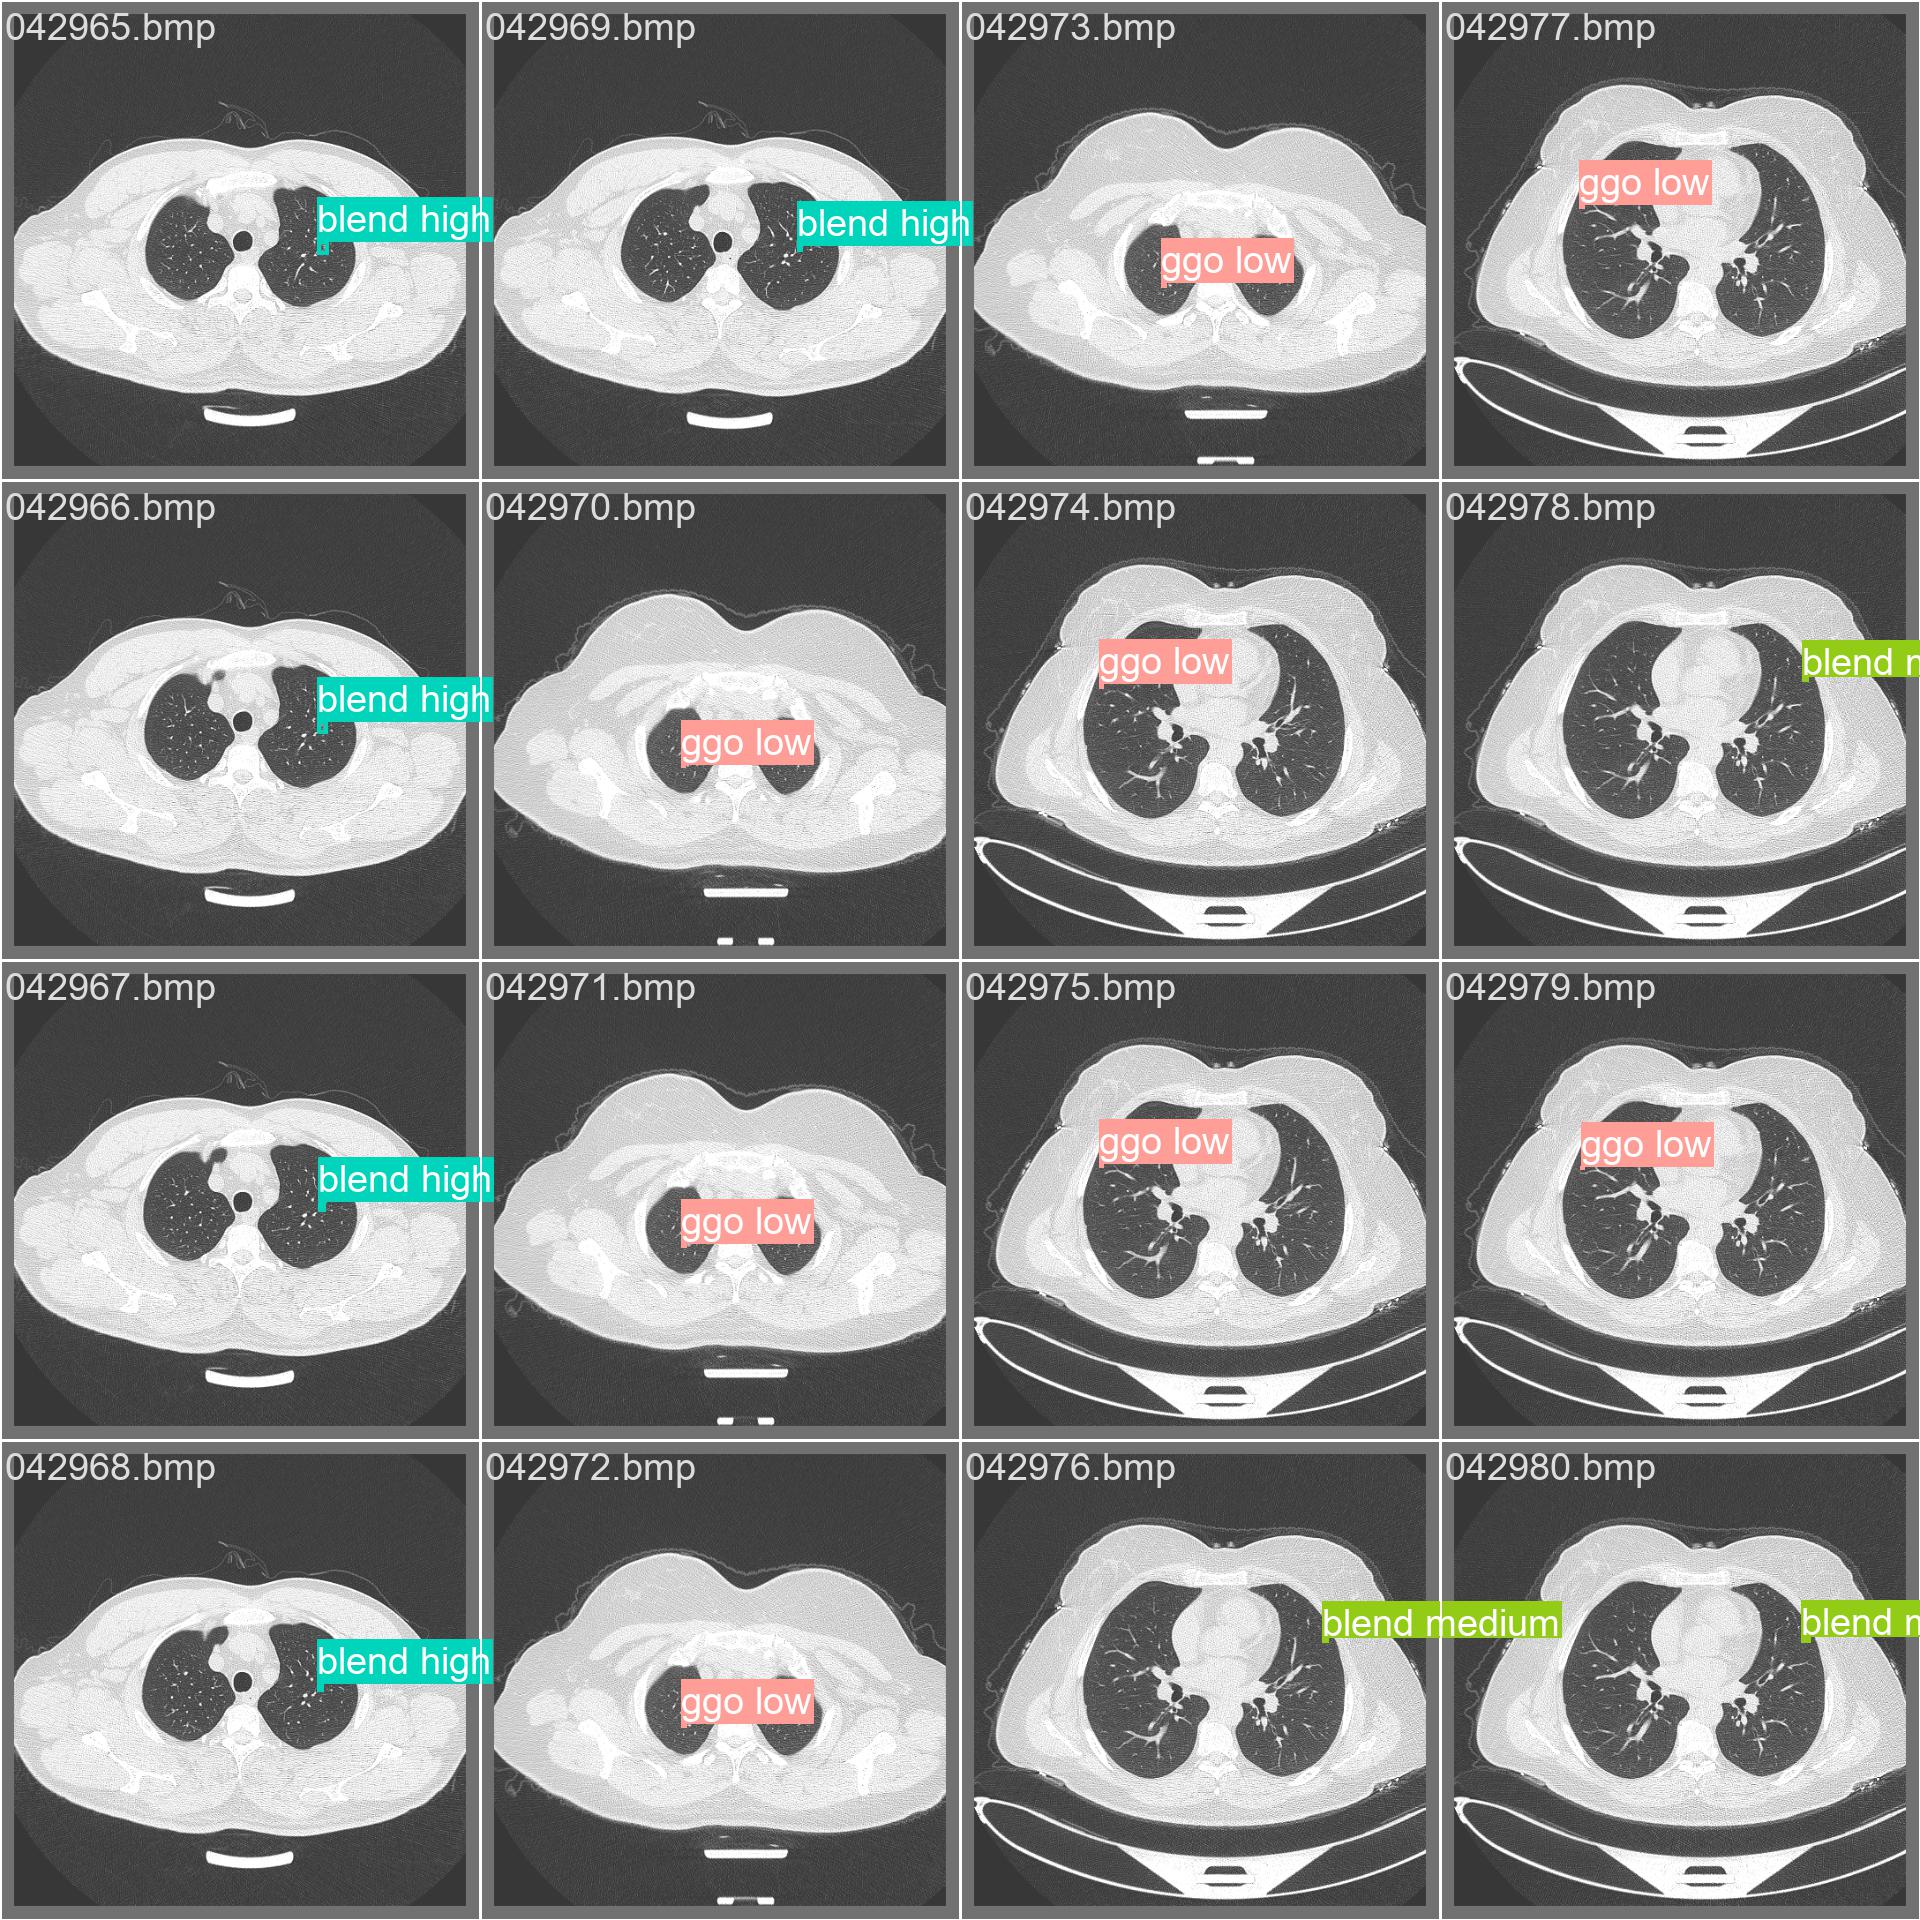
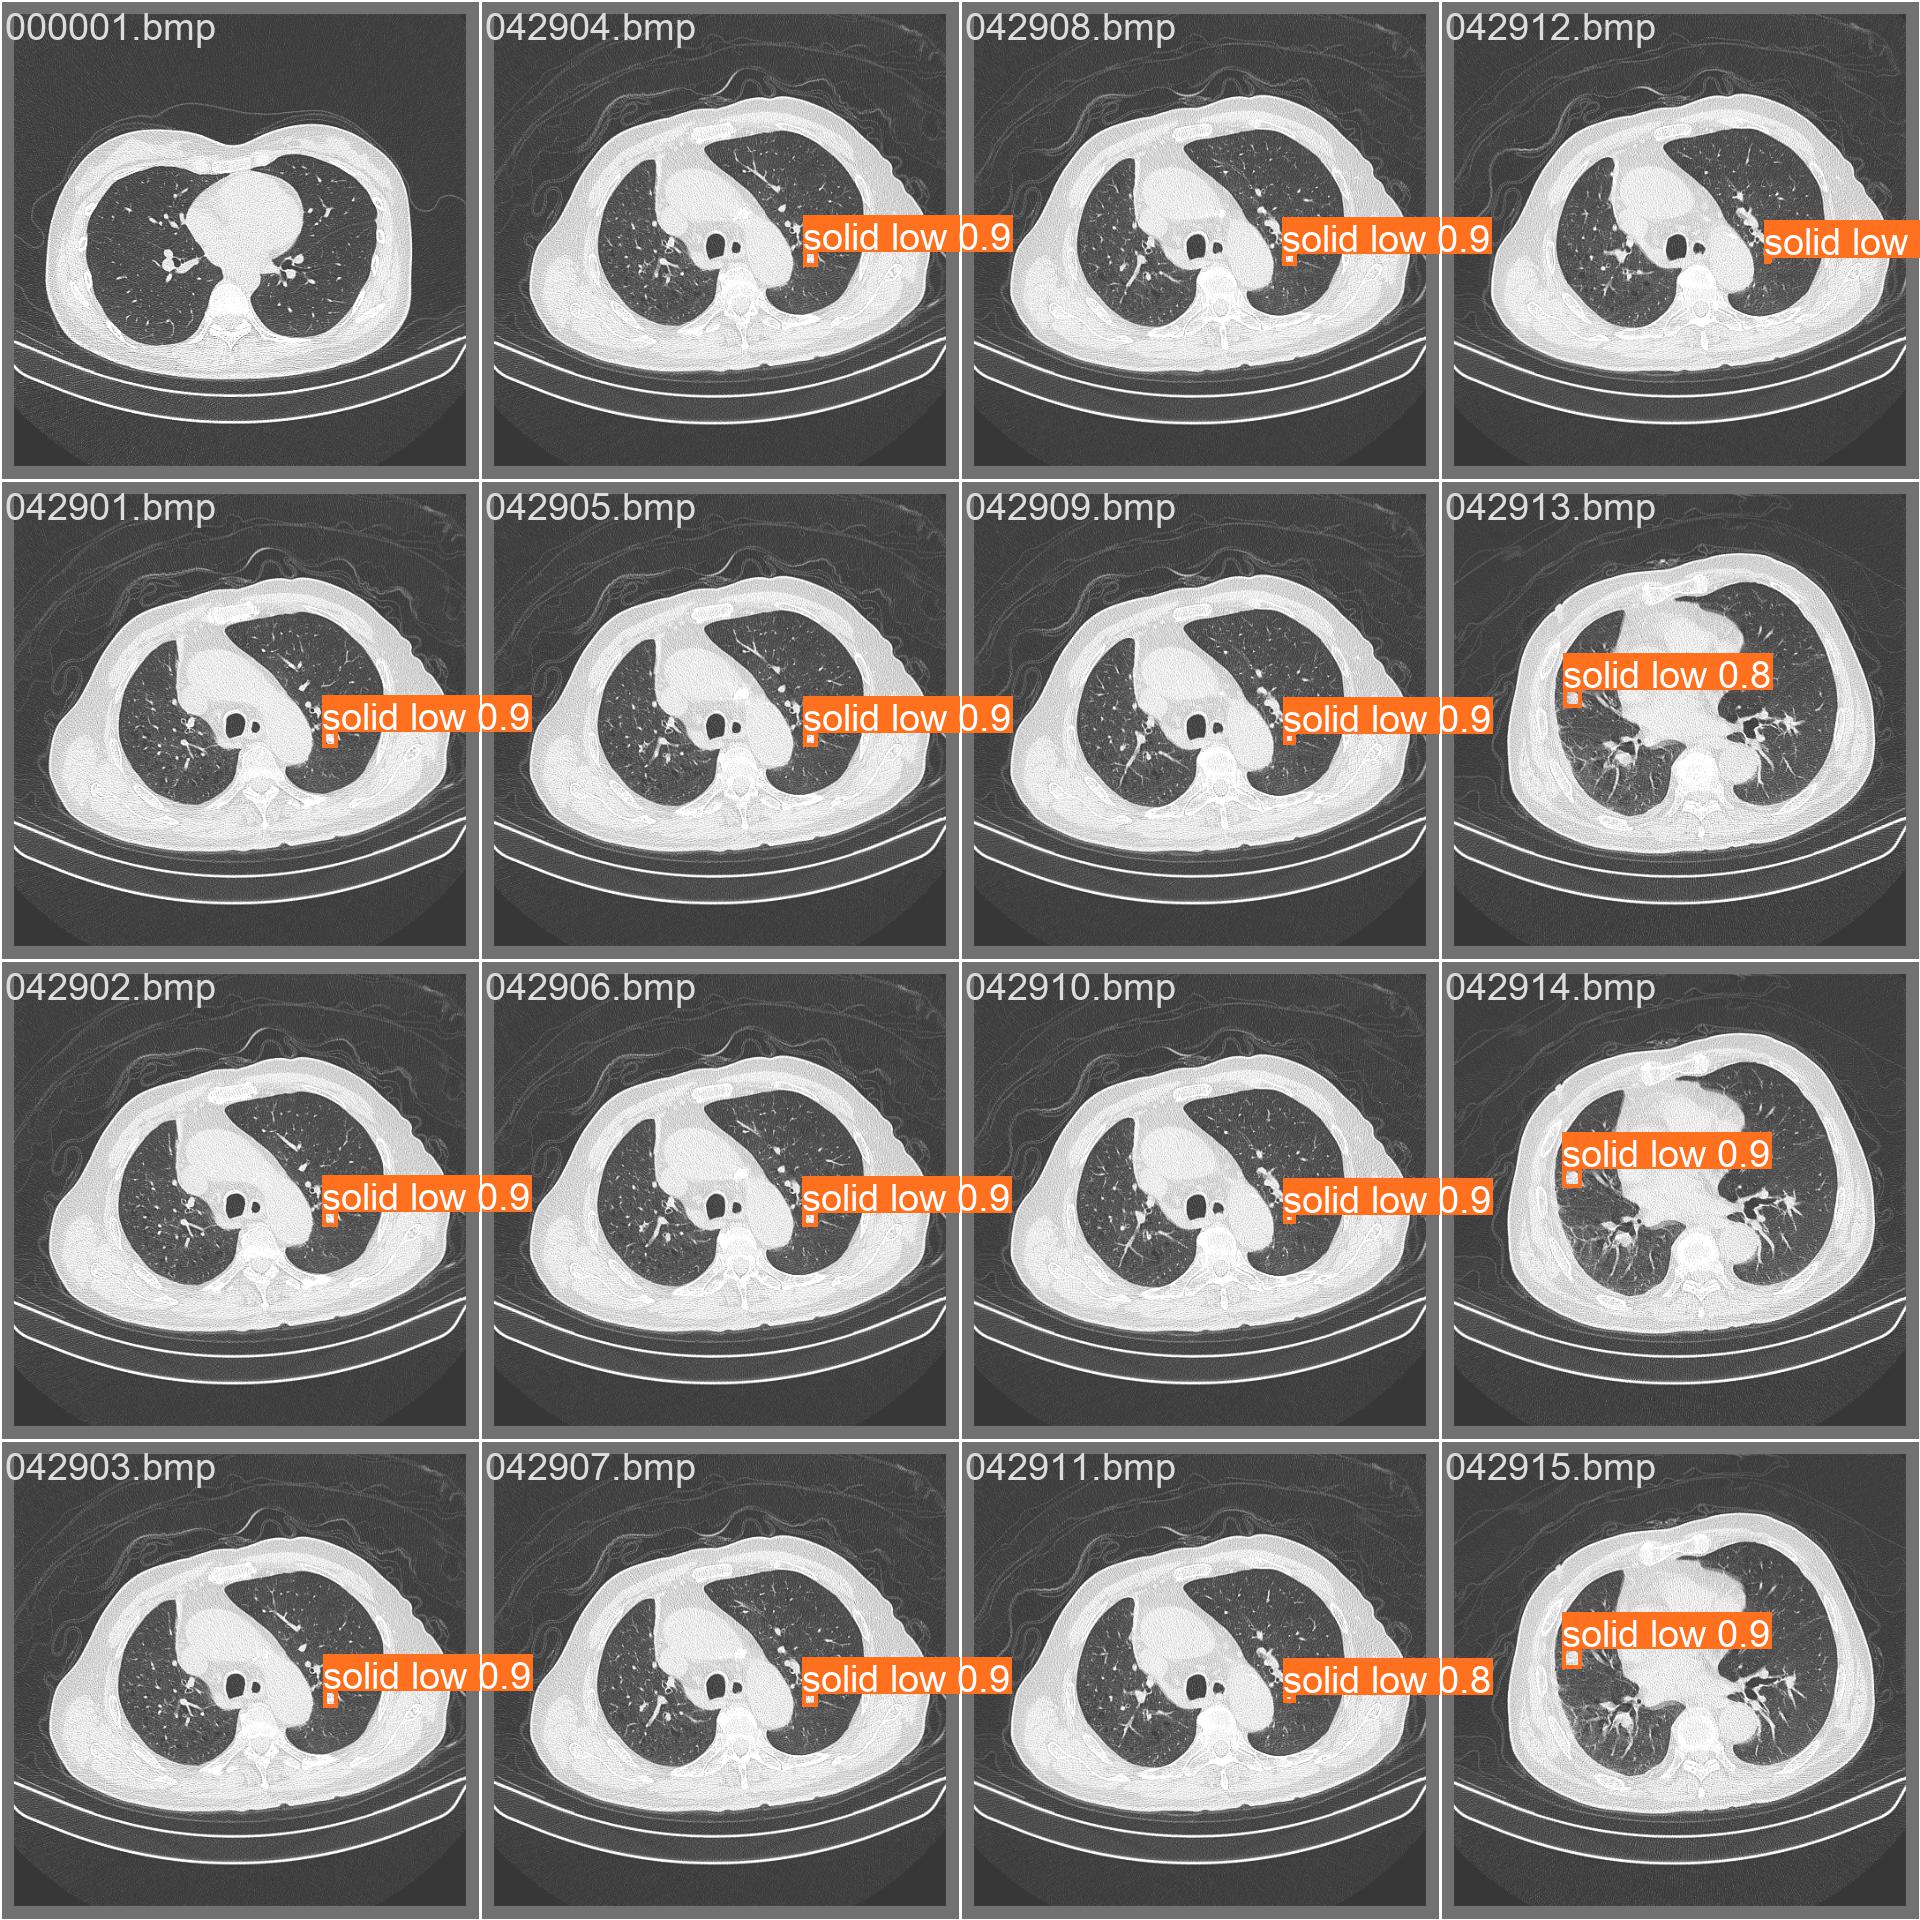
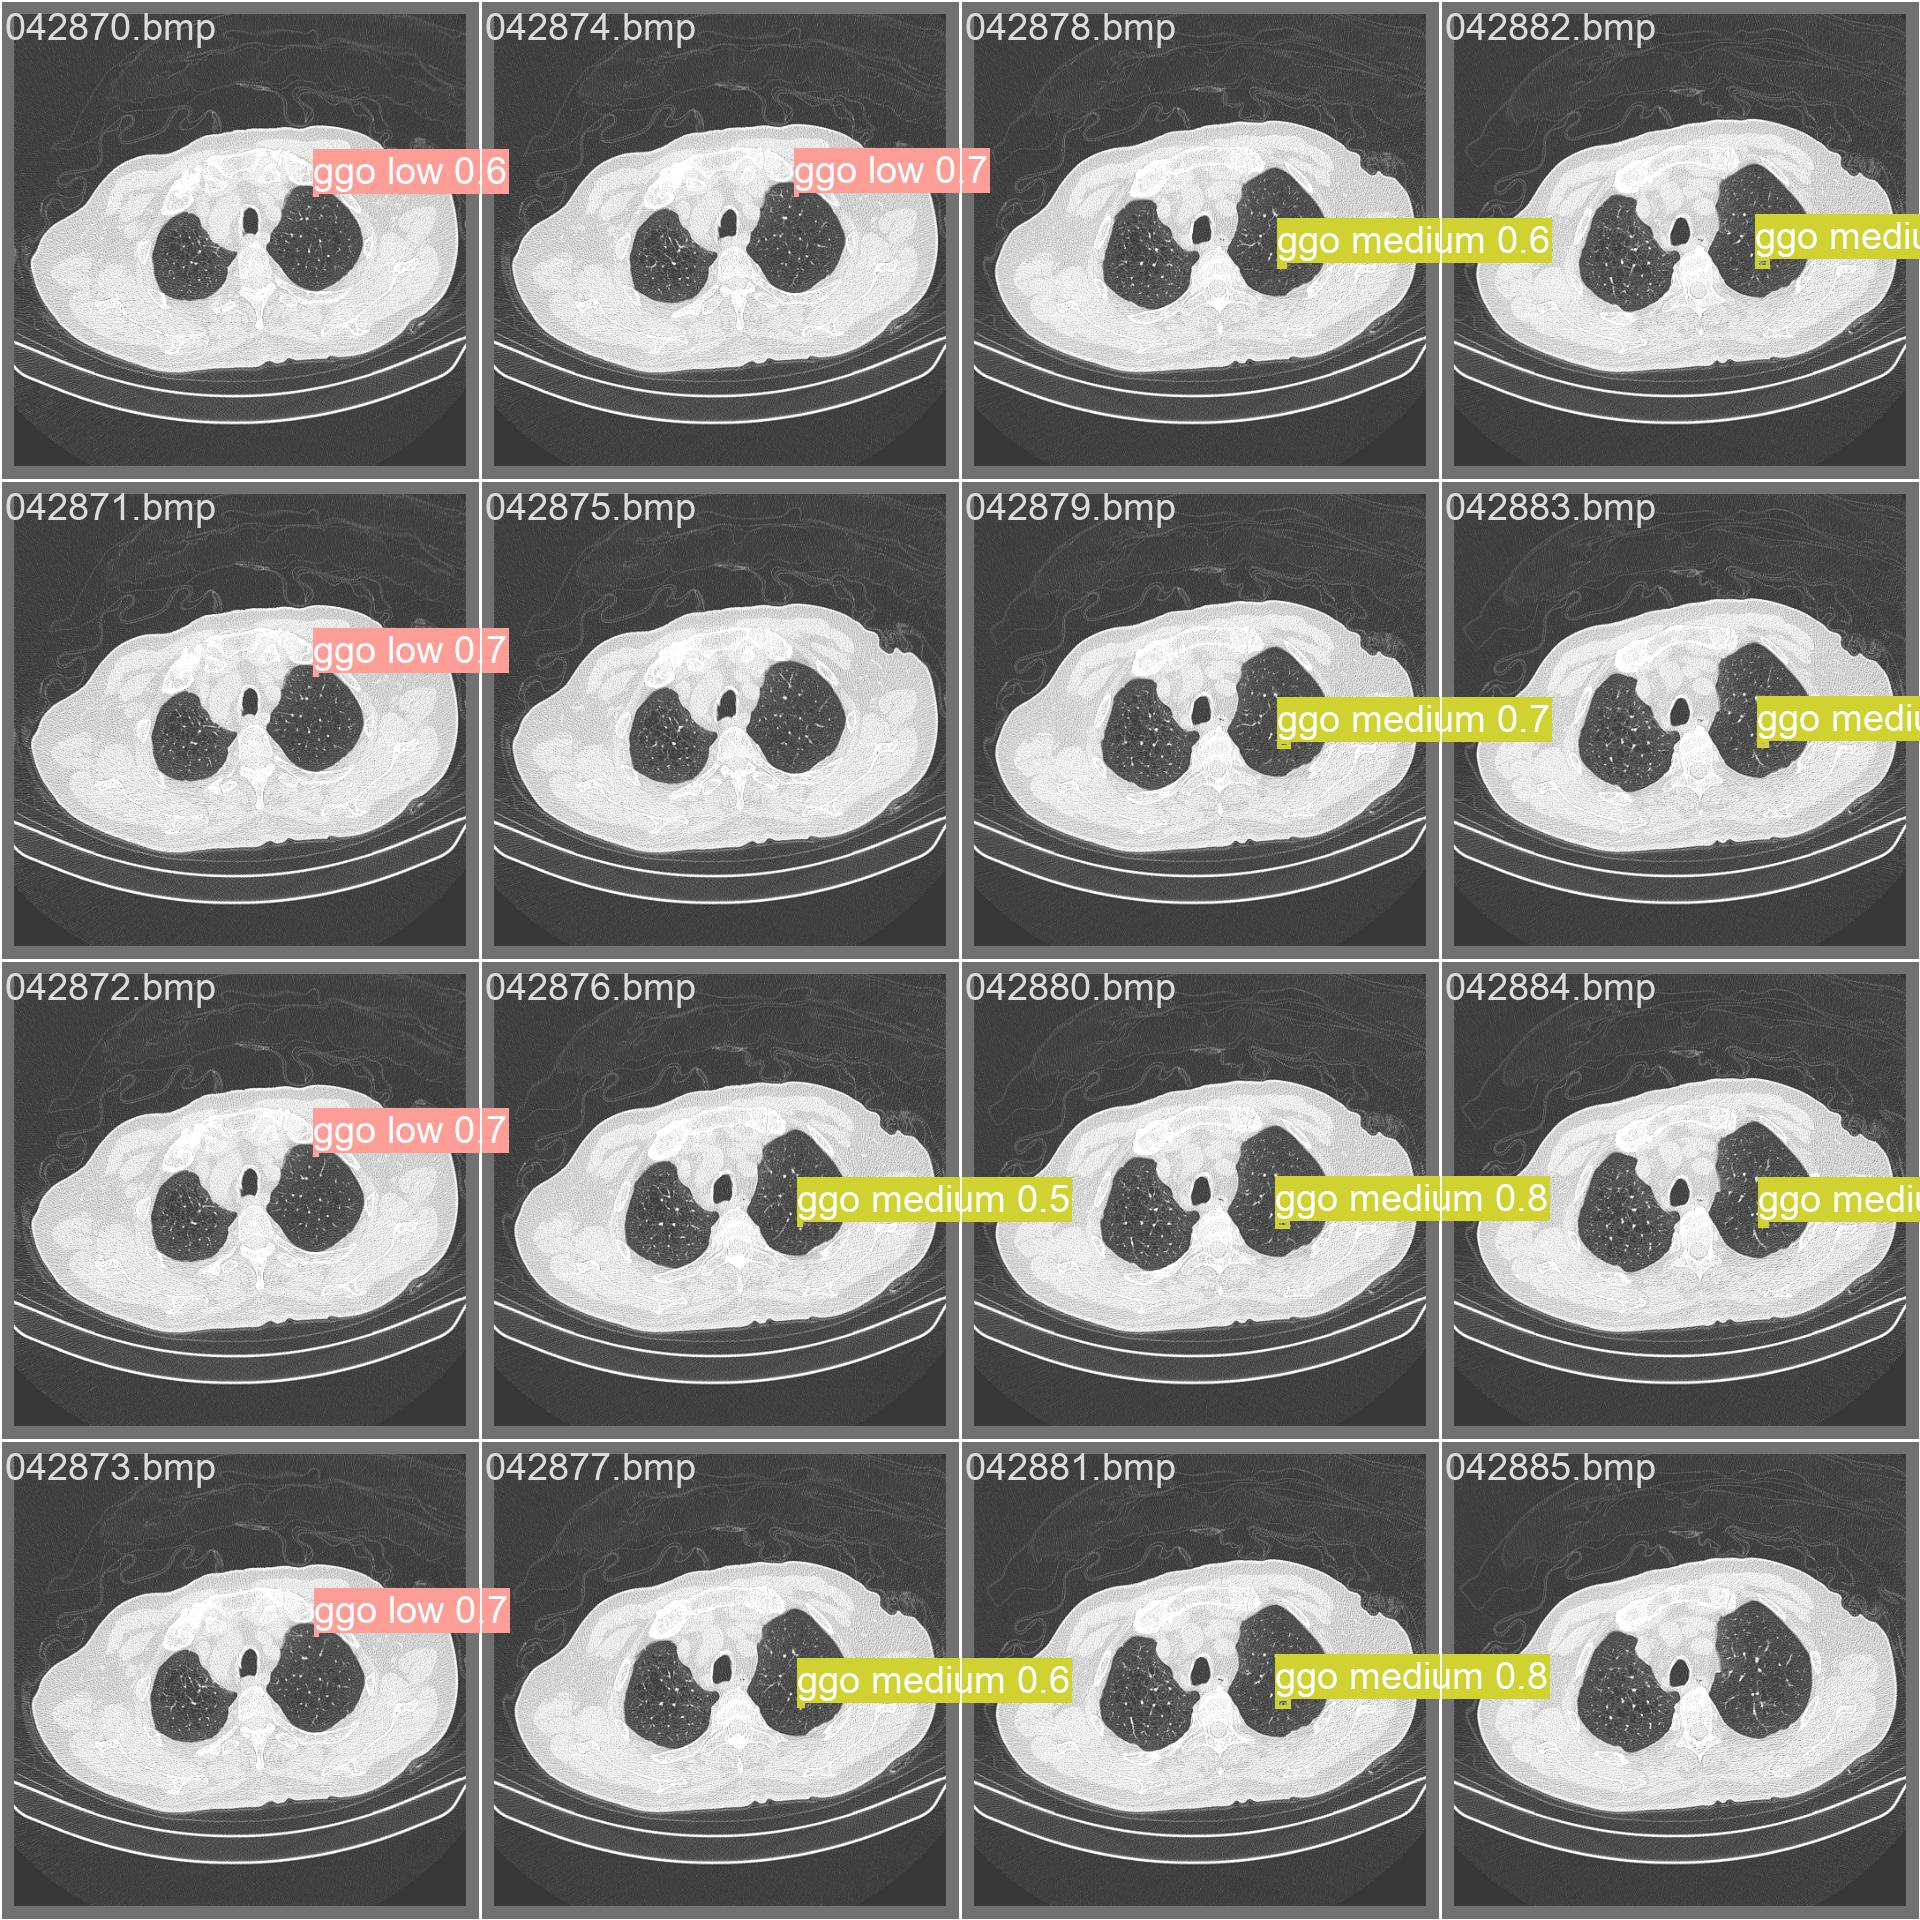
Yolov8在训练完成之后,默认会在runs/detect/目录下创建训练结果目录默认名称以train为前缀,把训练的过程一些参数与结果示意图保存到此目录,这里面包含是目标检测性能指标,如下图:

Yolov8医学肺影像CT模型训练结果可视化图分析与评估训练结果

评估目标检测性能指标通常涉及以下步骤:

准确率(Accuracy):

表示正确预测的目标数量与总预测数量的比率。
精确率(Precision):

表示模型正确预测为正样本的样本数量占所有预测为正样本的样本数量的比例。
召回率(Recall):

表示模型正确预测为正样本的样本数量占所有实际正样本的样本数量的比例。
F1分数(F1 Score):

综合考虑精确率和召回率,是精确率和召回率的调和平均数。
IoU(Intersection over Union):

衡量模型检测出的区域与实际目标区域的重叠程度。
平均精度(Average Precision,AP):

在目标检测中,AP通常指Precision-Recall曲线下的面积,用于综合评估模型的性能。
mAP(mean Average Precision):

多类别目标检测任务中,各类别的AP的平均值。
漏检率(Miss Rate):

表示模型未能检测到的目标数量占所有实际正样本的比例。
虚警率(False Alarm Rate):

表示模型错误地将负样本预测为正样本的数量占所有负样本的比例。
速度相关指标:

前向传播时间(Inference Time):
模型进行一次前向传播所需的时间。
每秒帧数(Frames Per Second,FPS):
描述模型在单位时间内能够处理的帧数。

1.weights目录

该目录下保存了两个训练时的权重:

last.pt:
“last.pt” 一般指代模型训练过程中最后一个保存的权重文件。在训练过程中,模型的权重可能会定期保存,而 “last.pt” 就是最新的一次保存的模型权重文件。这样的文件通常用于从上一次训练的断点继续训练,或者用于模型的推理和评估。

best.pt:
“best.pt” 则通常指代在验证集或测试集上表现最好的模型权重文件。在训练过程中,会通过监视模型在验证集上的性能,并在性能提升时保存模型的权重文件。“best.pt” 可以被用于得到在验证集上表现最好的模型,以避免模型在训练集上过拟合的问题。

2. 混沌矩阵

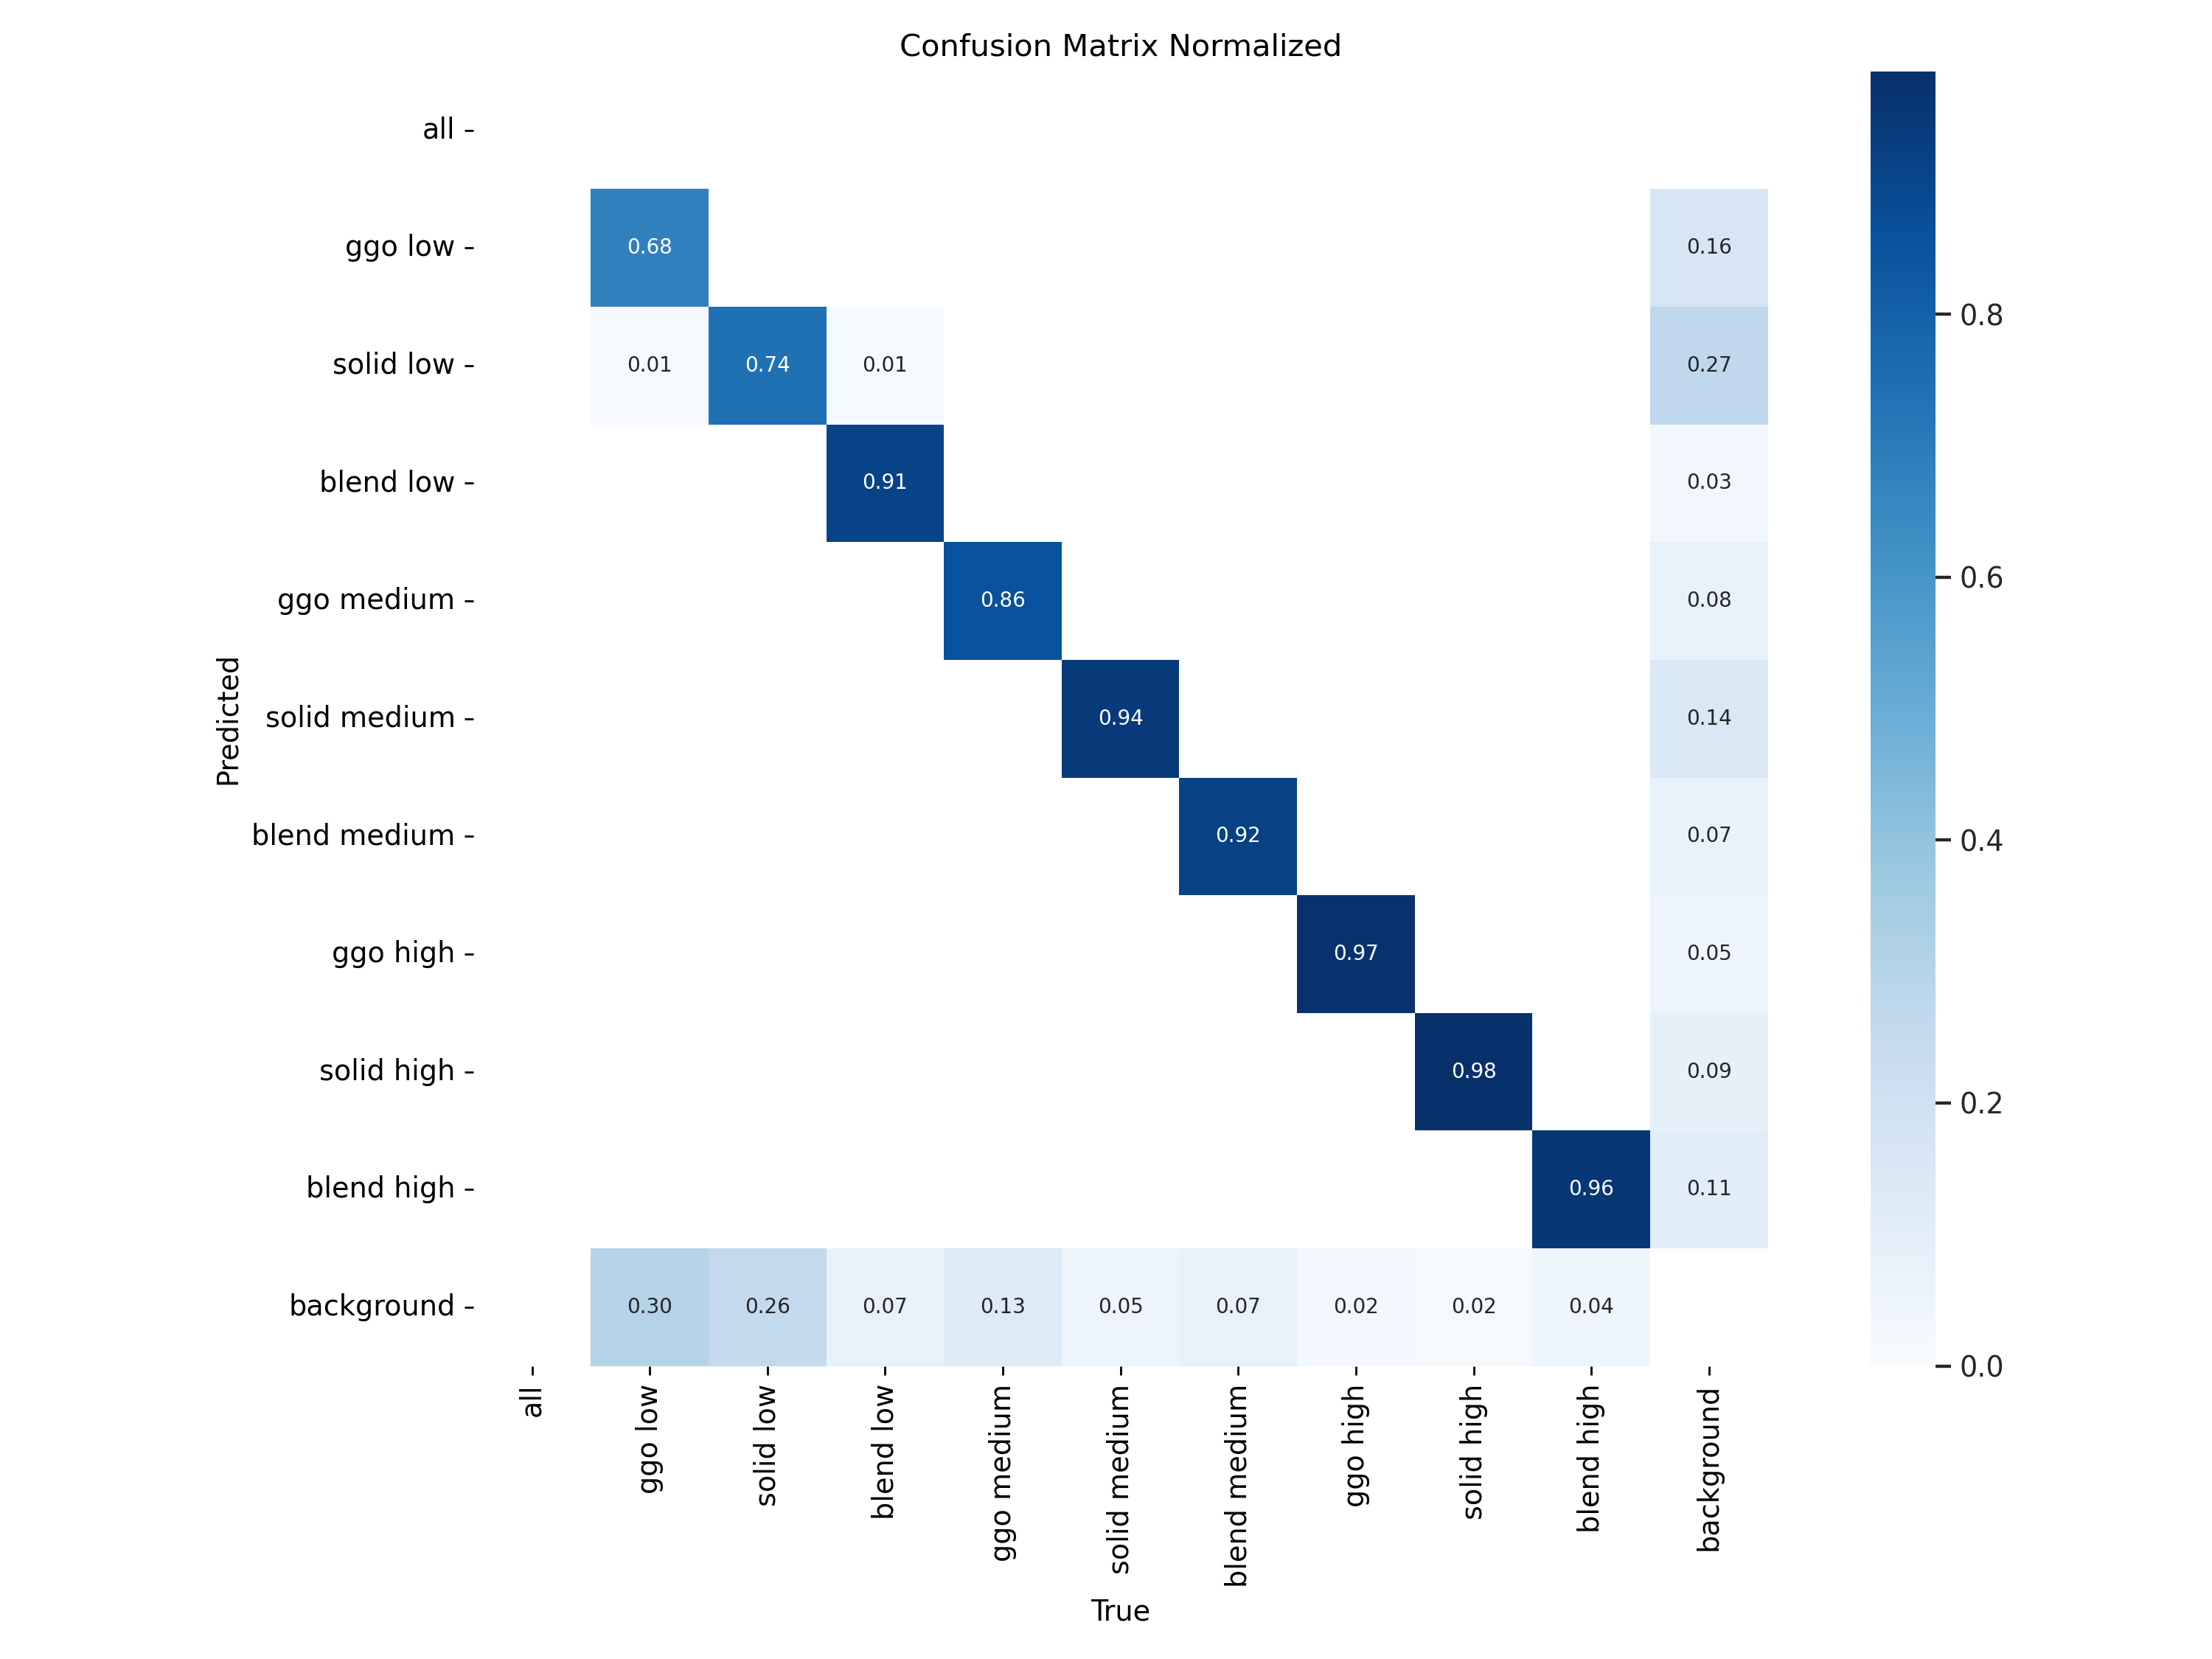
confusion_matrix_normalized.png
Yolov8医学肺影像CT模型训练结果可视化图分析与评估训练结果
confusion_matrix.png
Yolov8医学肺影像CT模型训练结果可视化图分析与评估训练结果

混淆矩阵是对分类问题预测结果的总结,通过计数值汇总正确和不正确预测的数量,并按每个类别进行细分,展示了分类模型在进行预测时对哪些部分产生混淆。该矩阵以行表示预测的类别(y轴),列表示真实的类别(x轴),具体内容如下:

            |  Predicted 0  |  Predicted 1  |
------------|---------------|---------------|
Actual 0    |      TN       |      FP       |
------------|---------------|---------------|
Actual 1    |      FN       |      TP       |

其中:

  1. TP(True Positive)表示将正类预测为正类的数量,即正确预测的正类样本数。
  2. FN(False Negative)表示将正类预测为负类的数量,即错误预测的正类样本数。
  3. FP(False Positive)表示将负类预测为正类的数量,即错误预测的负类样本数。
  4. TN(True Negative)表示将负类预测为负类的数量,即正确预测的负类样本数。

混淆矩阵的使用有助于直观了解分类模型的错误类型,特别是了解模型是否将两个不同的类别混淆,将一个类别错误地预测为另一个类别。这种详细的分析有助于克服仅使用分类准确率带来的局限性。
精确率(Precision)和召回率(Recall)是常用于评估分类模型性能的指标,其计算方法如下:

精确率(Precision):

公式:Precision = TP / (TP + FP)
解释:精确率是指在所有被模型预测为正例(Positive)的样本中,实际为正例的比例。它衡量了模型在正例预测中的准确性。
召回率(Recall):

公式:Recall = TP / (TP + FN)
解释:召回率是指在所有实际为正例的样本中,模型成功预测为正例的比例。它衡量了模型对正例的识别能力。

3. F1 曲线的图示

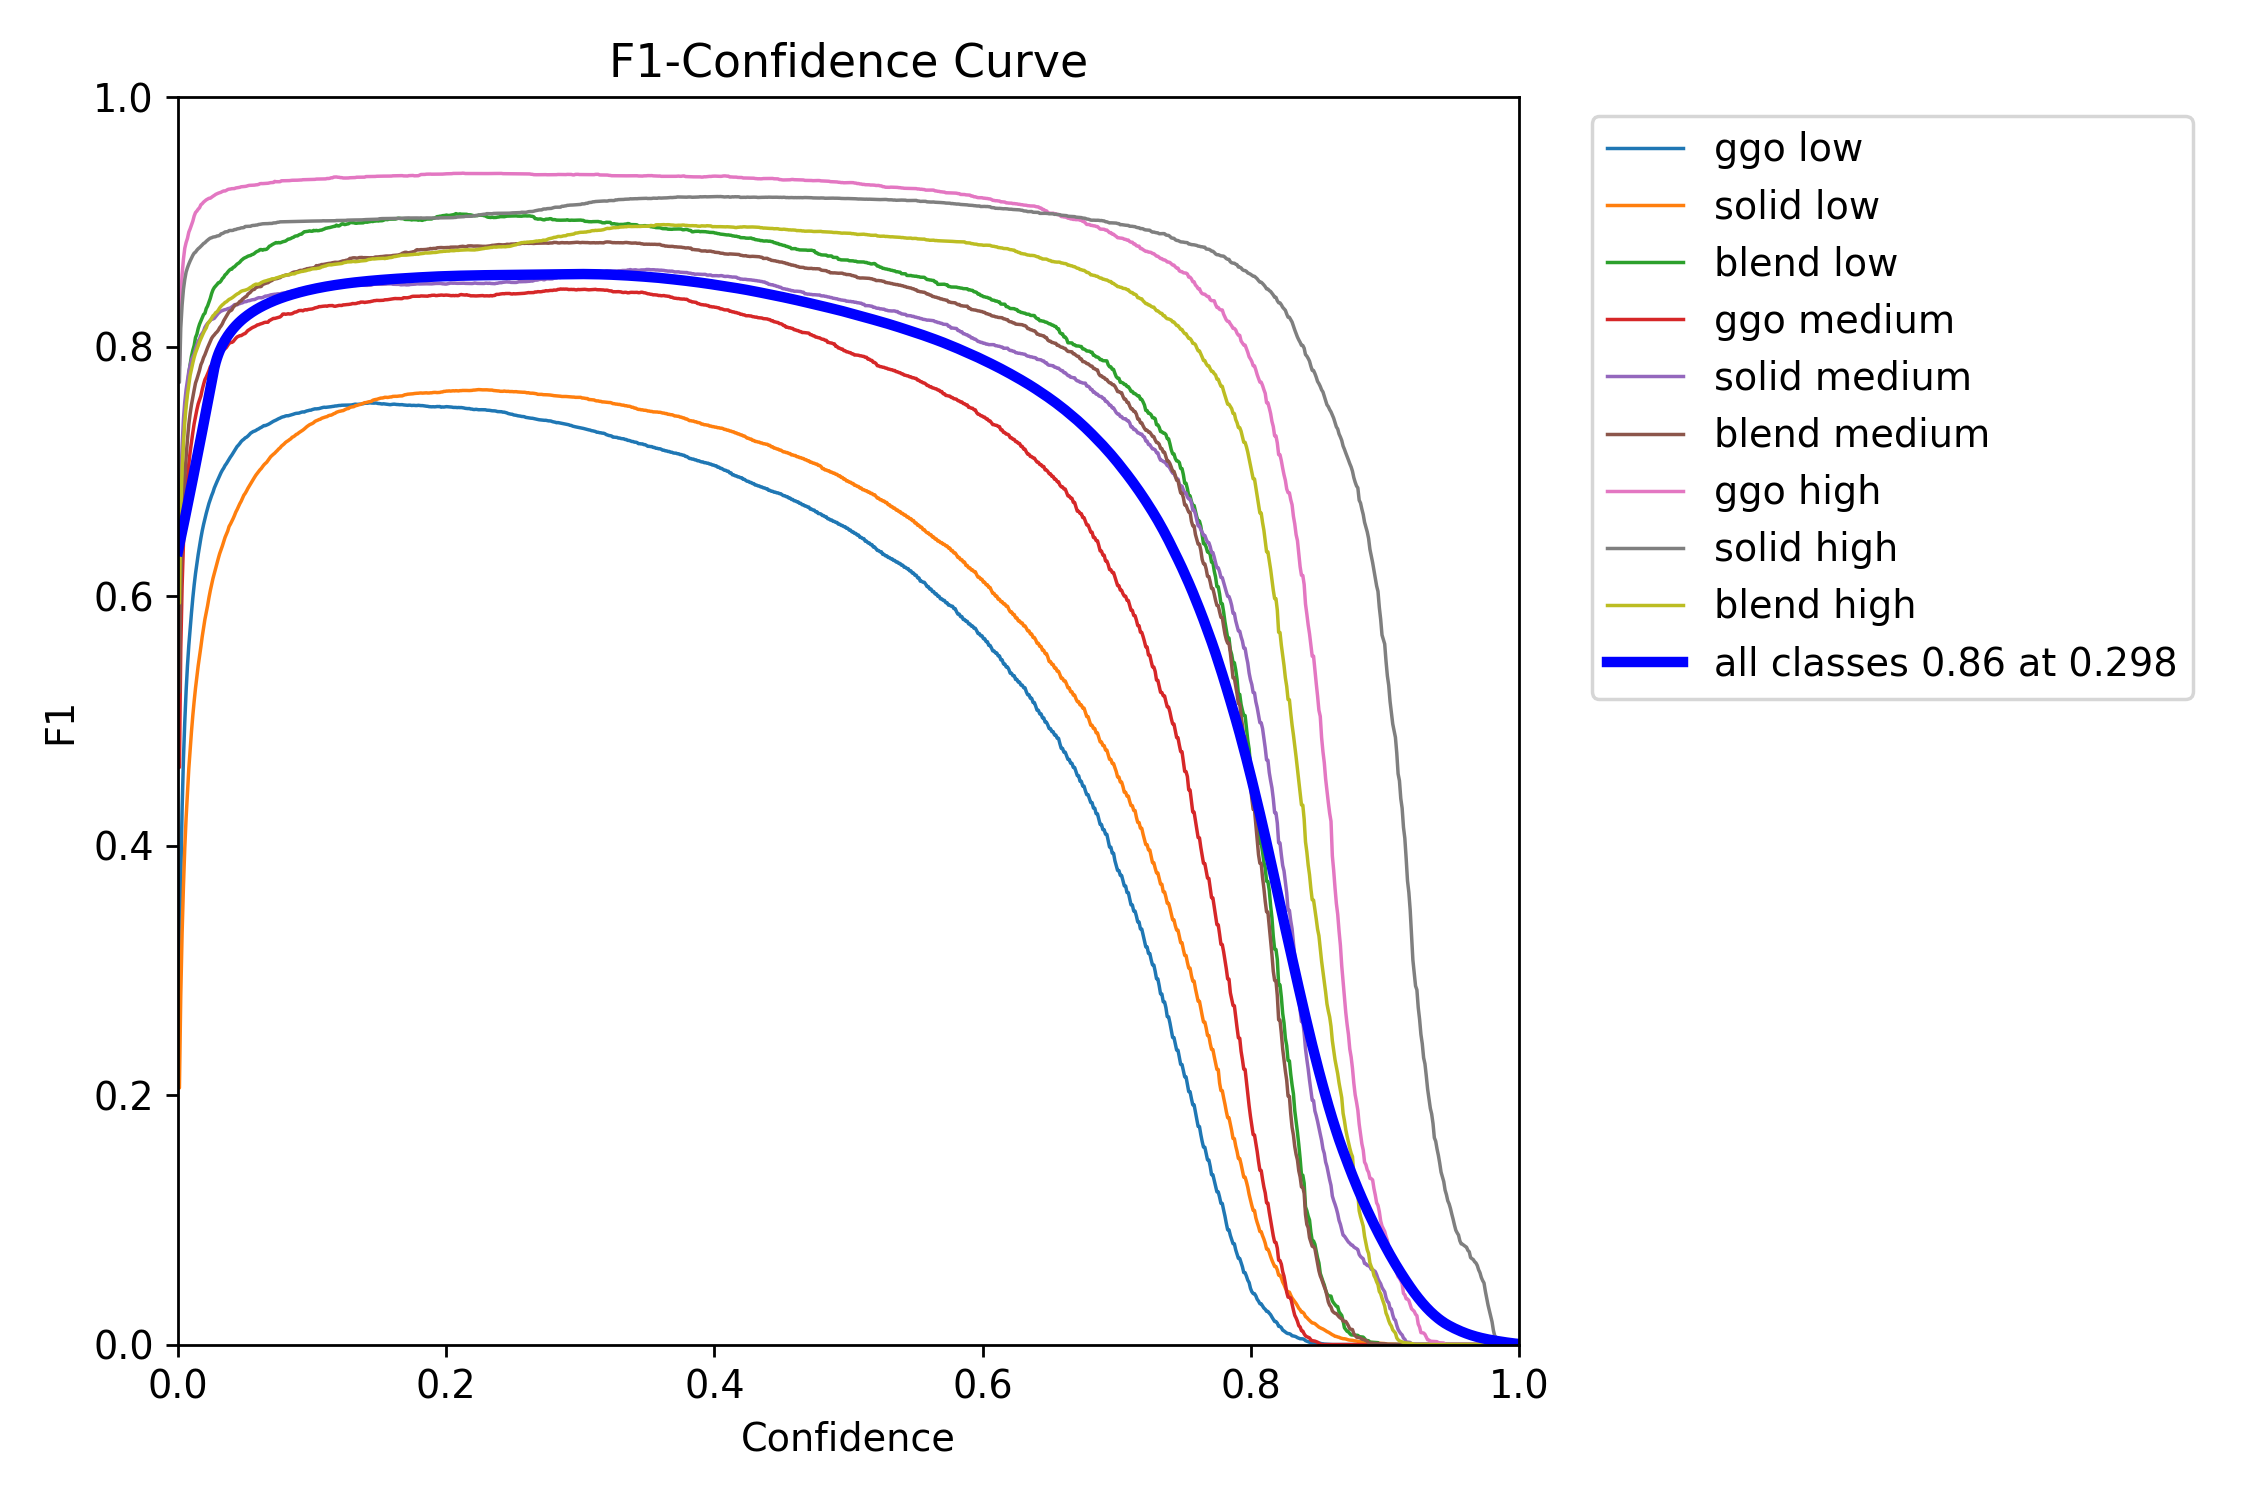
F1_curve.png
Yolov8医学肺影像CT模型训练结果可视化图分析与评估训练结果

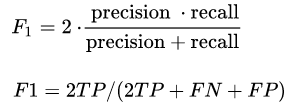
为了能够评价不同算法的优劣,在Precision和Recall的基础上提出了F1值的概念,来对Precision和Recall进行整体评价。F1的定义如下:

F1数学公式

F1曲线是一种多分类问题中常用的性能评估工具,尤其在竞赛中得到广泛应用。它基于F1分数,这是精确率和召回率的调和平均数,取值范围介于0和1之间。1代表最佳性能,而0代表最差性能。

通常情况下,通过调整置信度阈值(判定为某一类的概率阈值),可以观察到F1曲线在不同阈值下的变化。在阈值较低时,模型可能将许多置信度较低的样本判定为真,从而提高召回率但降低精确率。而在阈值较高时,只有置信度很高的样本才被判定为真,使得模型的类别判定更为准确,进而提高精确率。

理想状态下,F1曲线显示在置信度为0.4-0.6的区间内取得了较好的F1分数。表明在这个范围内,模型在平衡精确率和召回率方面表现较为理想。

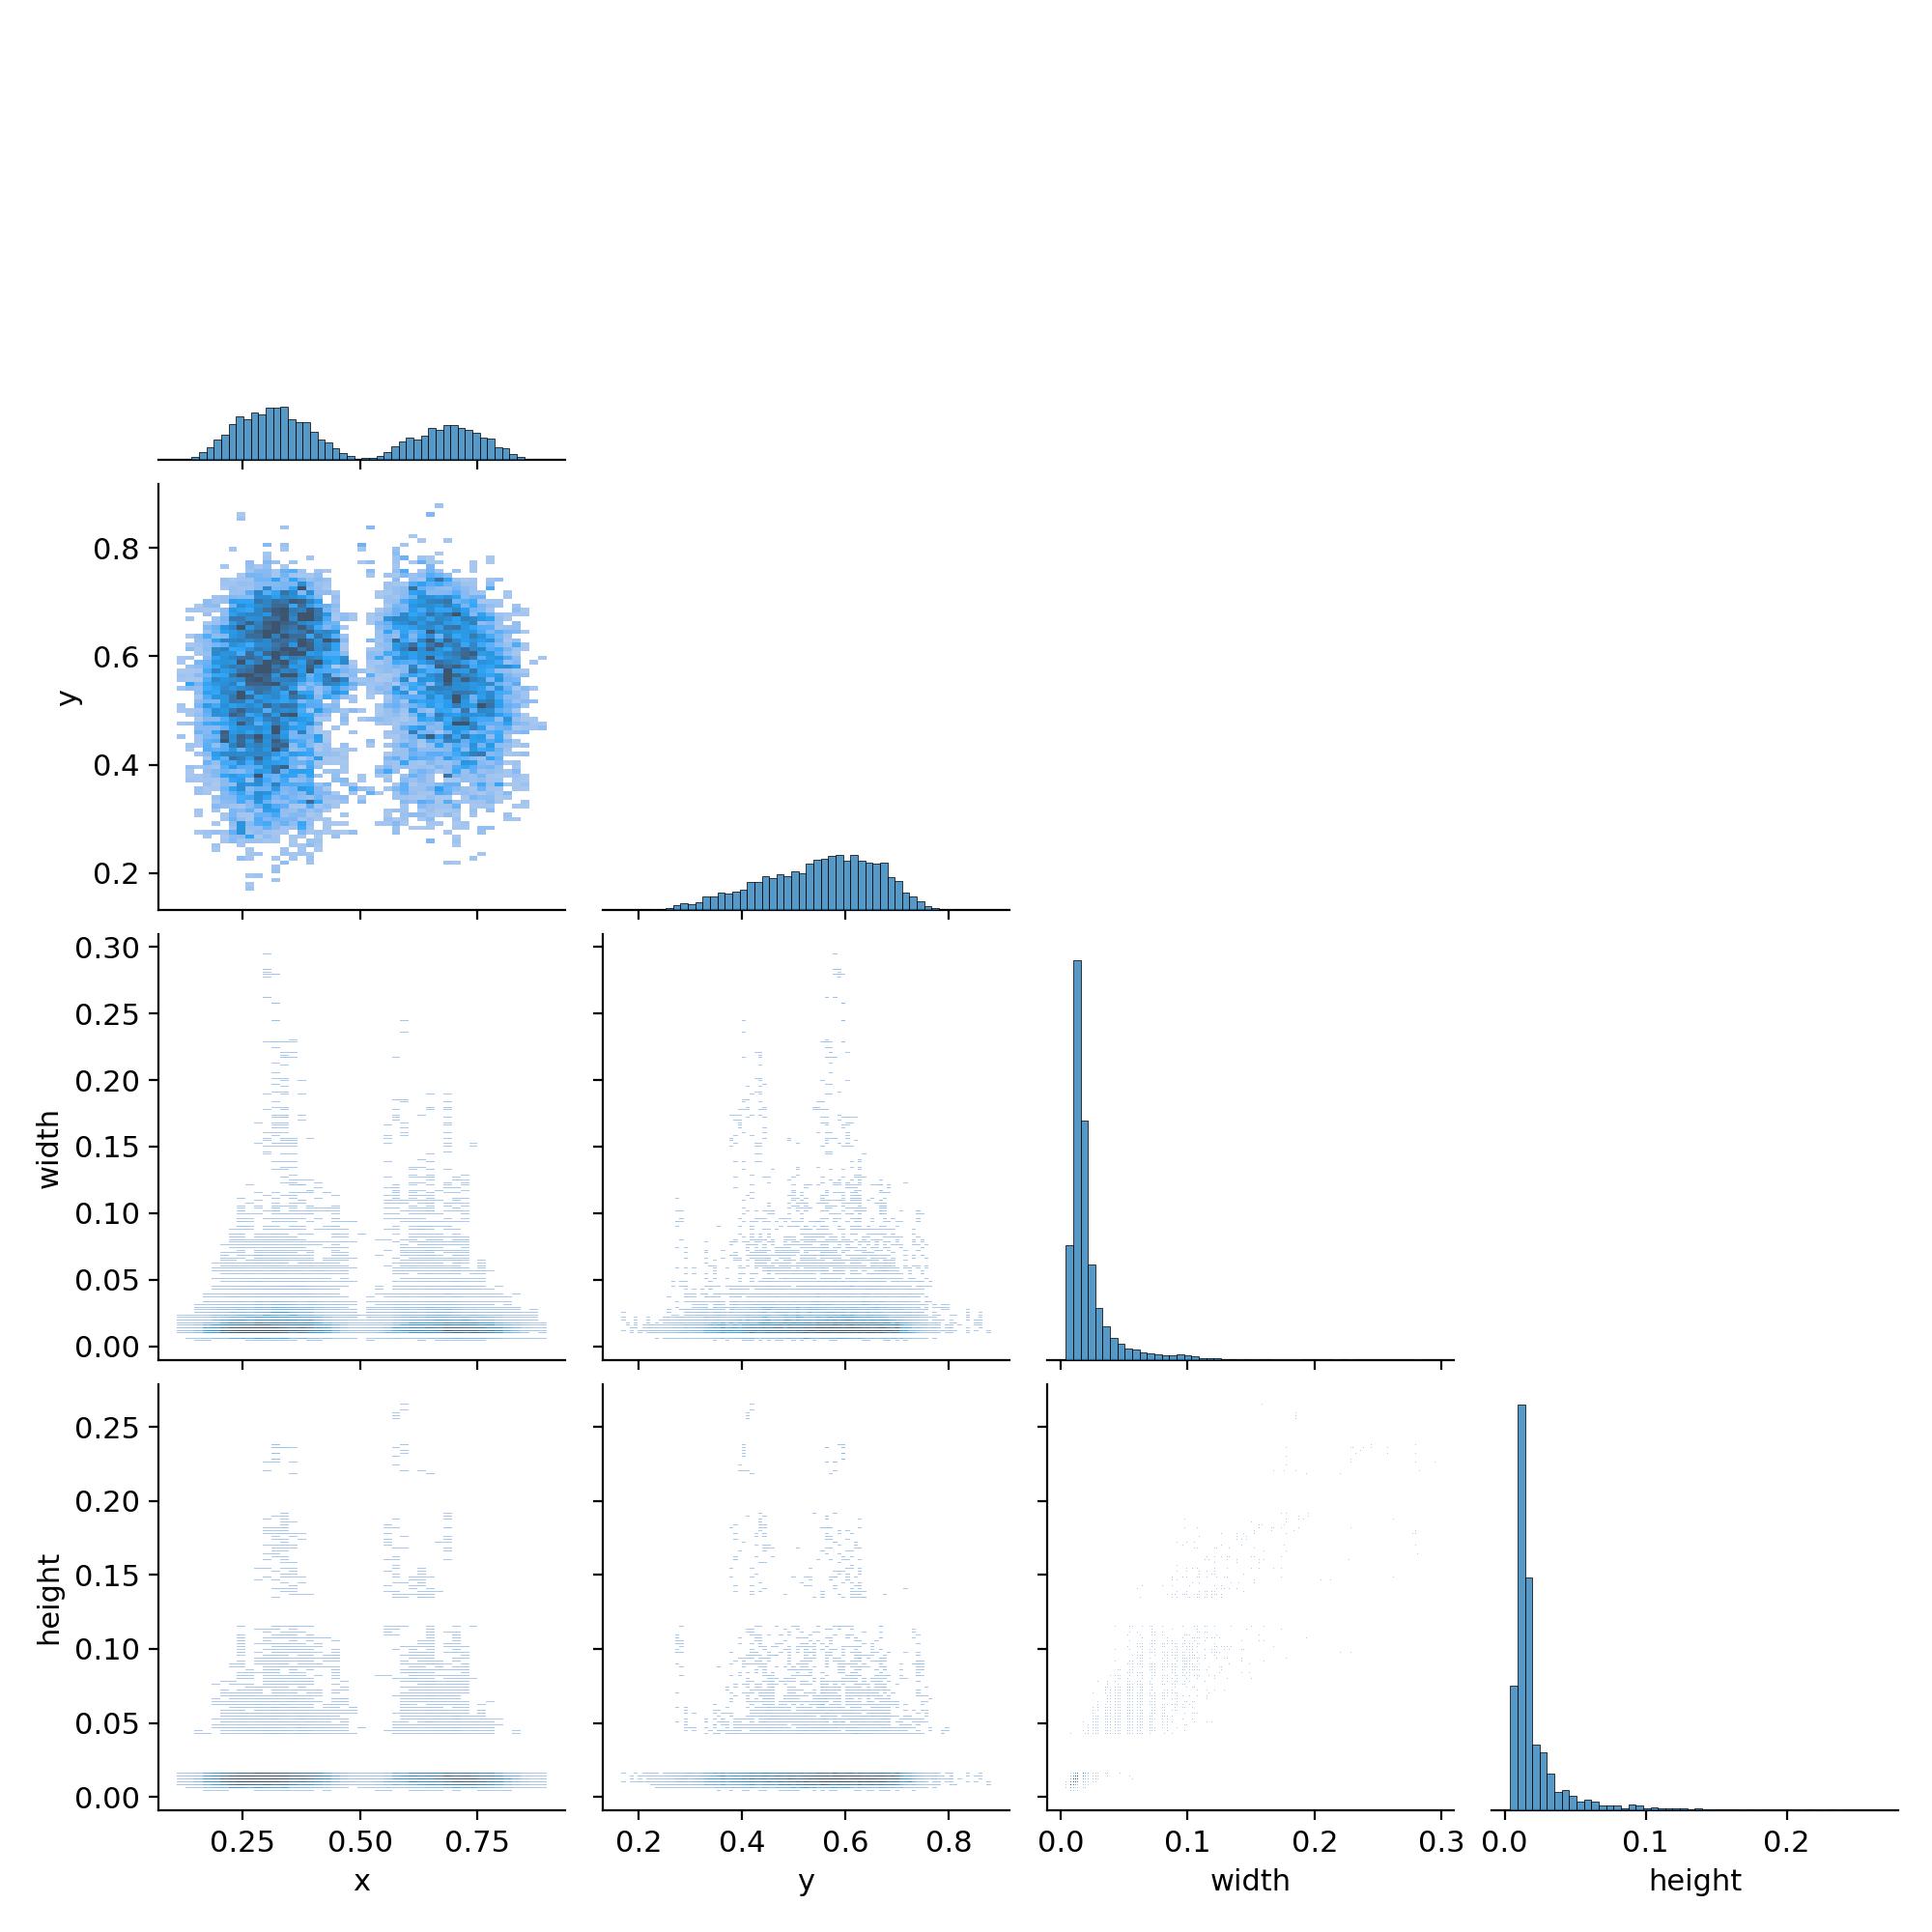
4. 标签图

labels.jpg
标签

从左往右按顺序排列:
宫格1:训练集的数据量,显示每个类别包含的样本数量。
宫格2:框的尺寸和数量,展示了训练集中边界框的大小分布以及相应数量。

宫格3:中心点相对于整幅图的位置,描述了边界框中心点在图像中的位置分布情况。

宫格4:图中目标相对于整幅图的高宽比例,反映了训练集中目标高宽比例的分布状况。

5.颜色矩阵图

labels_correlogram.jpg
标签

展示了目标检测算法在训练过程中对标签之间相关性的建模情况。每个矩阵单元代表模型训练时使用的标签,而单元格的颜色深浅反映了对应标签之间的相关性。

  • 深色单元格表示模型更强烈地学习了这两个标签之间的关联性。
    浅色单元格则表示相关性较弱。
  • 对角线上的颜色代表每个标签自身的相关性,通常是最深的,因为模型更容易学习标签与自身的关系。

可以直观识别到哪些标签之间存在较强的相关性,这对于优化训练和预测效果至关重要。如果发现某些标签之间的相关性过强,可能需要考虑合并它们,以简化模型并提高效率。最上面的图(0,0)至(3,3)分别表示中心点横坐标x、中心点纵坐标y、框的宽和框的高的分布情况。

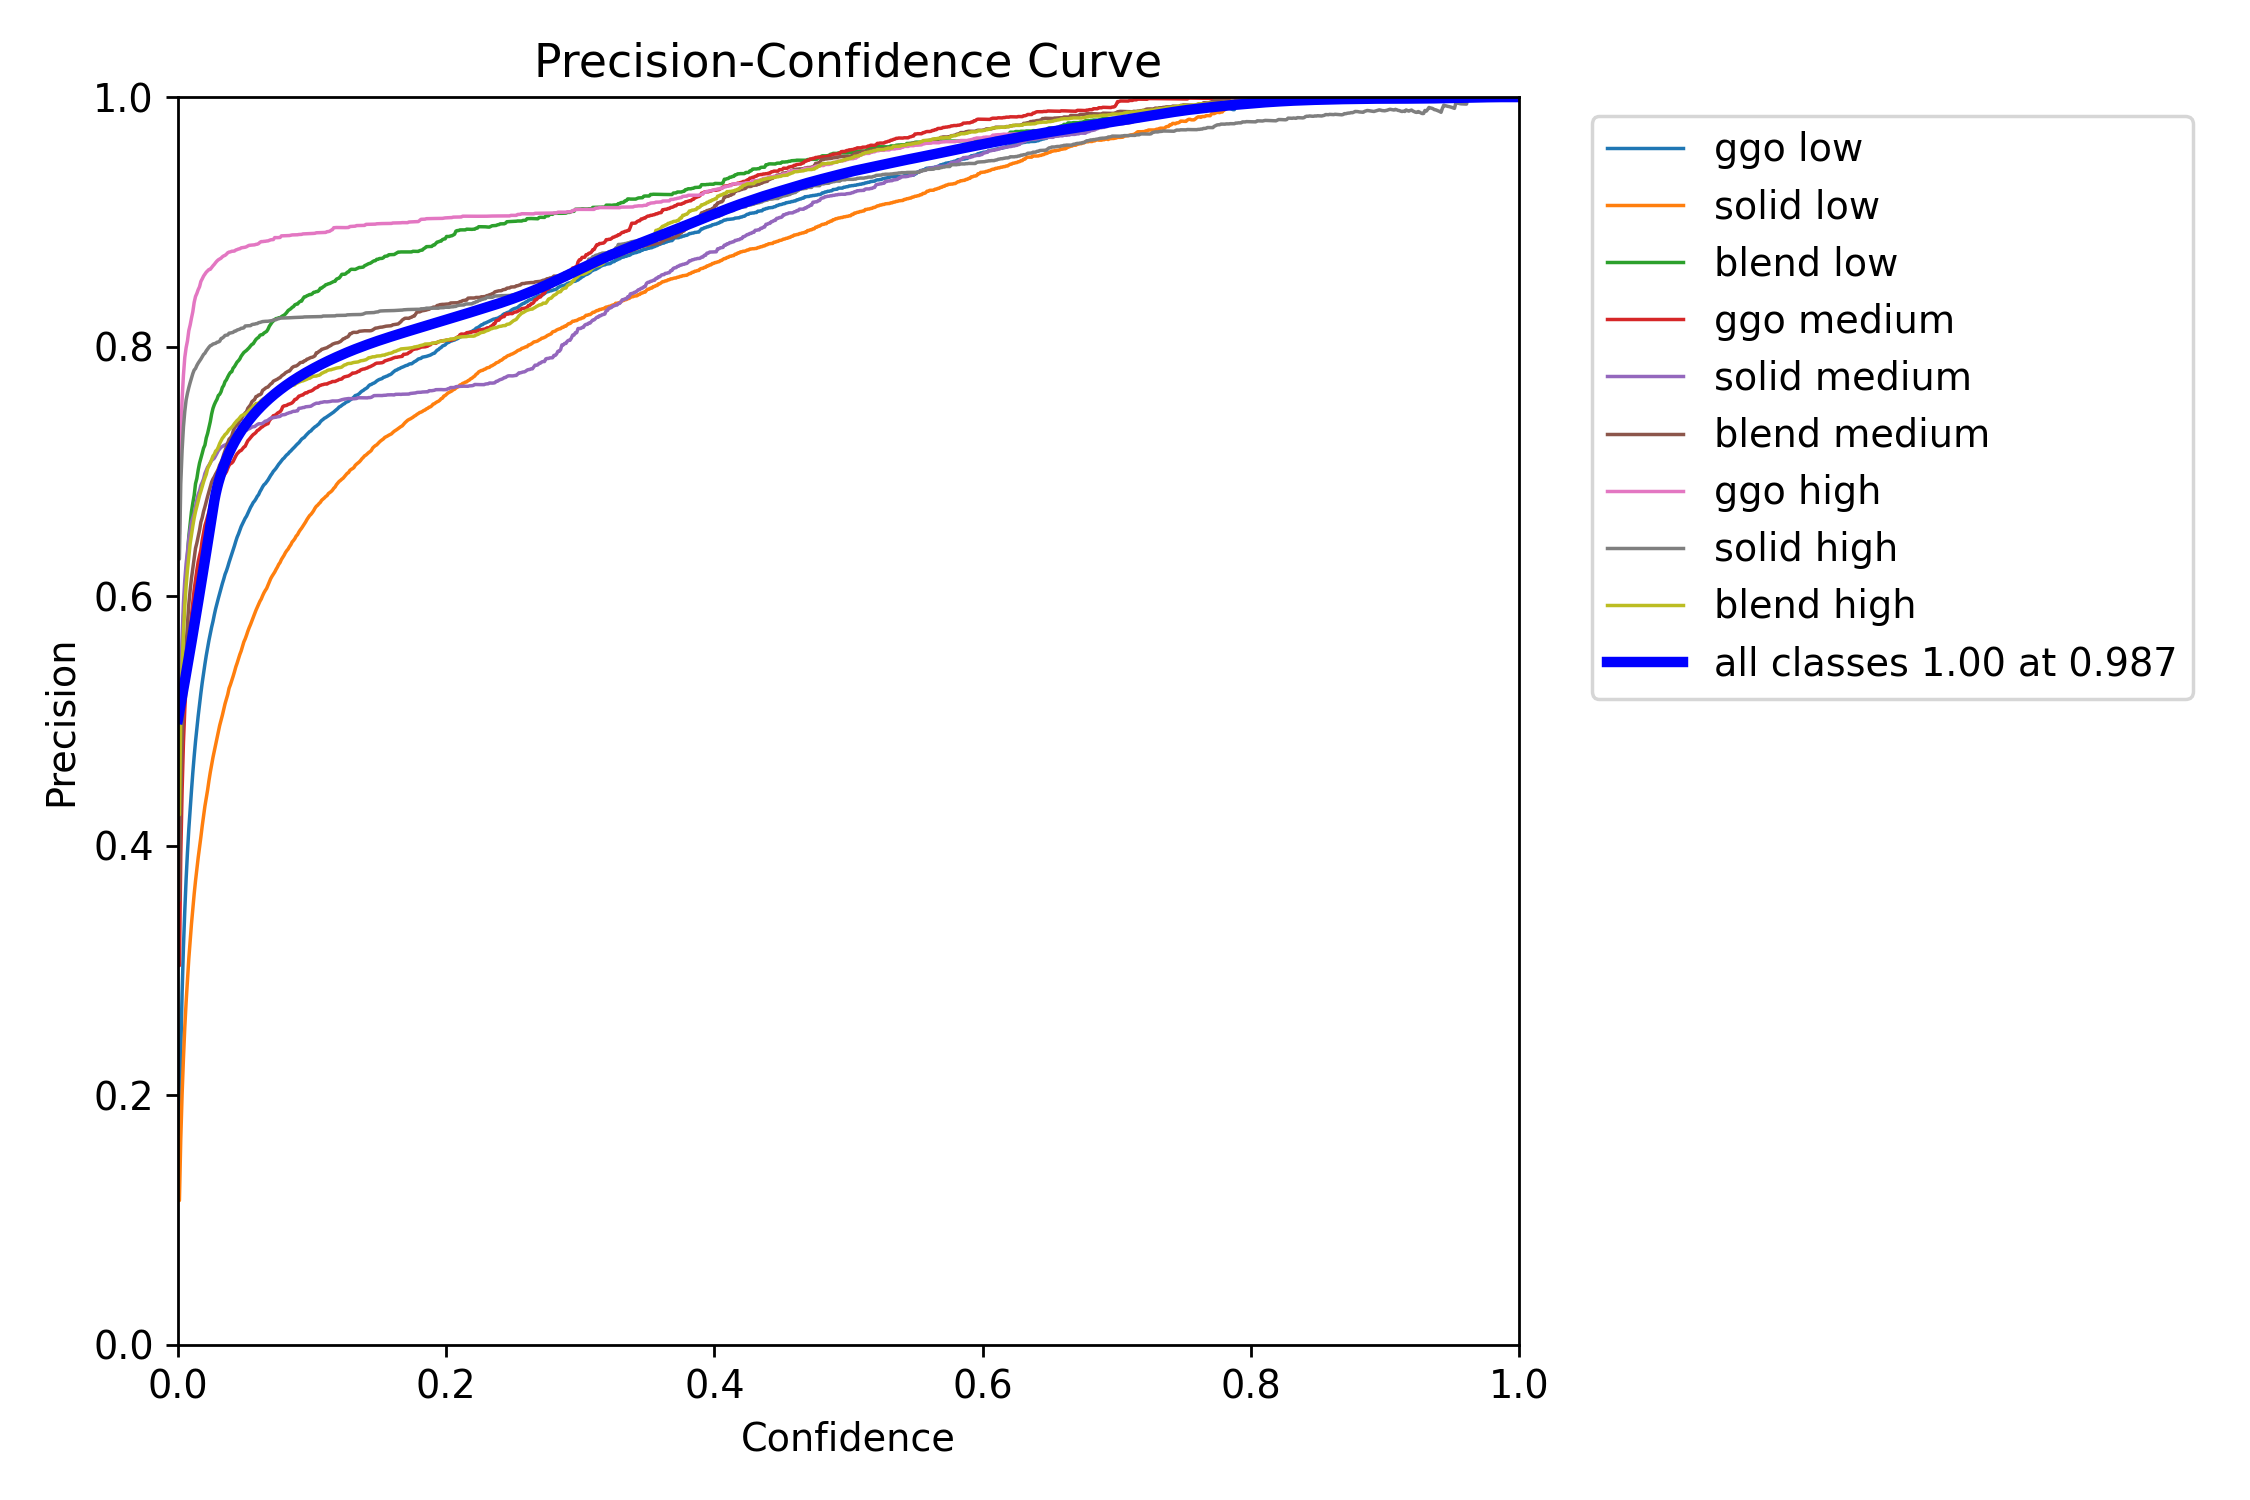
6.单一类准确率

P_curve.png

单一类准确率

PCC图的横坐标表示检测器的置信度,纵坐标表示精度(或召回率)。曲线的形状和位置反映了检测器在不同信心水平下的性能。
在PCC图中,当曲线向上并向左弯曲时,表示在较低置信度下仍能保持较高的精度,说明检测器在高召回率的同时能够保持低误报率,即对目标的识别准确性较高。

相反,当曲线向下并向右弯曲时,说明在较高置信度下才能获得较高的精度,这可能导致漏检率的增加,表示检测器的性能较差。

因此,PCC图对于评估检测器在不同信心水平下的表现提供了有用的信息。在图中,曲线向上并向左弯曲是期望的效果,而曲线向下并向右弯曲则表示改进的空间。

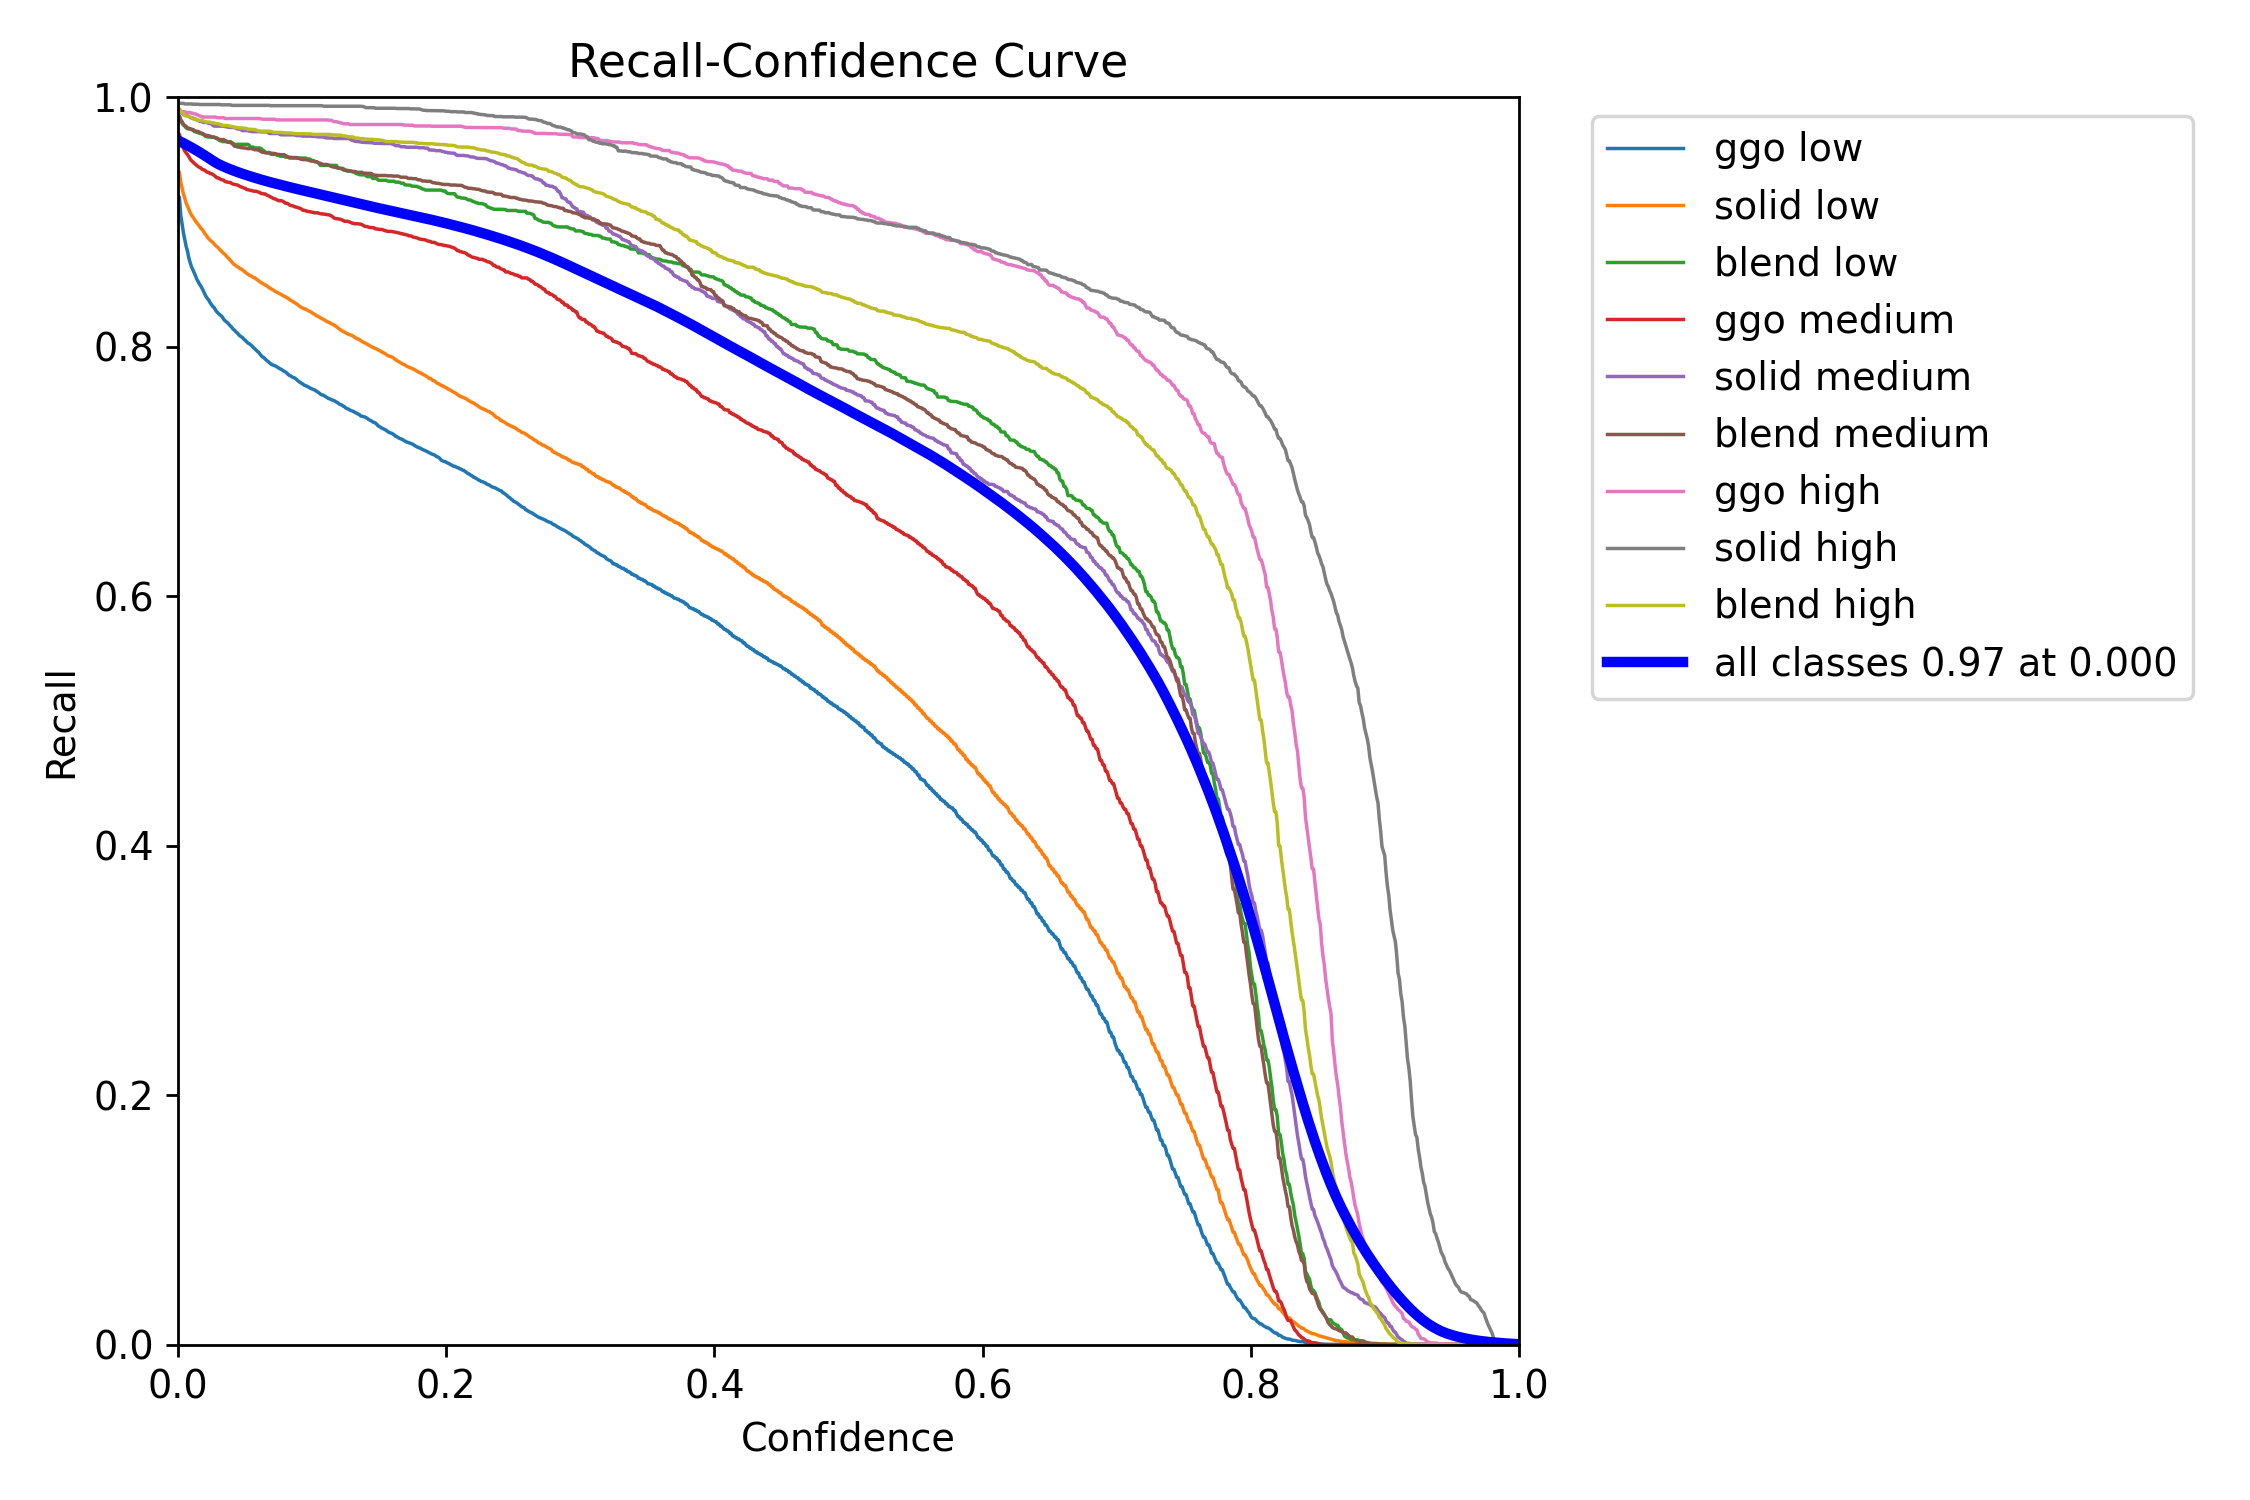
7.单一类召回率

R_curve.png
单一类召回率

在理想情况下,希望算法在保持高召回率的同时能够保持较高的精度。

在RCC图中,当曲线在较高置信度水平下呈现较高召回率时,说明算法在目标检测时能够准确地预测目标的存在,并在过滤掉低置信度的预测框后依然能够维持高召回率。这反映了算法在目标检测任务中的良好性能。

值得注意的是,RCC图中曲线的斜率越陡峭,表示在过滤掉低置信度的预测框后,获得的召回率提升越大,从而提高模型的检测性能。

在图表中,曲线越接近右上角,表示模型性能越好。当曲线靠近图表的右上角时,说明模型在保持高召回率的同时能够维持较高的精度。因此,RCC图可用于全面评估模型性能,帮助找到平衡模型召回率和精度的合适阈值。

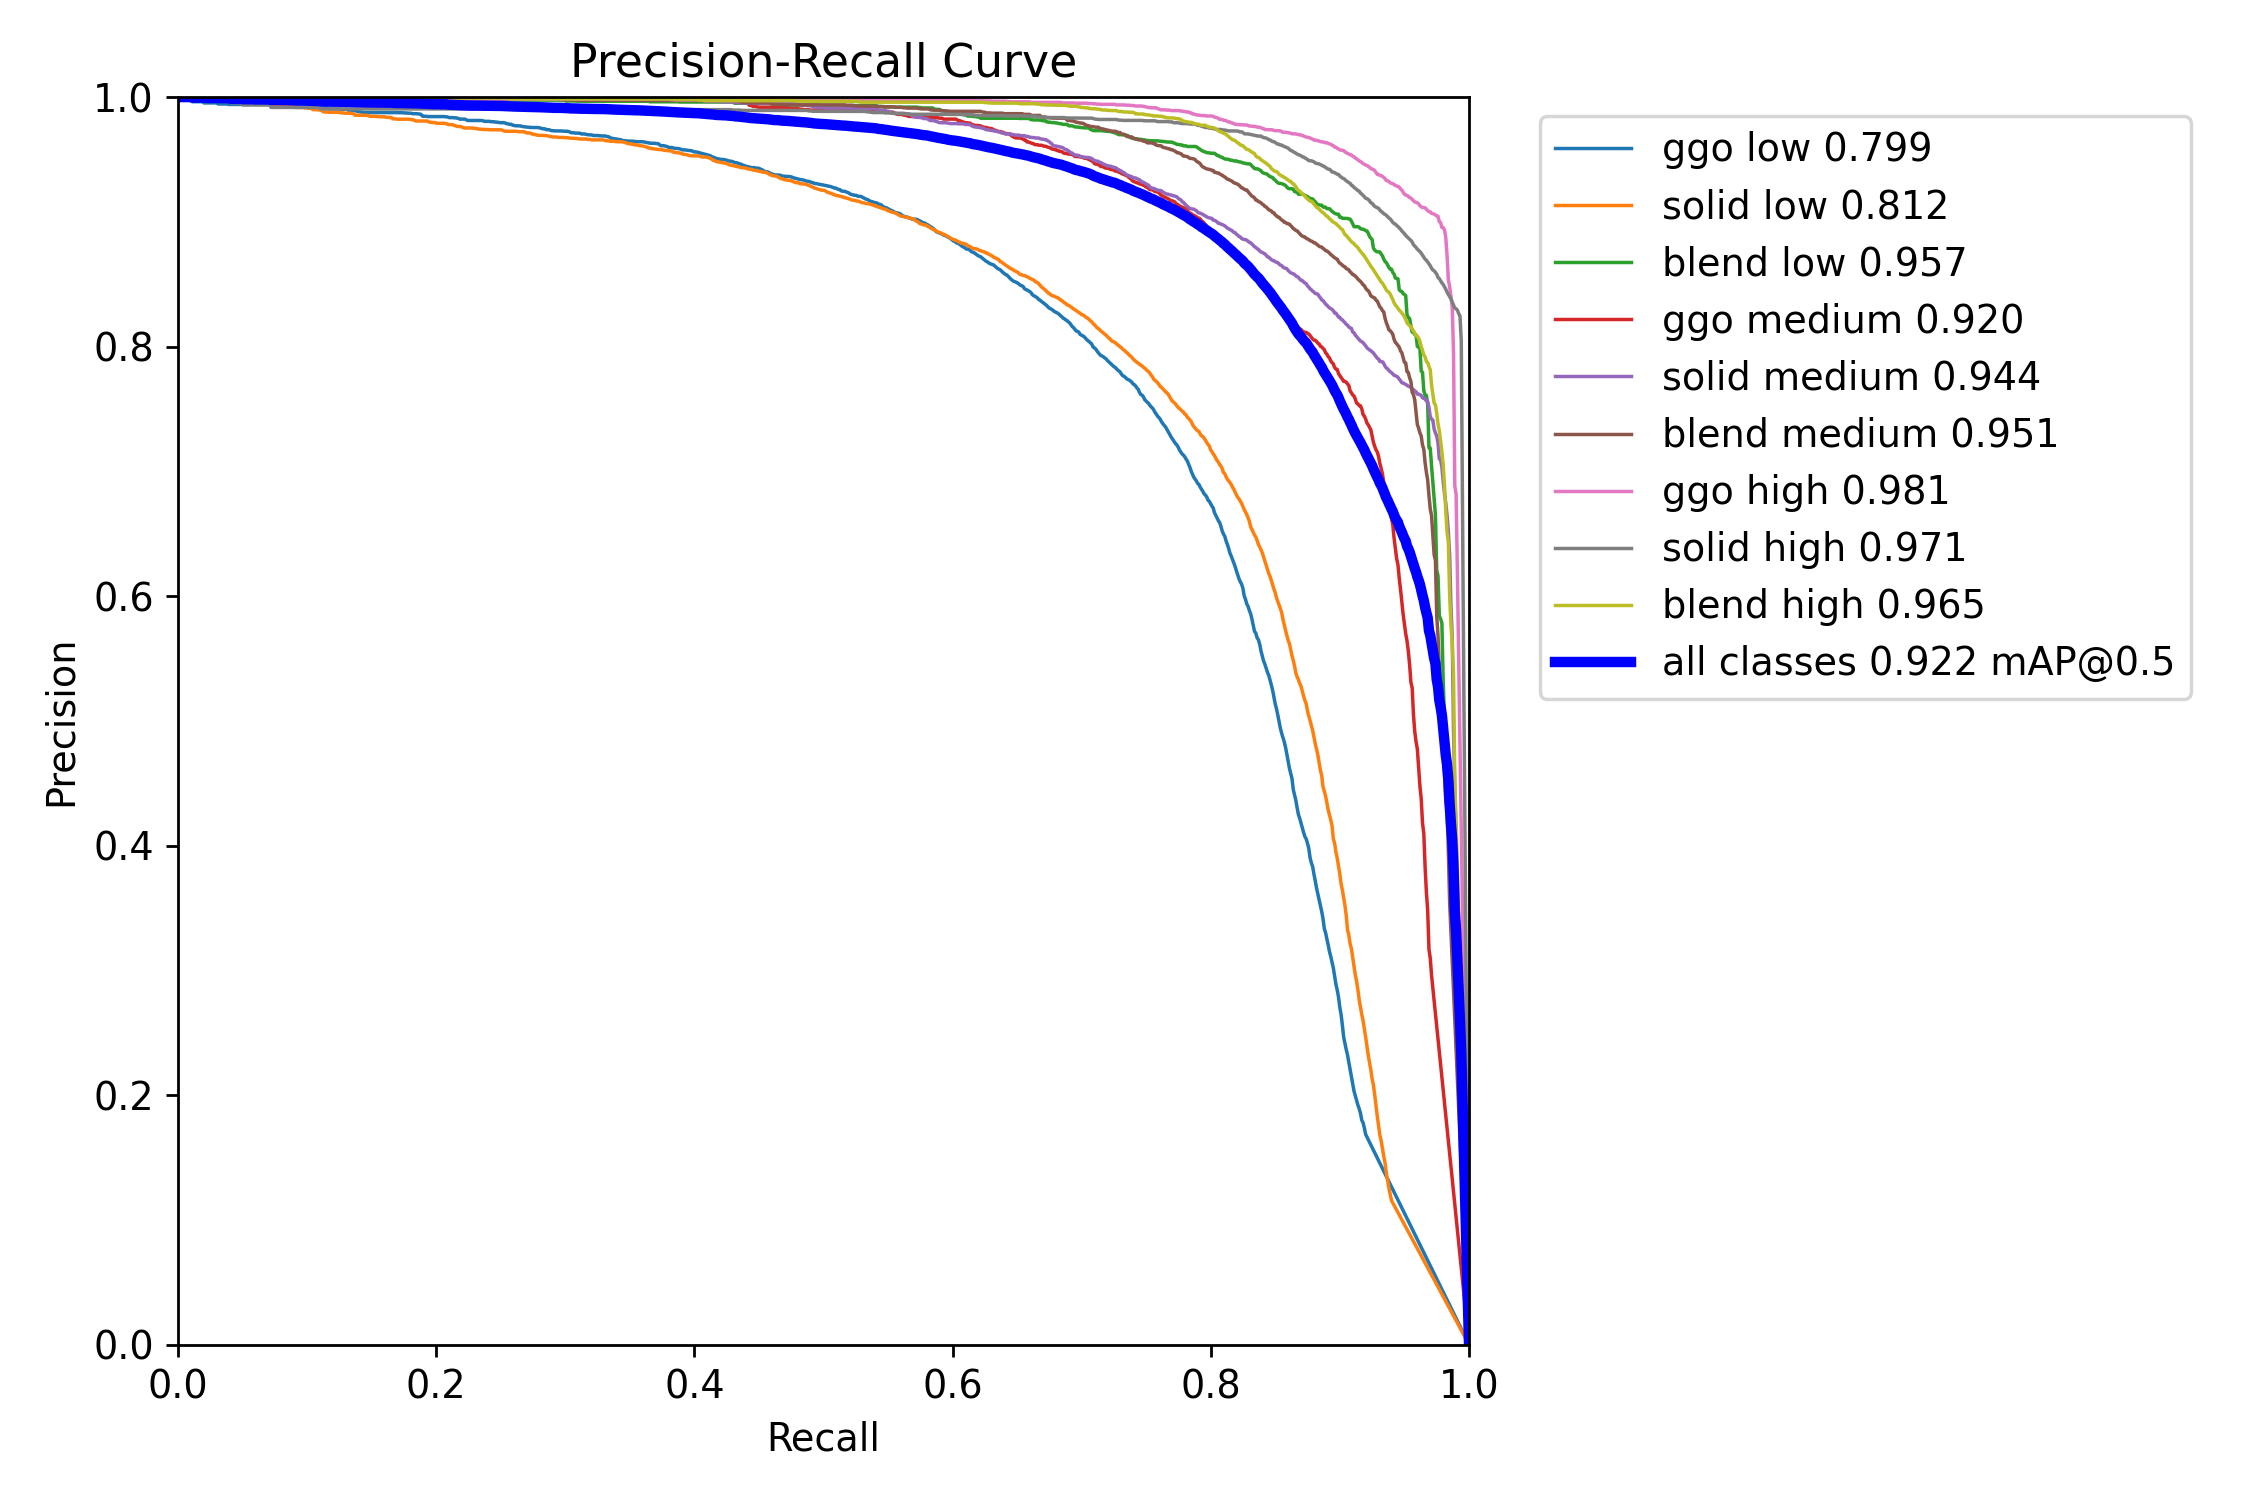
8.精确率和召回率的关系图

PR_curve.png
精确率和召回率的关系图

PR_curve是精确率(Precision)和召回率(Recall)之间的关系。精确率表示预测为正例的样本中真正为正例的比例,而召回率表示真正为正例的样本中被正确预测为正例的比例。

在PR Curve中,横坐标表示召回率,纵坐标表示精确率。通常情况下,当召回率升高时,精确率会降低,反之亦然。PR Curve反映了这种取舍关系。曲线越靠近右上角,表示模型在预测时能够同时保证高的精确率和高的召回率,即预测结果较为准确。相反,曲线越靠近左下角,表示模型在预测时难以同时保证高的精确率和高的召回率,即预测结果较为不准确。

通常,PR Curve与ROC Curve一同使用,以更全面地评估分类模型的性能。 PR Curve提供了对模型在不同任务下性能表现的更详细的洞察。

9. 训练过程的记录

results.png
训练过程的记录

box_loss bounding_box与GroundTruth之间的差异
obj_loss GroundTruth的检测丢失
cls_loss GroundTruth对应的bounding_box分类错误
precision 精确率=TP/TP+FP
recall 召回率=TP/TP+FN

损失函数在目标检测任务中扮演关键角色,它用于衡量模型的预测值与真实值之间的差异,直接影响模型性能。以下是一些与目标检测相关的损失函数和性能评价指标的解释:

定位损失(box_loss):

定义: 衡量预测框与标注框之间的误差,通常使用 GIoU(Generalized Intersection over Union)来度量,其值越小表示定位越准确。
目的: 通过最小化定位损失,使模型能够准确地定位目标。
置信度损失(obj_loss):

定义: 计算网络对目标的置信度,通常使用二元交叉熵损失函数,其值越小表示模型判断目标的能力越准确。
目的: 通过最小化置信度损失,使模型能够准确判断目标是否存在。
分类损失(cls_loss):

定义: 计算锚框对应的分类是否正确,通常使用交叉熵损失函数,其值越小表示分类越准确。
目的: 通过最小化分类损失,使模型能够准确分类目标。
Precision(精度):

定义: 正确预测为正类别的样本数量占所有预测为正类别的样本数量的比例。
目的: 衡量模型在所有预测为正例的样本中有多少是正确的。
Recall(召回率):

定义: 正确预测为正类别的样本数量占所有真实正类别的样本数量的比例。
目的: 衡量模型能够找出真实正例的能力。
mAP(平均精度):

定义: 使用 Precision-Recall 曲线计算的面积,mAP@[.5:.95] 表示在不同 IoU 阈值下的平均 mAP。
目的: 综合考虑了模型在不同精度和召回率条件下的性能,是目标检测任务中常用的评价指标。
在训练过程中,通常需要关注精度和召回率的波动情况,以及 [email protected] 和 mAP@[.5:.95] 评估训练结果。这些指标可以提供关于模型性能和泛化能力的有用信息。

10.args.yaml文件

args.yaml这个文件通常包含了模型训练时使用的配置参数。它详细记录了训练过程中使用的所有设置,如学习率、批大小、训练轮数等。这个文件的目的是为了提供一个清晰的训练配置概览,使得训练过程可以被复现或调整。
训练时的超参数:

task: detect
mode: train
model: yolov8s.pt
data: coco8.yaml
epochs: 150
patience: 50
batch: 8
imgsz: 640
save: true
save_period: -1
cache: false
device: 0
workers: 0
project: null
name: train
exist_ok: false
pretrained: true
optimizer: auto
verbose: true
seed: 0
deterministic: true
single_cls: false
rect: false
cos_lr: false
close_mosaic: 10
resume: false
amp: true
fraction: 1.0
profile: false
freeze: null
overlap_mask: true
mask_ratio: 4
dropout: 0.0
val: true
split: val
save_json: false
save_hybrid: false
conf: null
iou: 0.7
max_det: 300
half: false
dnn: false
plots: true
source: null
show: false
save_txt: false
save_conf: false
save_crop: false
show_labels: true
show_conf: true
vid_stride: 1
stream_buffer: false
line_width: null
visualize: false
augment: false
agnostic_nms: false
classes: null
retina_masks: false
boxes: true
format: torchscript
keras: false
optimize: false
int8: false
dynamic: false
simplify: false
opset: null
workspace: 4
nms: false
lr0: 0.01
lrf: 0.01
momentum: 0.937
weight_decay: 0.0005
warmup_epochs: 3.0
warmup_momentum: 0.8
warmup_bias_lr: 0.1
box: 7.5
cls: 0.5
dfl: 1.5
pose: 12.0
kobj: 1.0
label_smoothing: 0.0
nbs: 64
hsv_h: 0.015
hsv_s: 0.7
hsv_v: 0.4
degrees: 0.0
translate: 0.1
scale: 0.5
shear: 0.0
perspective: 0.0
flipud: 0.0
fliplr: 0.5
mosaic: 1.0
mixup: 0.0
copy_paste: 0.0
cfg: null
tracker: botsort.yaml
save_dir: runsdetecttrain

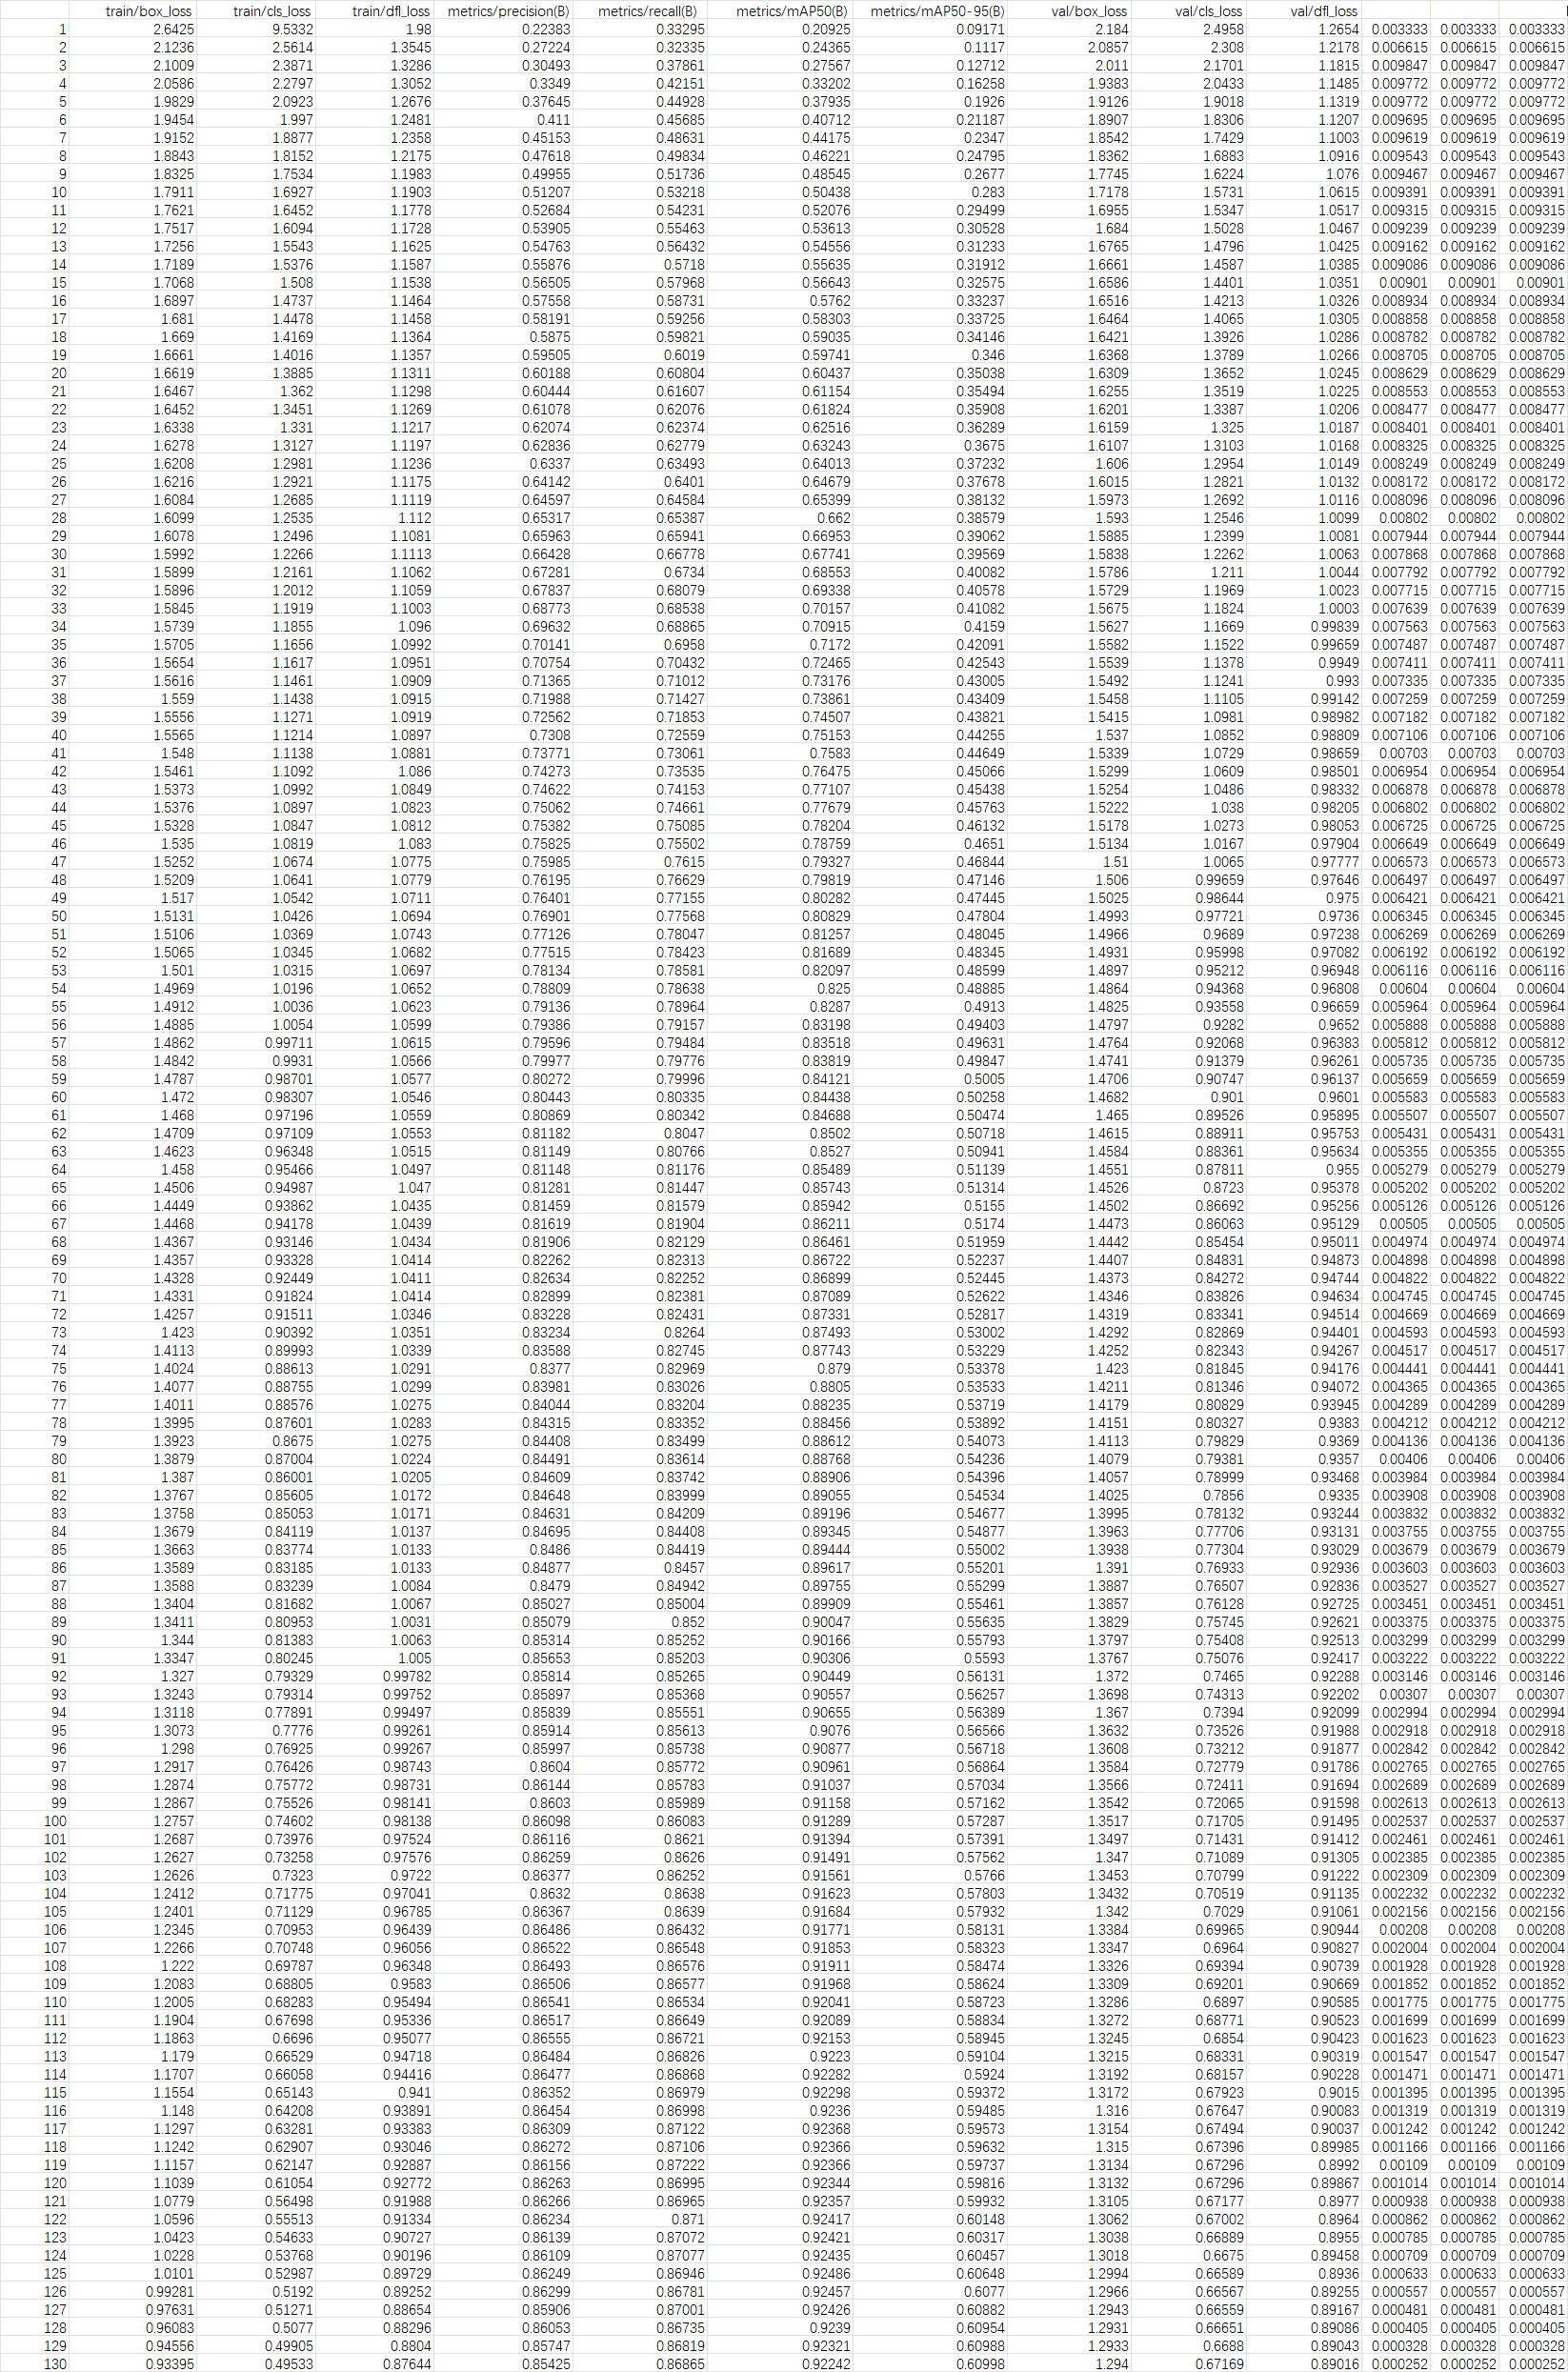
12.各项损失、精确度、mAP值、lr 等信息

模型训练时每次迭代结果:

results.csv
模型训练时每次迭代结果

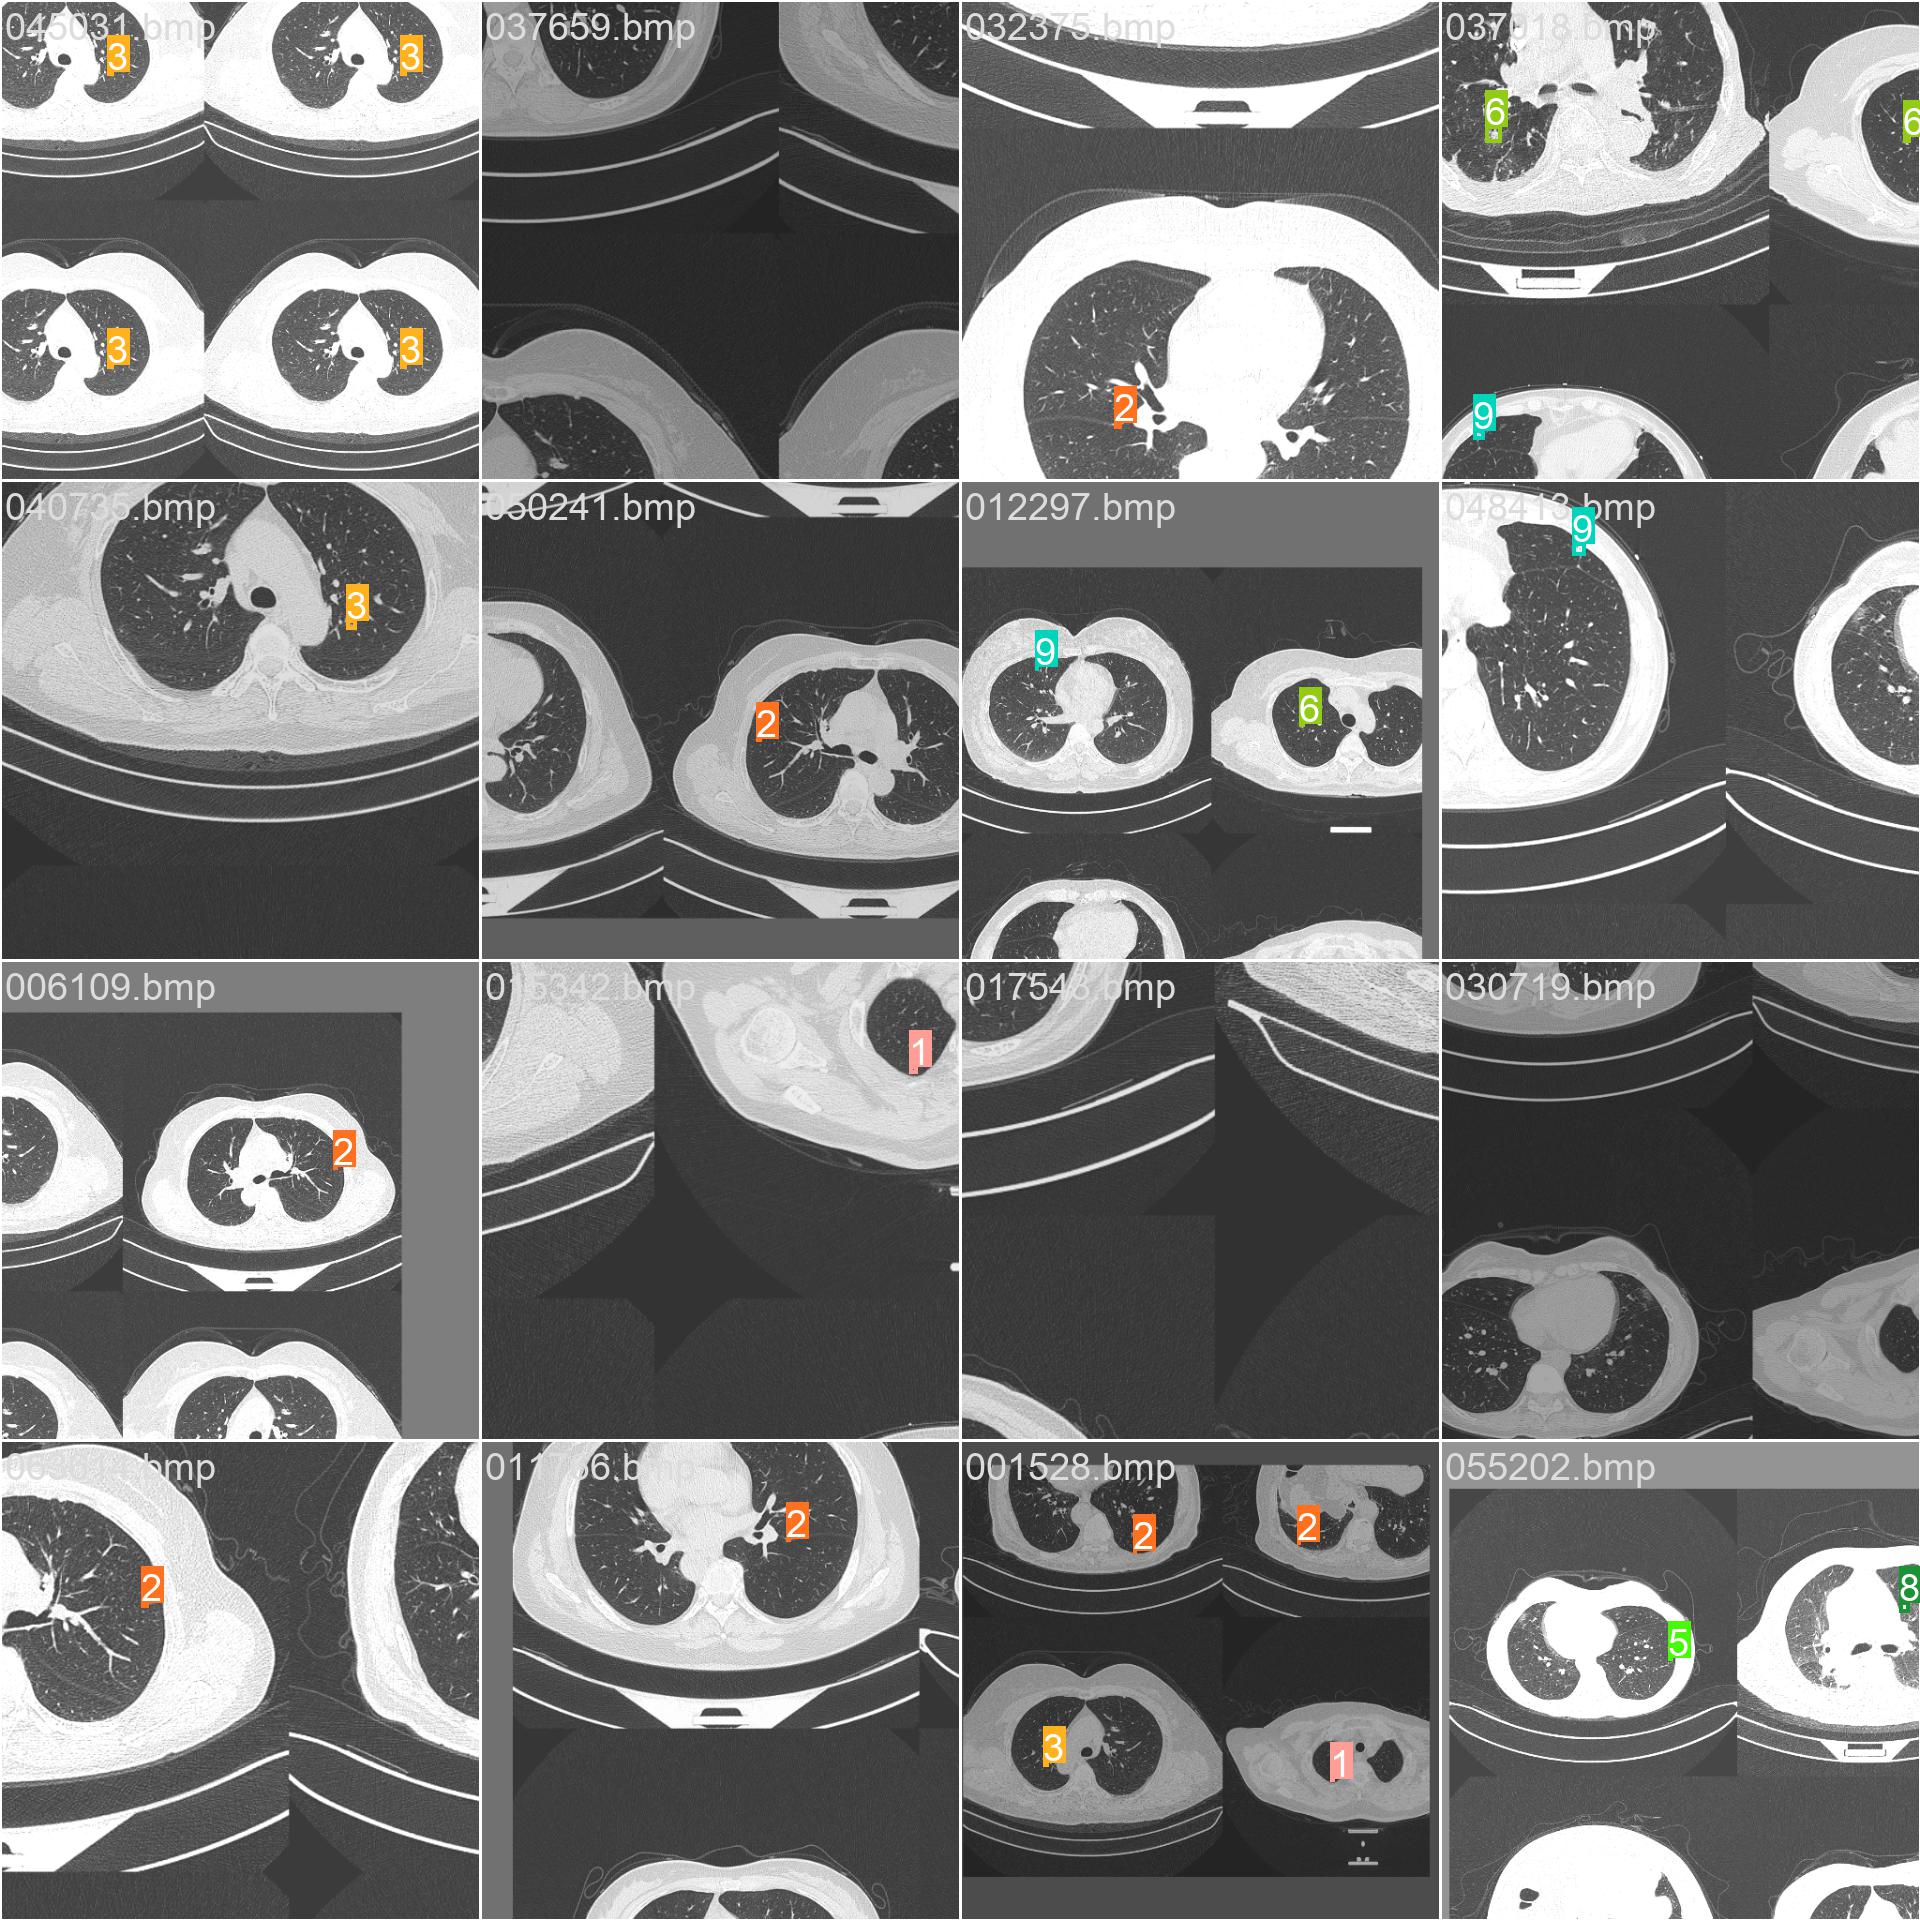
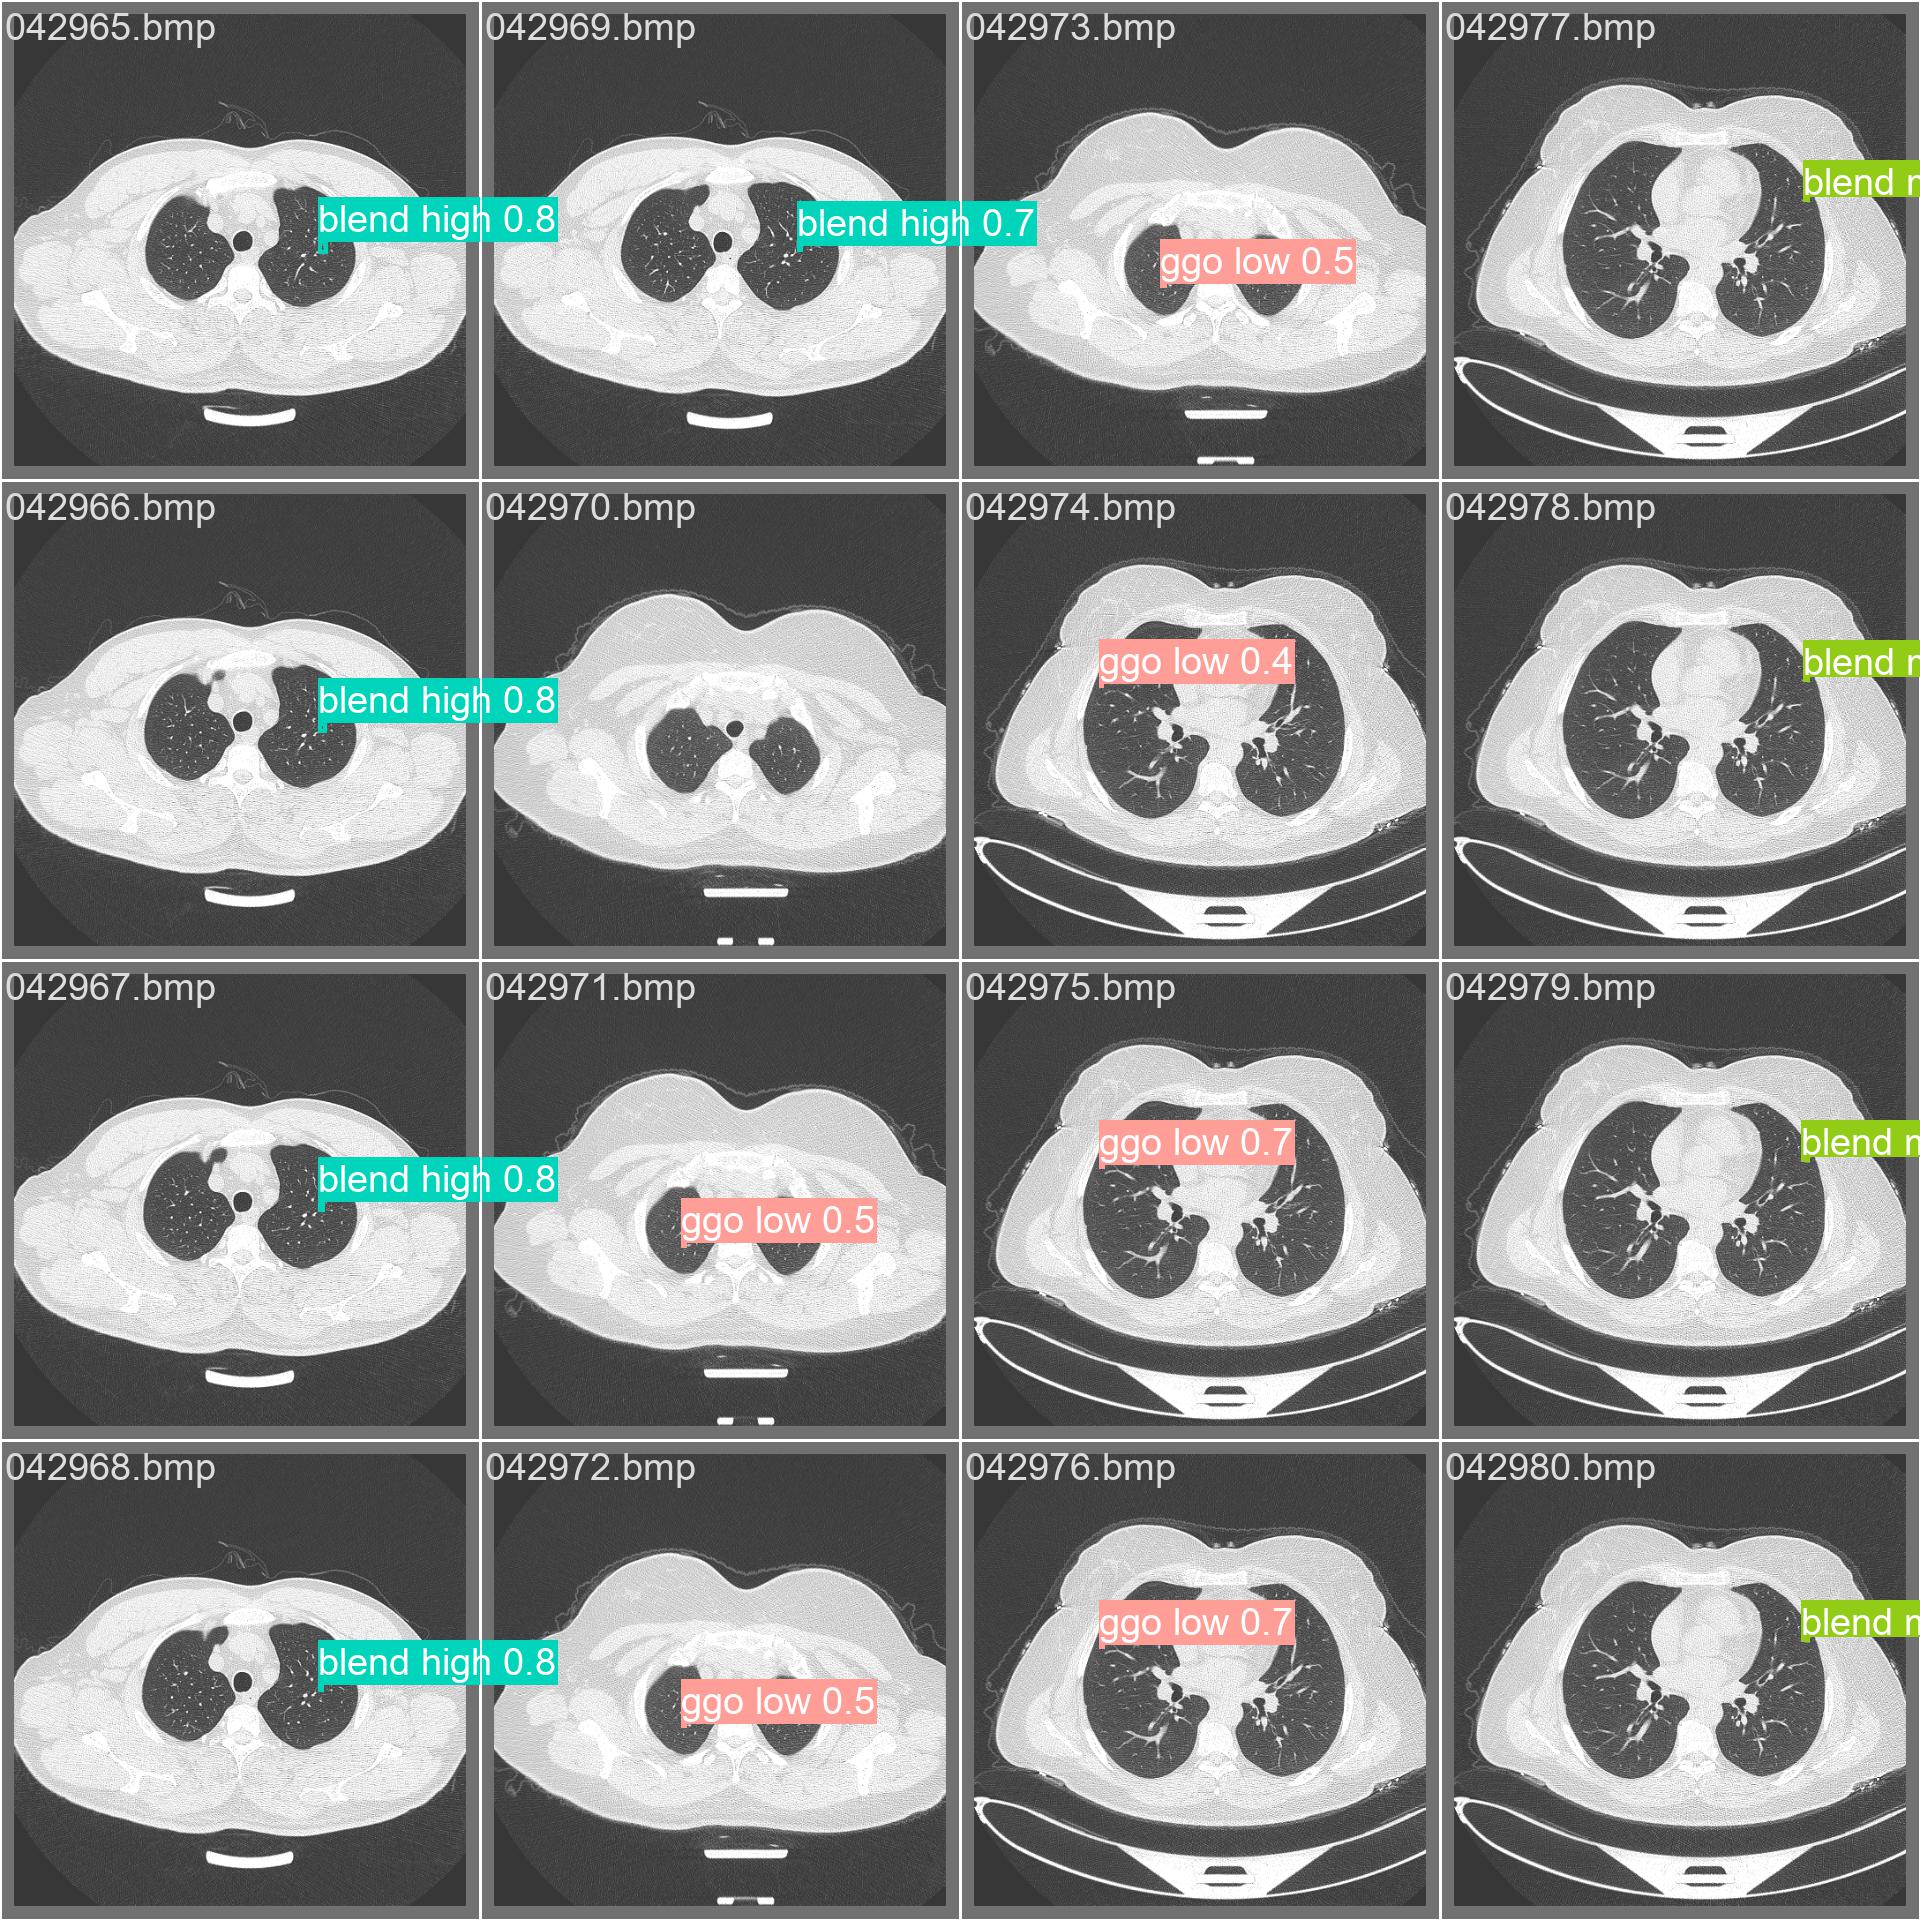
13.马赛克和标签

train_batch0.jpg
0
train_batch1.jpg
1
train_batch2.jpg
2
train_batch482760.jpg
482760
train_batch482761.jpg
482761
train_batch482762.jpg
482762

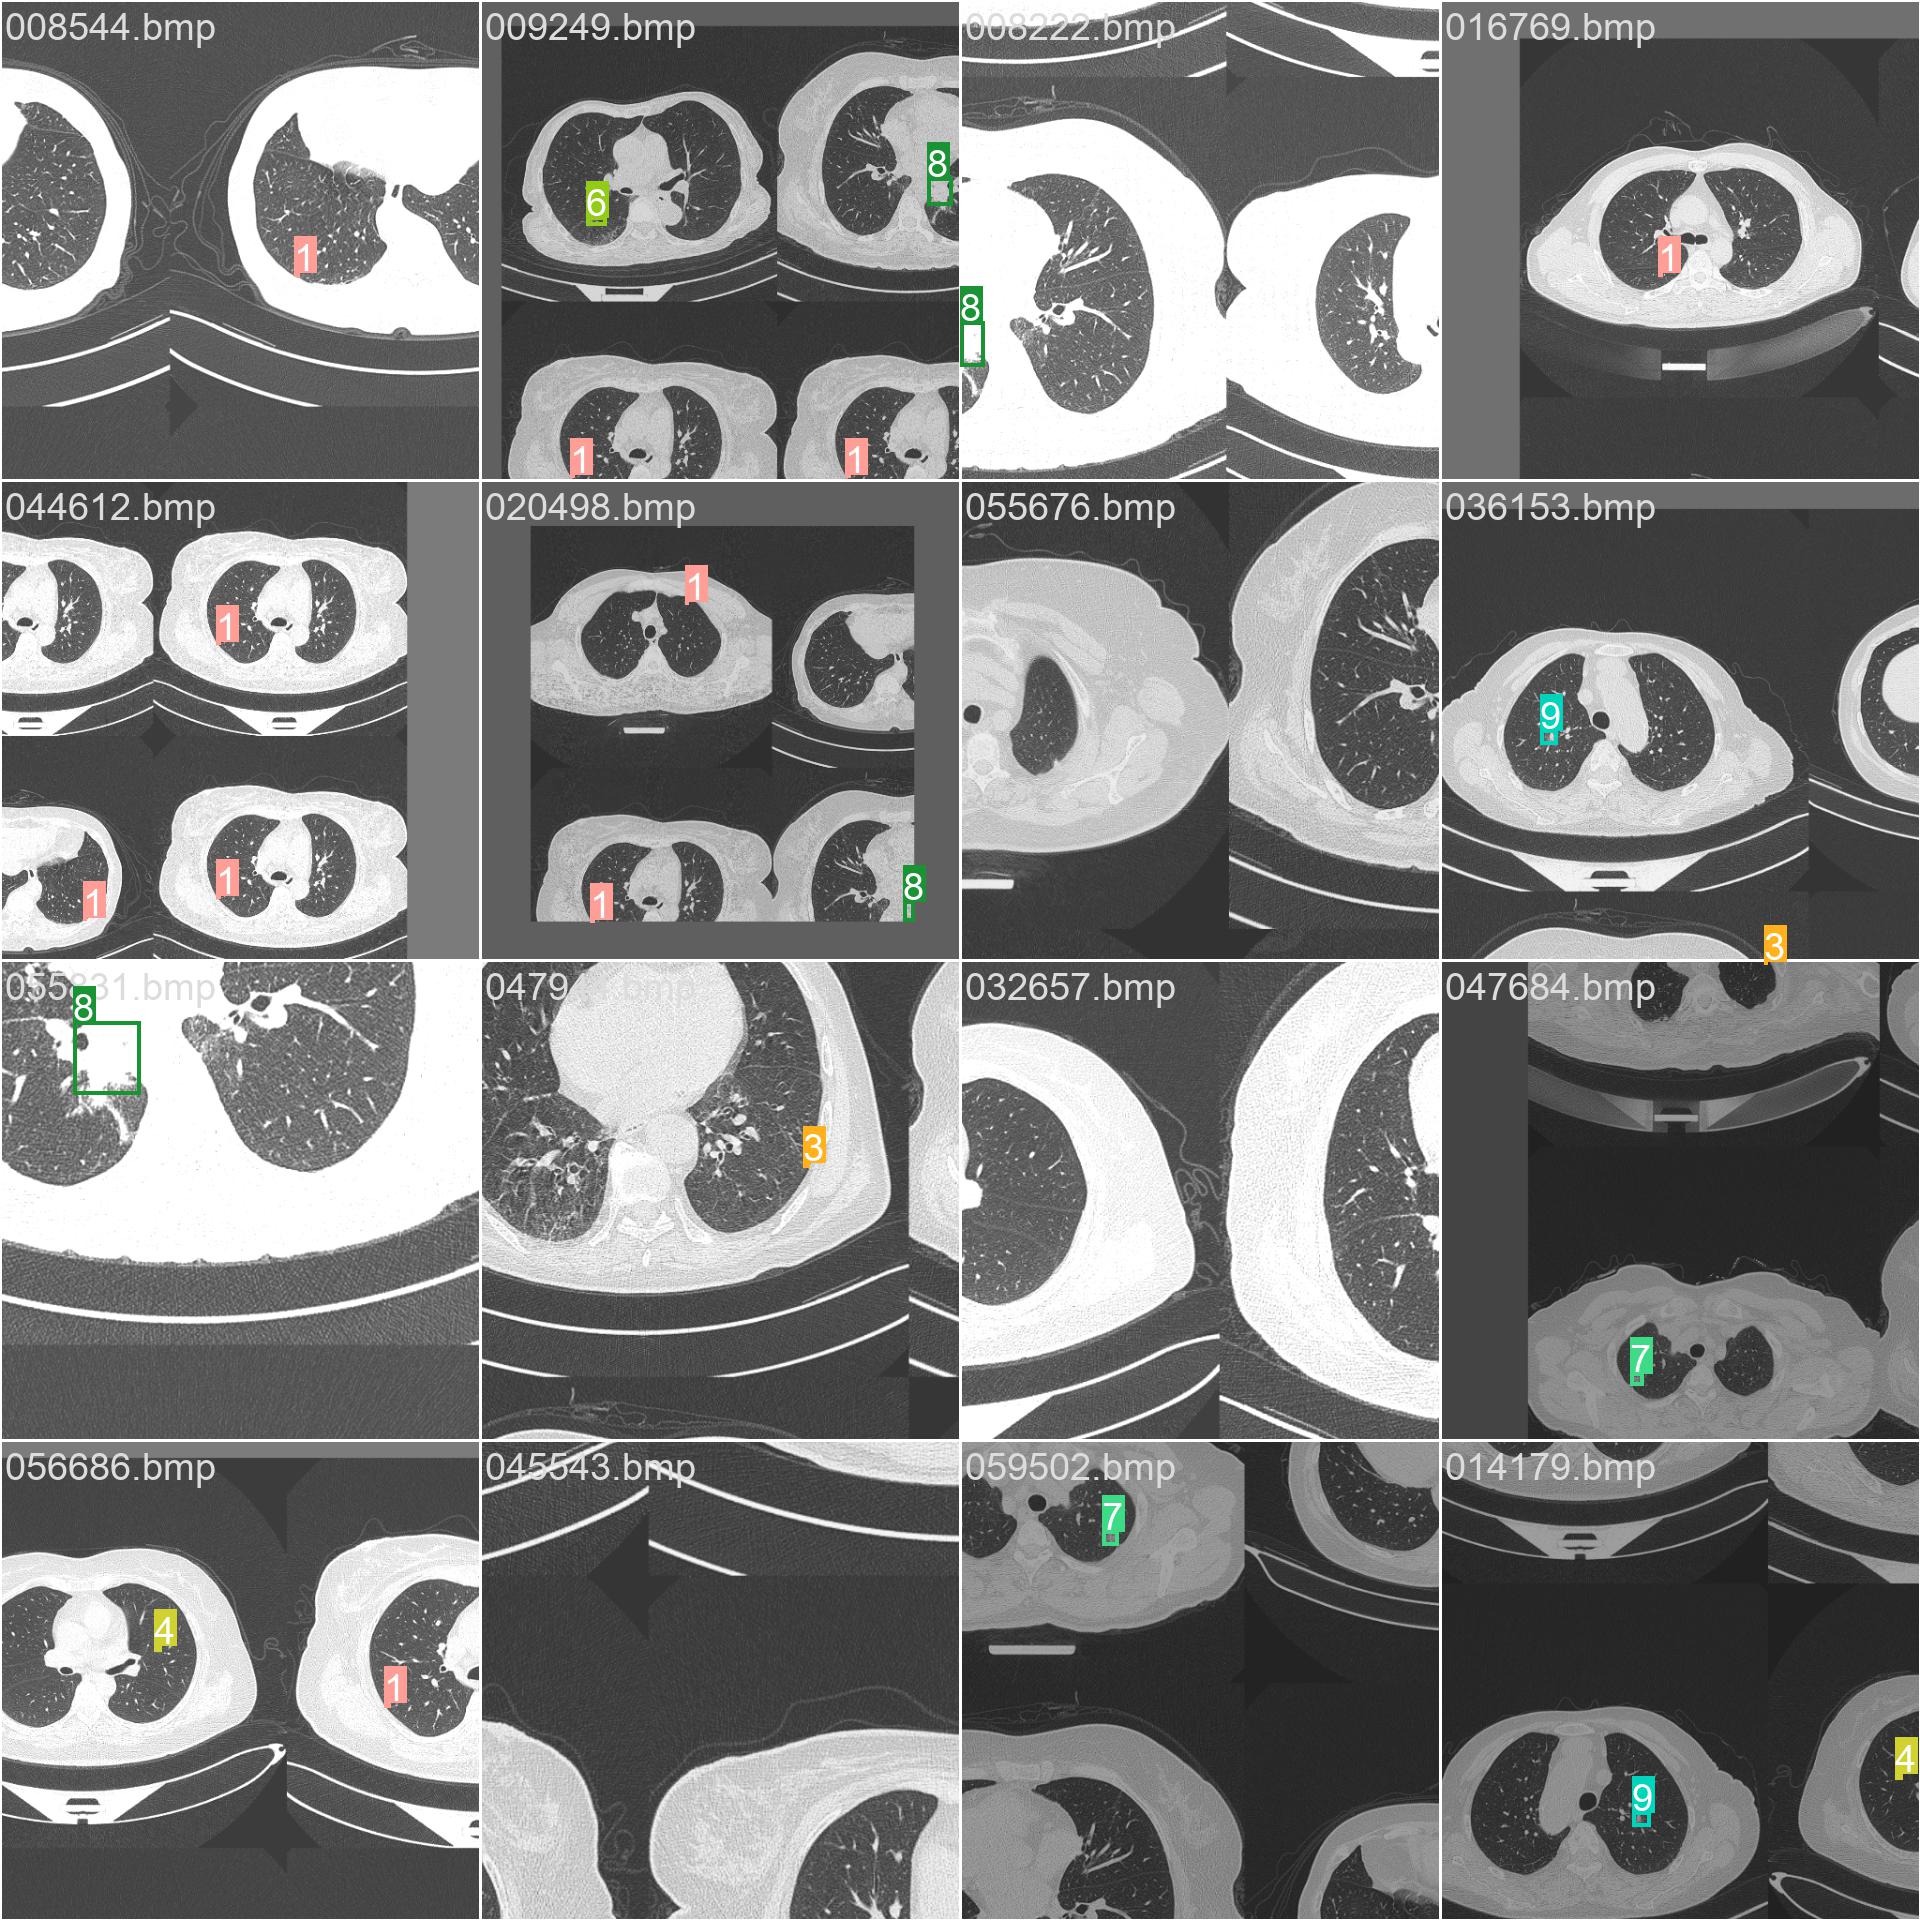
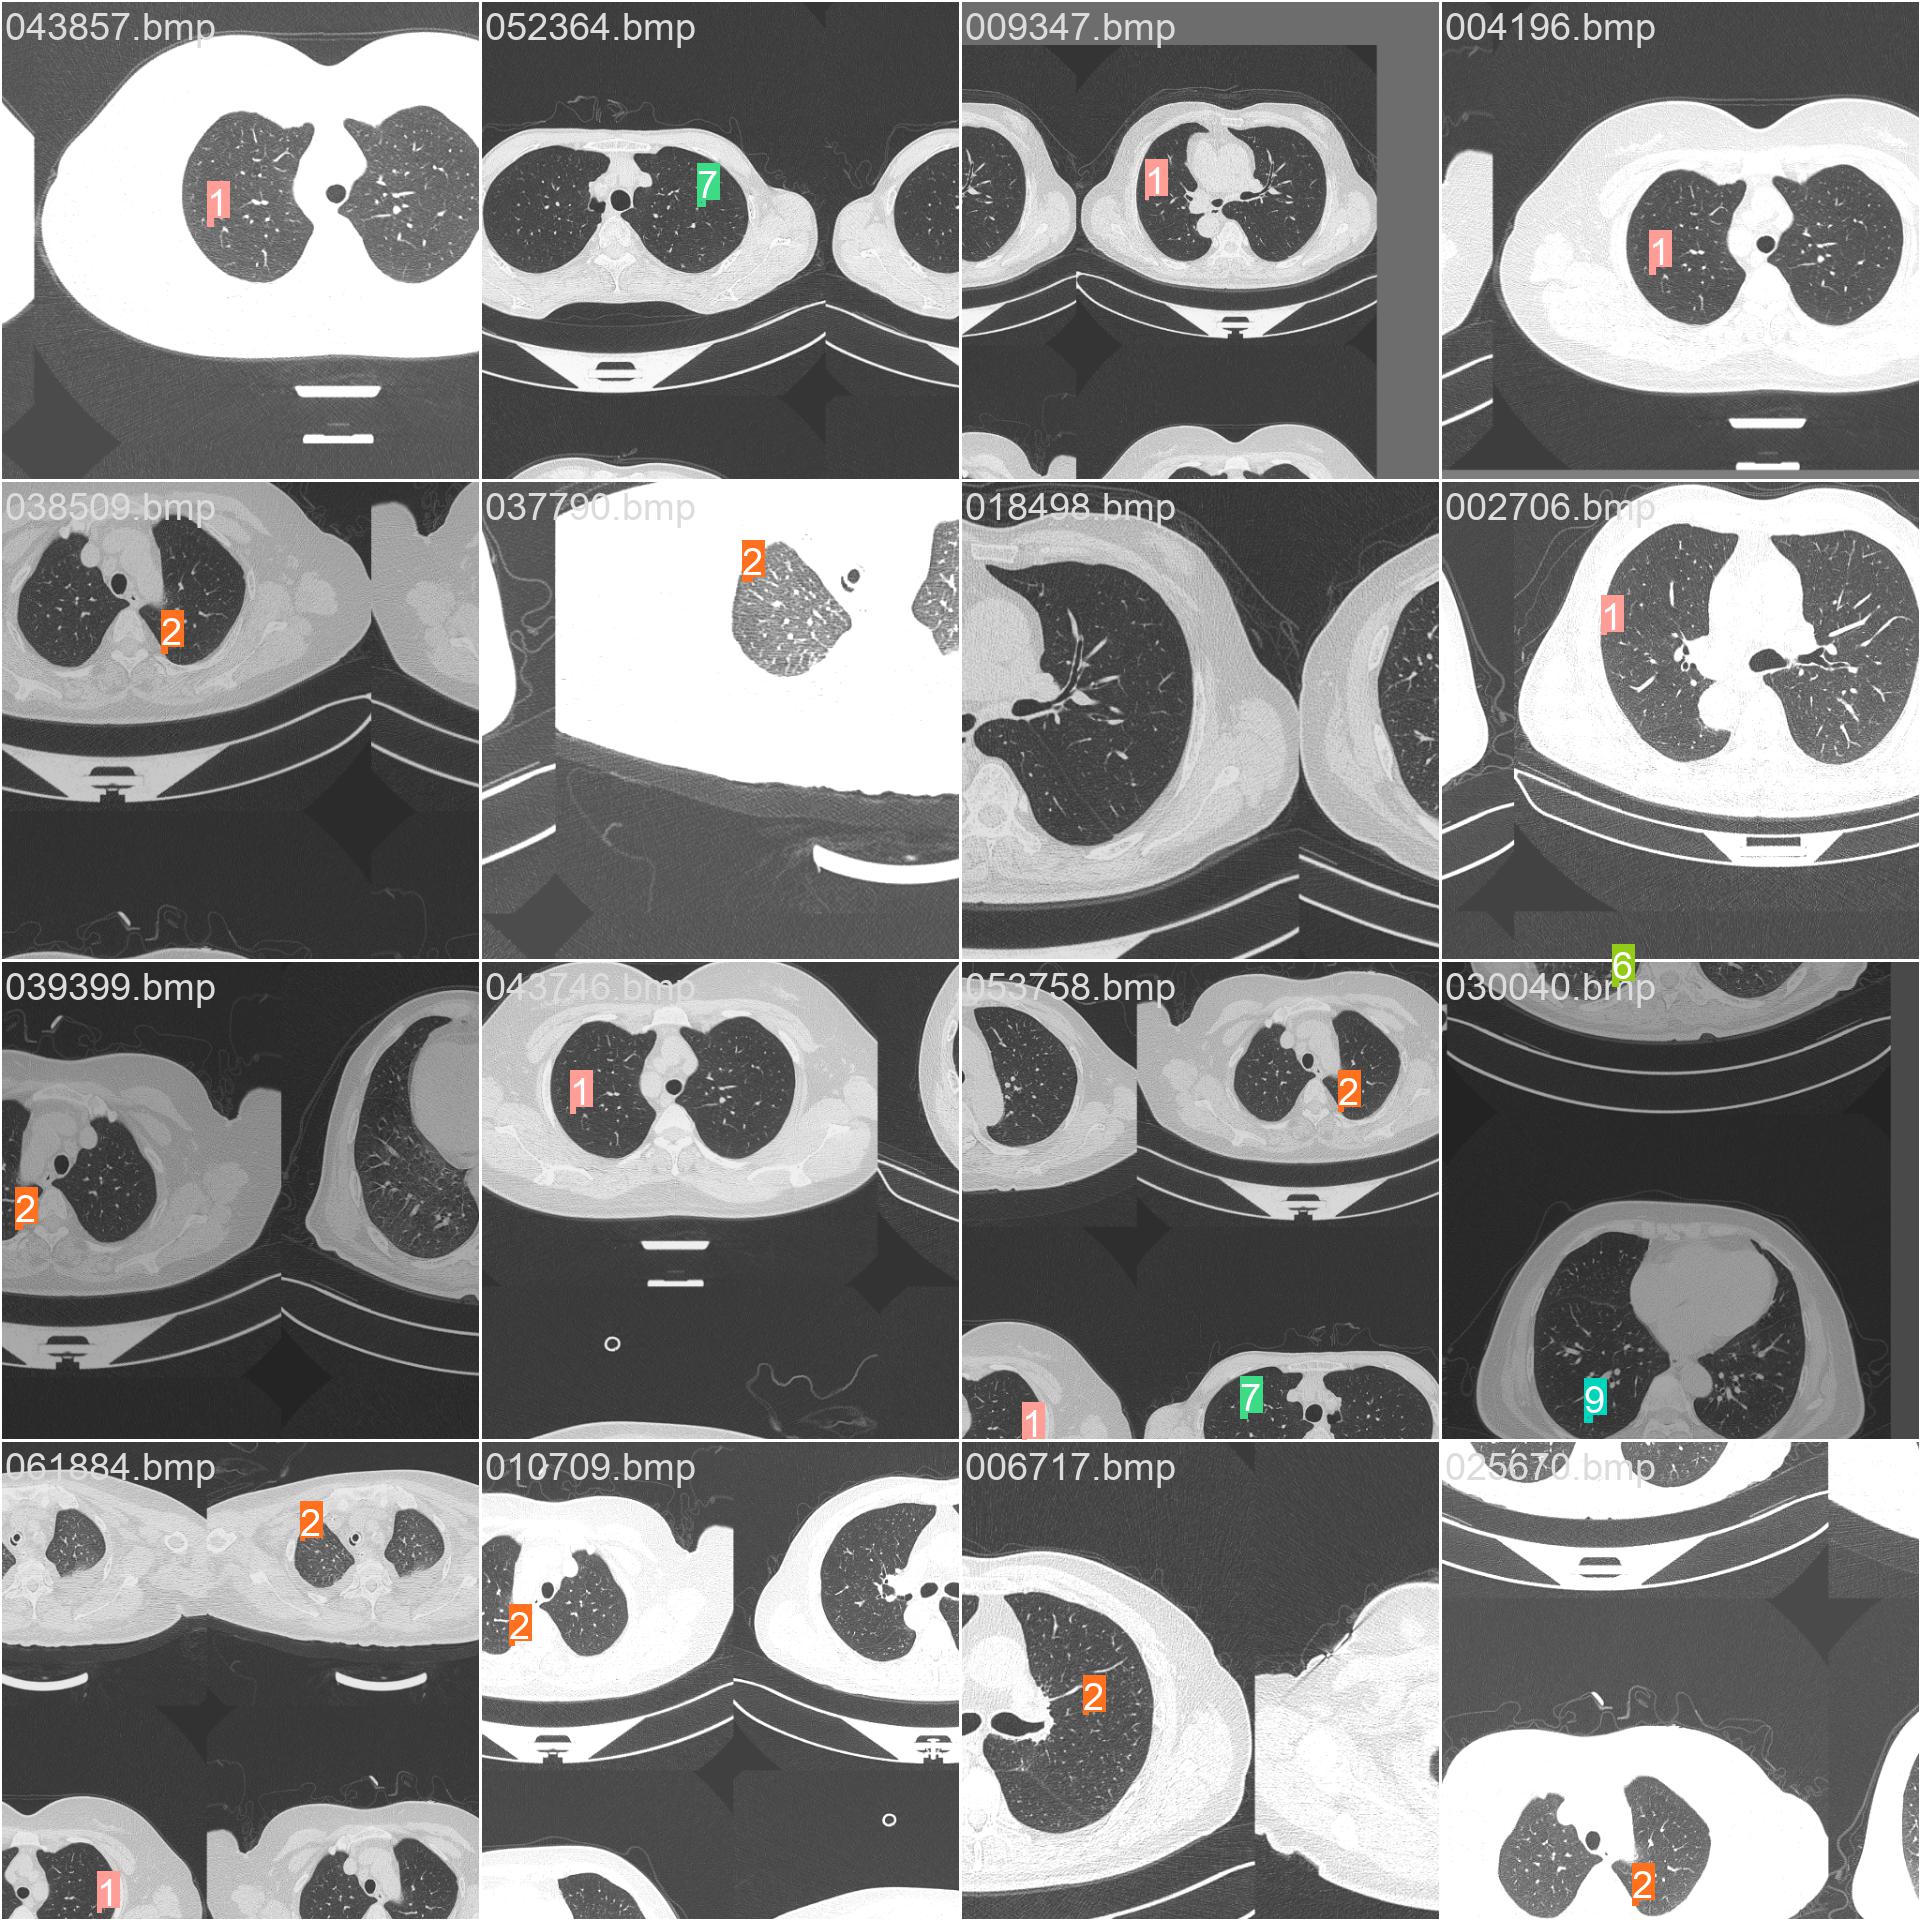
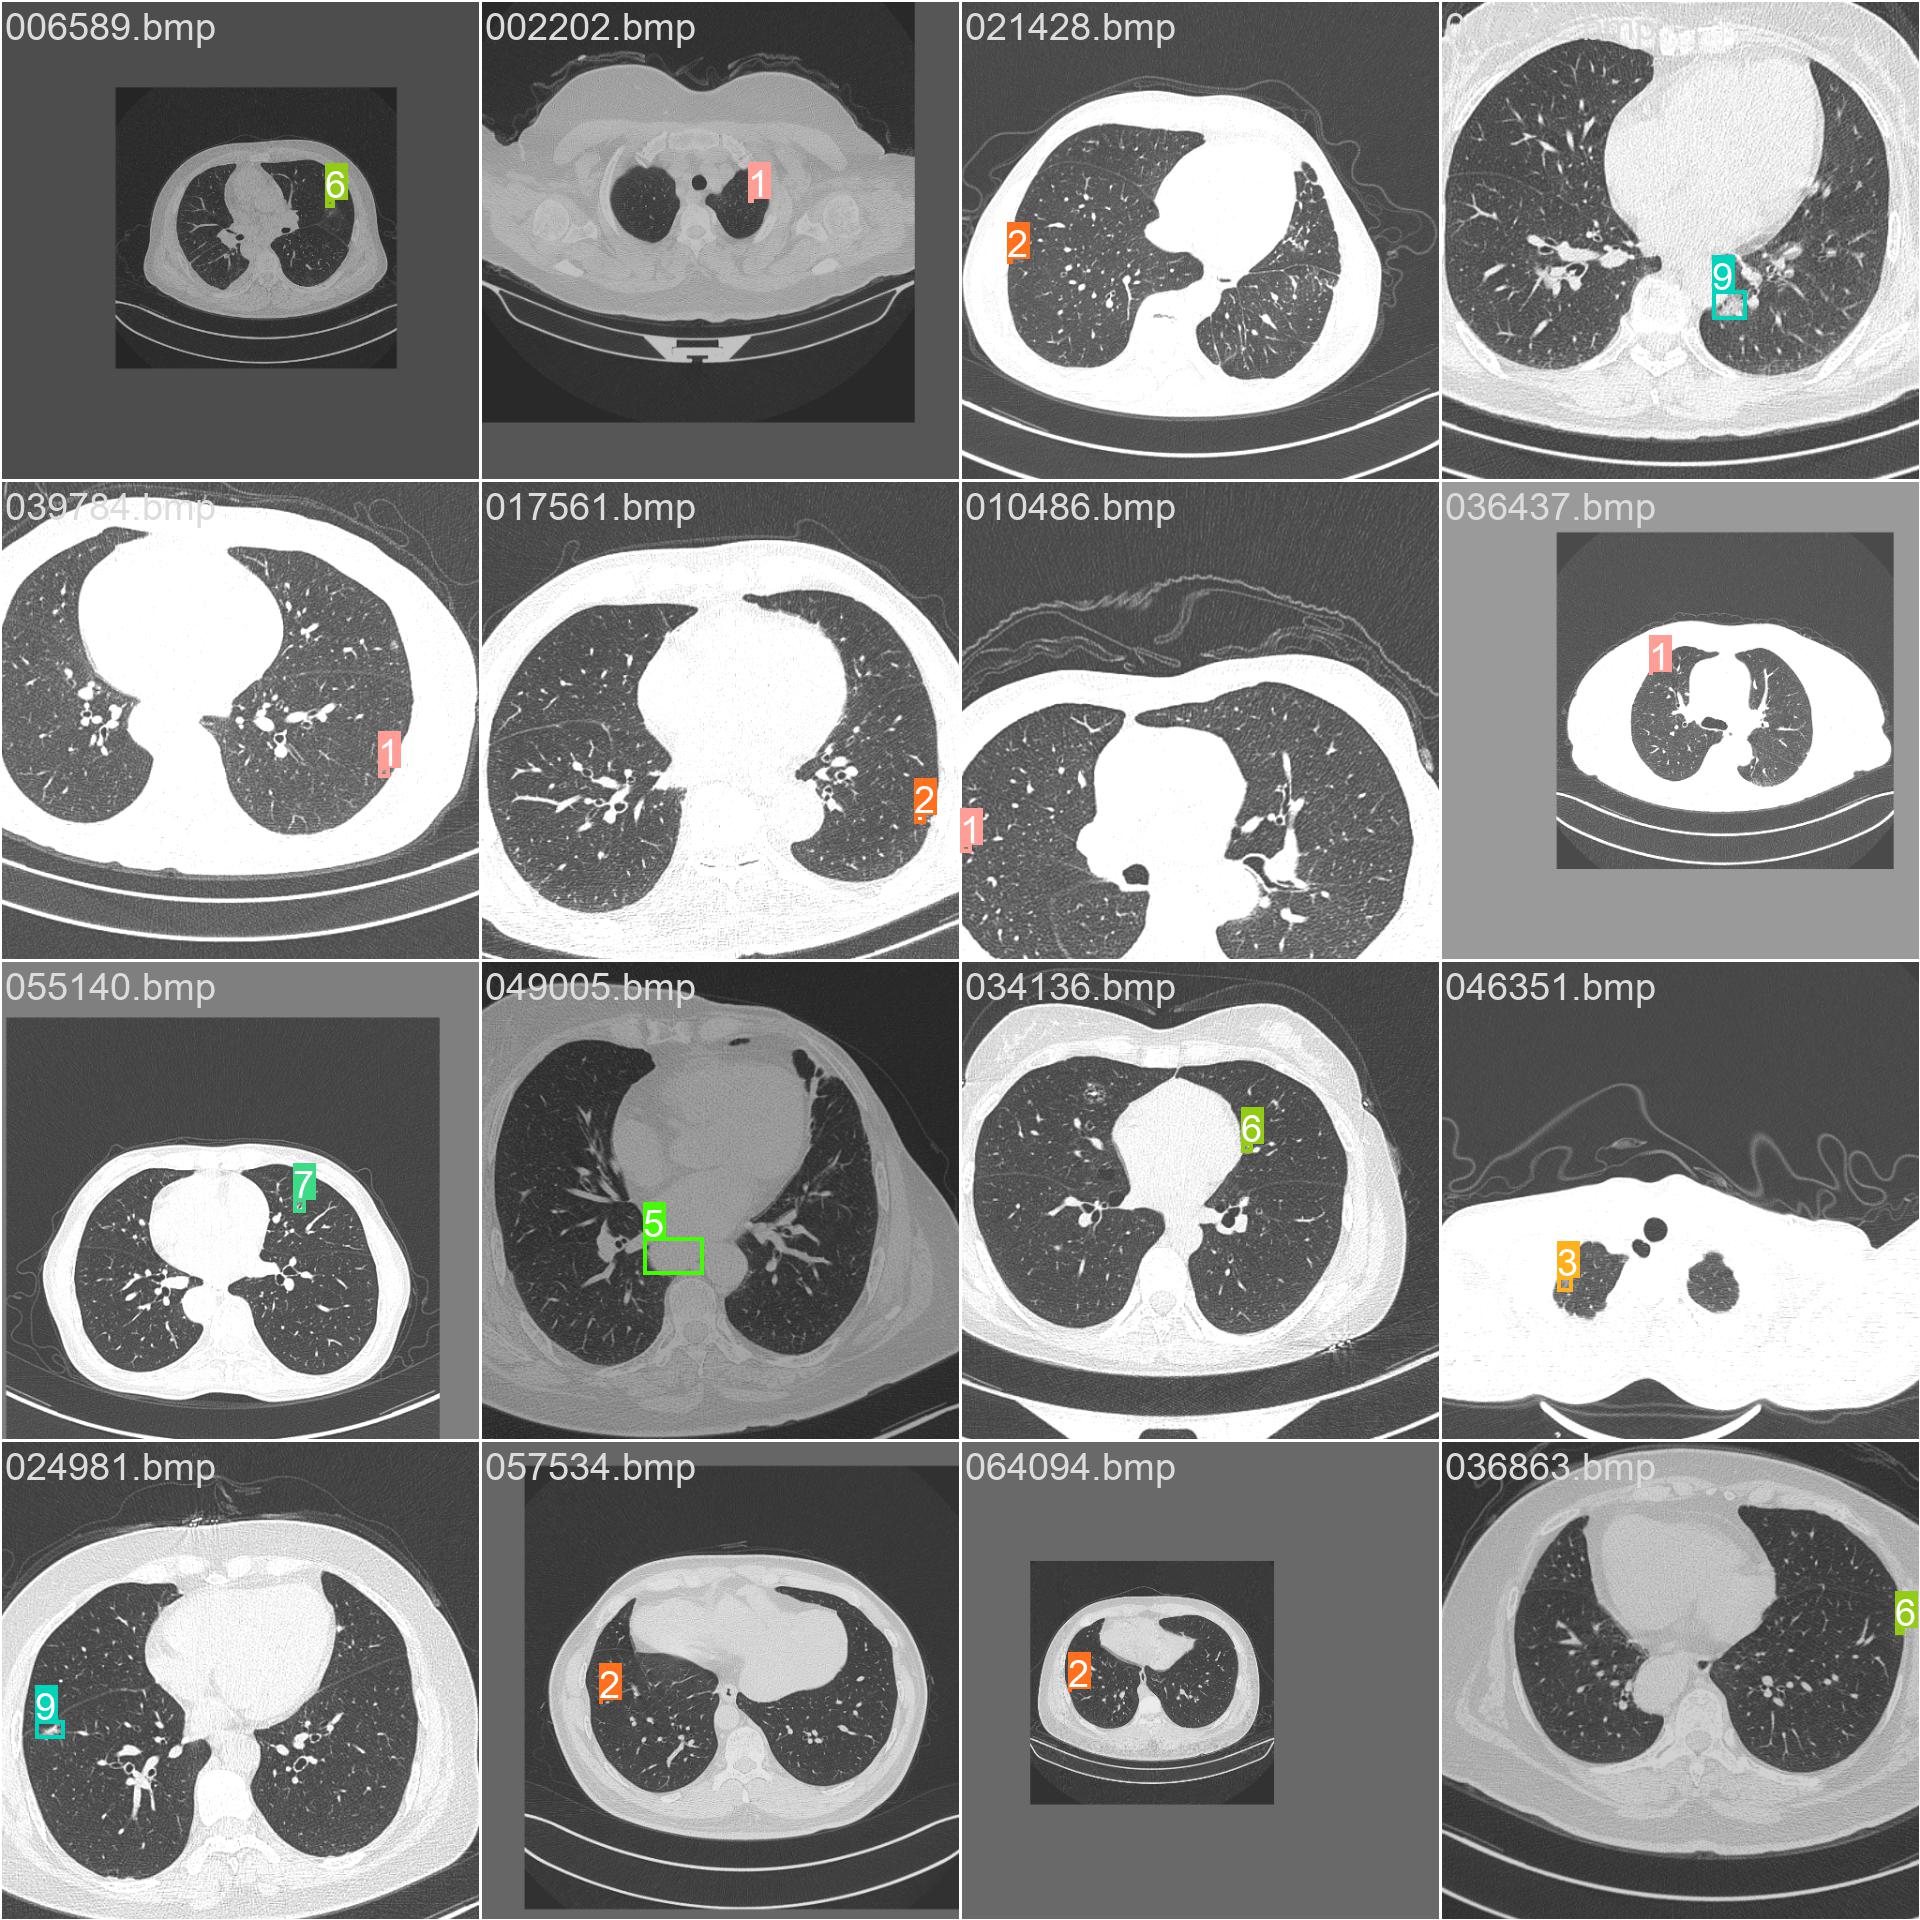
14.测试集的标签和预测结果

val_batch0_labels.jpg
0
val_batch1_labels.jpg
1
val_batch2_labels.jpg
2
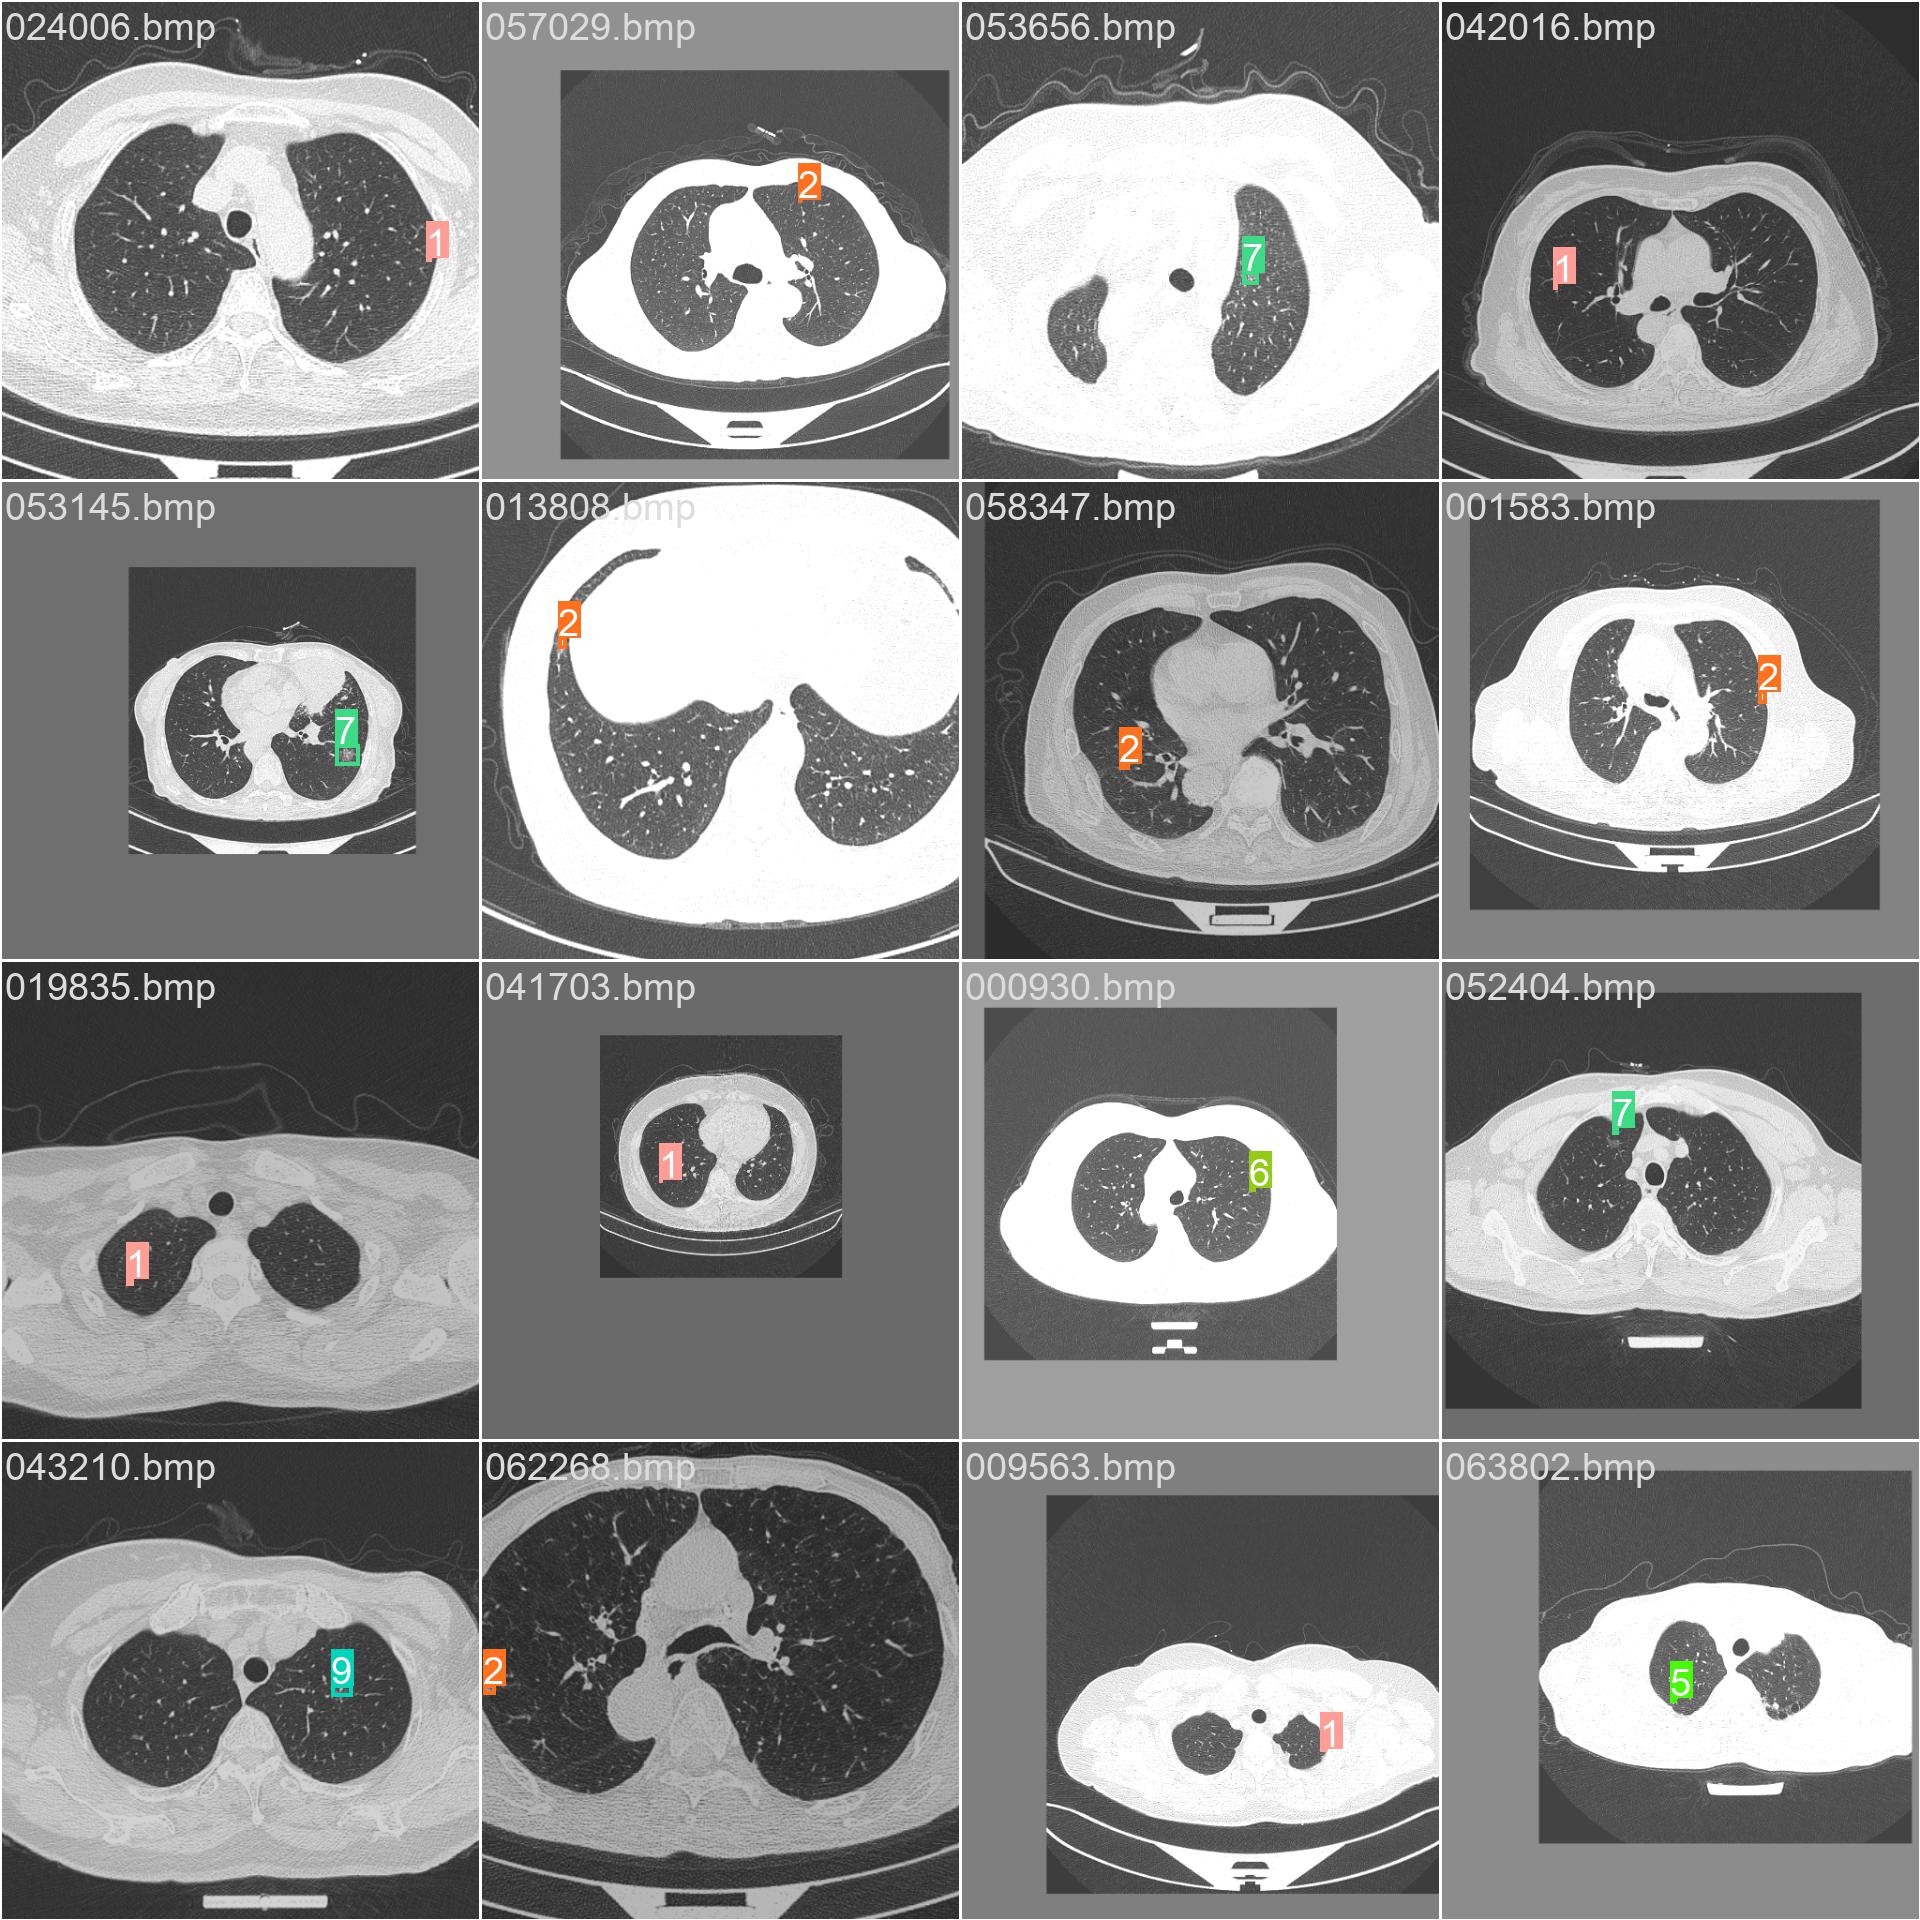
val_batch0_pred.jpg
0
val_batch1_pred.jpg
1
val_batch2_pred.jpg
2
val_batchx_labels:验证集第N轮的实际标签
val_batchx_pred:验证集第N轮的预测标签

vtk开源3D视觉医学影像

VTK简介

VTK,全称是Visualization Toolkit,即可视化工具包。是一个开源、跨平台、可自由获取、支持并行处理的图形应用函数库。

VTK 独立于系统的图形界面接口(GUI),可方便的嵌入到其他的相关软件中。同时开发人员可以基于 VTK 独立的基础类库开发自己的库函数,拓展 VTK 的应用范围。

VTK 采用面向对象思想,基于 OpenGL 开发出目标函数库。它将将一些常用的算法封装为类的形式,用户在开发过程中可以直接调用其函数库进行开发,而不必纠结函数内部具体的实现过程。

其优点主要有:

拓展 OpenGL:VTK 不仅封装了 OpenGL 复杂的底层环境代码,而且提供了常用功能和算法处理,如常见的图形建模算法和图像处理算法。继承OpenGL 状态机的优势,保留了其可视化工具的特色,使得开发人员秩序关注高级功能的实现,而不必纠结其细枝末节。
管线设计思想:VTK 相对于其他的可视化工具包,如 Direct3D、OpenGL 等的主要区别就在于采用管线(Pipeline)设计来实现可视化流程,这种设计可以节省设计与开发时间,加快测量系统的研发速度。
开发方便:VTK 采用面向对象的设计思想来实现其管线流程的,在其可视化的流程中,各阶段的数据在管线中都是以类和对象的形式进行调用,增强程序可读性,便于开发与拓展。

vtk的特点

1: 具有强大的三维图形功能。Visualization Toolkit 既支持基于体素Voxel-basedrendering 的体绘制Volume Rendering又保留了传统的面绘制,从而在极大的改善可视化效果的同时又可以充分利用现有的图形库和图形硬件。

2: Visualization Toolkit 的体系结构使其具有非常好的流streaming和高速缓存caching 的能力,在处理大量的数据时不必考虑内存资源的限制。

3: Visualization Toolkit 能够更好的支持基于网络的工具比如Java 和VRML 。随着Web 和Internet 技术的发展VisualizationToolkit 有着很好的发展前景

4: 能够支持多种着色如OpenGL 等。

5: Visualization Toolkit 具有设备无关性,其代码具有良好的可移植性。同时,官方也给出了各个编译器的技术文档与案例、教程。

6: VTK应用程序使用Filter(过滤器)操作数据,每个过滤器检查其接受的数据并产生输出数据。多个Filter与数据源组成一个数据流网络。可配置的网络将原始数据转换为更易理解的模式。

6: Visualization Toolkit 中定义了许多宏,这些宏极大的简化了编程工作并且加强了一致的对象行为

7: Visualization Toolkit 具有更丰富的数据类型,支持对多种数据类型进行处理。其核心数据模型能够表示几乎所有与物理科学相关的现实世界问题,适合涉及有限差分和有限元解决方案的医学成像和工程工作。

8: 既可以工作于Windows 操作系统又可以工作于Unix 操作系统极大的方便了用户。

Python VTK 三维CT重建

在医学领域,CT扫描是一种非常常见的影像学检查方法,通过CT图像可以获取人体内部的三维结构信息。而VTK(Visualization Toolkit)是一种开源的可视化工具包,可以用于处理和呈现三维数据。本文将介绍如何使用Python和VTK对三维CT数据进行重建和可视化。

1. 安装VTK
首先需要安装VTK库,可以通过pip来安装:

pip install vtk

安装完成后,就可以开始使用VTK库来处理三维CT数据了。

2. 加载CT数据
在处理三维CT数据之前,我们首先需要加载CT数据。通常CT数据以DICOM格式保存,可以使用Pydicom库来读取DICOM文件。以下是一个示例代码:

import vtk
import pydicom

# 读取DICOM文件
ds = pydicom.dcmread('ct_data.dcm')

# 获取CT数据
image_data = vtk.vtkImageData()
image_data.SetDimensions(ds.Rows, ds.Columns, 1)
image_data.AllocateScalars(vtk.VTK_UNSIGNED_CHAR, 1)

for i in range(ds.Rows):
    for j in range(ds.Columns):
        pixel = ds.pixel_array[i][j]
        image_data.SetScalarComponentFromFloat(i, j, 0, 0, pixel)

3. 三维重建

# 创建等距体绘图器
volume_mapper = vtk.vtkFixedPointVolumeRayCastMapper()
volume_mapper.SetInputData(image_data)

# 创建颜色传递函数
color_func = vtk.vtkColorTransferFunction()
color_func.AddRGBPoint(0, 0.0, 0.0, 0.0)
color_func.AddRGBPoint(255, 1.0, 1.0, 1.0)

# 创建不透明度传递函数
opacity_func = vtk.vtkPiecewiseFunction()
opacity_func.AddPoint(0, 0.0)
opacity_func.AddPoint(255, 1.0)

# 创建体属性
volume_property = vtk.vtkVolumeProperty()
volume_property.SetColor(color_func)
volume_property.SetScalarOpacity(opacity_func)

# 创建体绘图
volume = vtk.vtkVolume()
volume.SetMapper(volume_mapper)
volume.SetProperty(volume_property)

# 创建渲染器
renderer = vtk.vtkRenderer()
renderer.AddVolume(volume)

# 创建渲染窗口
render_window = vtk.vtkRenderWindow()
render_window.AddRenderer(renderer)

# 创建交互器
interactor = vtk.vtkRenderWindowInteractor()
interactor.SetRenderWindow(render_window)

# 开始渲染
render_window.Render()
interactor.Start()

下载

官网地址:https://vtk.org/
GitHub地址:https://github.com/Kitware/VTK

编译和安装:

下载 VTK 源代码后,您需要按照 VTK 提供的文档和指南进行编译和安装。通常情况下,您需要使用 CMake 来配置和生成构建文件,然后使用您的编译工具(如 Visual Studio、Make、Xcode 等)来编译源代码并安装生成的库和可执行文件。
请注意,编译 VTK 可能需要一定的时间和系统配置,具体的步骤和要求可以在 VTK 的官方文档中找到。

DICOM医学影像Tag分类和说明

1. 前言:

基于DICOM3.0标准的医学图像中,每一张图像中都携带着许多的信息,这些信息主要可以分为Patient, Study, Series和Image四类。每一个DICOM Tag都是由两个十六进制数的组合来确定的,分别为Group和Element。如(0010,0010)这个Tag表示的是Patient’s Name,它存储着这张DICOM图像的患者姓名。

在研发关于医学影像软件时,必然需要对导入的DICOM图像进行文件解析,很重要的一部分工作就是需要从图像中获取它所储存的信息,然后在开发的软件中根据需要显示出来。一般医学影像软件在显示某一张影像时会有四角信息,或者当医生在调整窗宽窗位值时,需要软件实时显示此时的值。

基于C++的DCMTK和基于Java的dcm4che,都是非常优秀的解释DICOM标准的第三方库,通过在工程中引入它们可以避免软件开发人员去进行底层的解析工作,可为项目开发提高效率。

以下是归纳的常见的DICOM Tag标签,和它们的描述和值表现(VR)。

VR 含义 允许

字符

数据长度
CS – Code String


代码字符串


开头结尾可以有没有意义的空格的字符串,比如“CD123_4”


大写字母,0-9,空格以及下划线字符


最多 16 个字符


SH – Short String


短字符串


短字符串,比如:电话号码,ID等


最多 16 个字符


LO – Long String


长字符串


一个字符串,可能在开头、结尾填有空 格。比如“Introduction to DICOM”


最多 64 个字符


ST  – Short Text


短文本


可能包含一个或多个段落的字符串


最多 1024 个字符


LT  – Long Text


短文本


可能包含一个或多个锻炼的字符串,与LO相同,但可以更长


最多 10240 个字符


UT – Unlimited Text


无限制文本


包含一个或多个段落的字符串,与 LT类似


最多(2的32次方–2)个字符


AE – Application Entity


应用实体


标识一个设备的名称的字符串,开头和 结尾可以有无意义的字符。比如“MyPC01”


最多 16 个字符


PN – Person Name


病人姓名


有插入符号(^)作为姓名分隔符的病人姓名。比如“SMITH^JOHN” “Morrison- Jones^Susan^^^Ph.D, Chief Executive Officer”


最多 64 个字符


UI – Unique Identifier (UID)


唯一标识符


一个用作唯一标识各类项目的包含UID 的字符串。比如“1.2.840.10008.1.1”


0-9 和半角句号(.)


最多64 个字符


DA – Date


日期


格式为 YYYYMMDD 的字符串;YYYY代表年;MM 代表月;DD 代表日。比 如“20050822”表示 2005 年 8月 22 日


0-9


8个字符


TM – Time


时间


格式为 HHMMSS 的字符串。FRAC; HH 表示小时(范围“00”-“23”); MM 表示分钟(范围“00”-“59”); 而 FRAC 包含秒的小数部分,即百万分 之一秒。比如“183200.00” 表示下午 6:32


0-9 和半角句号(.)


最多 16 个字符


DT – Date Time


日期时间


格式为 YYYYMMDDHHMMSS. FFFFFF,串联的日期时间字符串。字符串的各部分从左至右是:年 YYYY;月 MM;日 DD;小时 HH;分钟MM;秒 SS;秒的小数 FFFFFF。比如 20050812183000.00”表示2005 年 8 月 12 日下午 18 点 30分 00 秒


0-9,加号,减号和半角句号


最多 26 个字符


AS – Age String


年龄字符串


符合以下格式的字符串:nnnD,nnnW, nnnM, nnnY;其中 nnn对于 D 来说表示天数,对于W来说表示周数,对于M 来说表示月数,对于Y 来说表示岁数。 比如“018M”表示他的年龄是 18 个月


0–9, D,W,M, Y


4 个字符


IS – Integer String


整型字符串


表示一个整型数字的字符串。比如“-1234567”


0-9,加号(+),减号(-)


最多 12 个字符


DS – Decimal String 小数字符串


表示定点小数和浮点小数。 比如“12345.67”,“-5.0e3”


0-9,加号(+),减号(-), 最多16 个字符E,e 和半角句号(.)


最多 16 个字符


SS – Signed Short


有符号短型


符号型二进制整数,长度 16 比特


2 个字符


US – Unsigned Short 无符号短型


无符号二进制整数,长度 16 比特


2 个字符


SL – Signed Long


有符号长型


有符号二进制整数


4 个字符


UL – Unsigned Long 无符号长型


无符号二进制整数,长度 32 比特


4 个字符


AT – Attribute Tag


属性标签


16 比特无符号整数的有序对,数据元素的标签


4 个字符


FL – Floating Single 单精度浮点


单精度二进制浮点数字


4 个字符


FD – Floating Point Double


双精度二进制浮点数字


双精度二进制浮点数字


8 个字符


OB – Other Byte String


其他字节字符串


字节的字符串(“其他”表示没有在VR中定义的内容)


OW – Other Word String


其他单词字符串


16 比特(2 字节)单词字符串


OF – Other Float String


其他浮点字符串


32 比特(4 个字节)浮点单词字符串


SQ – Sequence Items


条目序列


条目的序列


UN – Unknown


未知


字节的字符串,其中内容的编码方式是未知的


3. DICOM TAG分类和说明

Patient Tag


Group Element Tag Description 中文解释


VR
0010


0010


Patient’s Name 患者姓名


PN
0010


0020


Patient ID 患者ID


LO
0010


0030


Patient’s Birth Date 患者出生日期


DA
0010


0032


Patient’s Birth Time 患者出生时间


TM
0010


0040


Patient’s Sex 患者性别


CS
0010


1030


Patient’s Weight 患者体重


DS
0010


21C0


Pregnancy Status 怀孕状态


US


Study Tag


Group Element Tag Description 中文解释 VR
0008


0050


Accession Number:

A RIS generated number that identifies the order for the Study.

检查号:


RIS的生成序号,用以标识做检查的次序.


SH
0020


0010


Study ID


检查ID.


SH


0020


000D


Study Instance UID:


Unique identifier for the Study.


检查实例号:


唯一标记不同检查的号码.


UI


0008


0020


Study Date:

Date the Study started.

检查日期:


检查开始的日期.


DA
0008


0030


Study Time:

Time the Study started.

检查时间:


检查开始的时间.


TM
0008


0061


Modalities in Study 一个检查中含有的不同检查类型.


CS
0008


0015


Body Part Examined 检查的部位.


CS
0008


1030


Study Description 检查的描述.


LO
0010


1010


Patient’s Age 做检查时刻的患者年龄,而不是此刻患者的真实年龄.


AS


Series Tag

Group Element Tag Description 中文解释 VR
0020 0011 Series Number:

A number that identifies this Series.

序列号:

识别不同检查的号码.

IS
0020 000E Series Instance UID:

Unique identifier for the Series.

序列实例号:

唯一标记不同序列的号码.

UI
0008 0060 Modality 检查模态(MRI/CT/CR/DR) CS
0008 103E Series Description 检查描述和说明 LO
0008 0021 Series Date 检查日期 DA
0008 0031 Series Time 检查时间 TM
0020 0032 Image Position (Patient):

The x, y and z coordinates of the upper left hand corner of the image, in mm.

图像位置:

图像的左上角在空间坐标系中的x,y,z坐标,单位是毫米. 如果在检查中,则指该序列中第一张影像左上角的坐标.

DS
0020 0037 Image Orientation (Patient):

The direction cosines of the first row and the first column with respect to the patient.

图像方位: DS
0018 0050 Slice Thickness:

Nominal slice thickness, in mm.

层厚. DS
0018 0088 Spacing Between Slices 层与层之间的间距,单位为mm DS
0020 1041 Slice Location:

Relative position of exposure expressed in mm.

实际的相对位置,单位为mm. DS
0018 0023 MR Acquisition CS
0018 0015 Body Part Examined 身体部位. CS


Image Tag


Group Element Tag Description 中文解释


VR
0008


0008


Image Type:

Image identification characteristics.


CS
0008


0018


SOP Instance UID SOP实例UID.


0008


0023


Content Date:

The date the image pixel data creation started.

影像拍摄的日期.


DA
0008


0033


Content Time 影像拍摄的时间.


TM
0020


0013


Image/Instance Number:

A number that identifies this image.

图像码:


辨识图像的号码.


IS
0028


0002


Samples Per Pixel:

Number of samples (planes) in this image.

图像上的采样率.


US
0028


0004


Photometric Interpretation:

Specifies the intended interpretation of the pixel data.

光度计的解释,对于CT图像,用两个枚举值


MONOCHROME1,MONOCHROME2.


用来判断图像是否是彩色的,


MONOCHROME1/2是灰度图,


RGB则是真彩色图,还有其他.


CS
0028


0010


Rows: Number of rows in the image. 图像的总行数,行分辨率.


US
0028


0011


Columns: Number of columns in the image. 图像的总列数,列分辨率.


US
0028


0030


Pixel Spacing:

Physical distance in the patient between the center of each pixel.

像素间距.


像素中心之间的物理间距.


DS
0028


0100


Bits Allocated:

Number of bits allocated for each pixel sample. Each sample shall have the same number of bits allocated.

分配的位数:


存储每一个像素值时分配的位数,每一个样本应该拥有相同的这个值.


US
0028


0101


Bits Stored:

Number of bits stored for each pixel sample. Each sample shall have the same number of bits stored.

存储的位数:有12到16列举值.


存储每一个像素用的位数.每一个样本应该有相同值.


US
0028


0102


High Bit:

Most significant bit for pixel sample data. Each sample shall have the same high bit.

高位.


US
0028


0103


Pixel Representation:

Data representation of the pixel samples. Each sample shall have the same pixel representation.

Enum: 0000H=unsigned integer,

0001H=2’s complement.

像素数据的表现类型:


这是一个枚举值,分别为十六进制数0000和0001.


0000H = 无符号整数,


0001H = 2的补码.


US
0028


1050


Window Center 窗位.


DS
0028


1051


Window Width 窗宽.


DS
0028


1052


Rescale Intercept:

The value b in relationship between stored values (SV) and the output units.

Output units = m*SV + b.

Required if Modality LUT Sequence (0028, 0030) is not present.

截距:


如果表明不同模态的LUT颜色对应表不存在时,则使用方程


Units = m*SV + b,计算真实的像素值到呈现像素值。


其中这个值为表达式中的b。


DS
0028


1053


Rescale Slope:

m in the equation specified by Rescale Intercept (0028,1052).

Required if Rescale Intercept is present.

斜率.


这个值为表达式中的m。


DS
0028


1054


Rescale Type:

Specifies the output units of Rescale Slope (0028,1053) and Rescale Intercept (0028,1052).

Enum: US=Unspecified Requried if Photometric Interpretation is MONOCHROME2, and Bits Stored is greater than 1.

This specifies an identity Modality LUT transformation.

输出值的单位.


这是一个枚举值,


LO

1. 前言:


基于DICOM3.0标准的医学图像中,每一张图像中都携带着许多的信息,这些信息主要可以分为Patient, Study, Series和Image四类。每一个DICOM Tag都是由两个十六进制数的组合来确定的,分别为Group和Element。如(0010,0010)这个Tag表示的是Patient’s Name,它存储着这张DICOM图像的患者姓名。

在研发关于医学影像软件时,必然需要对导入的DICOM图像进行文件解析,很重要的一部分工作就是需要从图像中获取它所储存的信息,然后在开发的软件中根据需要显示出来。一般医学影像软件在显示某一张影像时会有四角信息,或者当医生在调整窗宽窗位值时,需要软件实时显示此时的值。

基于C++的DCMTK和基于Java的dcm4che,都是非常优秀的解释DICOM标准的第三方库,通过在工程中引入它们可以避免软件开发人员去进行底层的解析工作,可为项目开发提高效率。

以下是归纳的常见的DICOM Tag标签,和它们的描述和值表现(VR)。

2. VR


VR是DICOM标准中用来描述数据类型的,总共有27个值。简单分类如下:


VR 含义 允许

字符

数据长度
CS – Code String


代码字符串


开头结尾可以有没有意义的空格的字符串,比如“CD123_4”


大写字母,0-9,空格以及下划线字符


最多 16 个字符


SH – Short String


短字符串


短字符串,比如:电话号码,ID等


最多 16 个字符


LO – Long String


长字符串


一个字符串,可能在开头、结尾填有空 格。比如“Introduction to DICOM”


最多 64 个字符


ST  – Short Text


短文本


可能包含一个或多个段落的字符串


最多 1024 个字符


LT  – Long Text


短文本


可能包含一个或多个锻炼的字符串,与LO相同,但可以更长


最多 10240 个字符


UT – Unlimited Text


无限制文本


包含一个或多个段落的字符串,与 LT类似


最多(2的32次方–2)个字符


AE – Application Entity


应用实体


标识一个设备的名称的字符串,开头和 结尾可以有无意义的字符。比如“MyPC01”


最多 16 个字符


PN – Person Name


病人姓名


有插入符号(^)作为姓名分隔符的病人姓名。比如“SMITH^JOHN” “Morrison- Jones^Susan^^^Ph.D, Chief Executive Officer”


最多 64 个字符


UI – Unique Identifier (UID)


唯一标识符


一个用作唯一标识各类项目的包含UID 的字符串。比如“1.2.840.10008.1.1”


0-9 和半角句号(.)


最多64 个字符


DA – Date


日期


格式为 YYYYMMDD 的字符串;YYYY代表年;MM 代表月;DD 代表日。比 如“20050822”表示 2005 年 8月 22 日


0-9


8个字符


TM – Time


时间


格式为 HHMMSS 的字符串。FRAC; HH 表示小时(范围“00”-“23”); MM 表示分钟(范围“00”-“59”); 而 FRAC 包含秒的小数部分,即百万分 之一秒。比如“183200.00” 表示下午 6:32


0-9 和半角句号(.)


最多 16 个字符


DT – Date Time


日期时间


格式为 YYYYMMDDHHMMSS. FFFFFF,串联的日期时间字符串。字符串的各部分从左至右是:年 YYYY;月 MM;日 DD;小时 HH;分钟MM;秒 SS;秒的小数 FFFFFF。比如 20050812183000.00”表示2005 年 8 月 12 日下午 18 点 30分 00 秒


0-9,加号,减号和半角句号


最多 26 个字符


AS – Age String


年龄字符串


符合以下格式的字符串:nnnD,nnnW, nnnM, nnnY;其中 nnn对于 D 来说表示天数,对于W来说表示周数,对于M 来说表示月数,对于Y 来说表示岁数。 比如“018M”表示他的年龄是 18 个月


0–9, D,W,M, Y


4 个字符


IS – Integer String


整型字符串


表示一个整型数字的字符串。比如“-1234567”


0-9,加号(+),减号(-)


最多 12 个字符


DS – Decimal String 小数字符串


表示定点小数和浮点小数。 比如“12345.67”,“-5.0e3”


0-9,加号(+),减号(-), 最多16 个字符E,e 和半角句号(.)


最多 16 个字符


SS – Signed Short


有符号短型


符号型二进制整数,长度 16 比特


2 个字符


US – Unsigned Short 无符号短型


无符号二进制整数,长度 16 比特


2 个字符


SL – Signed Long


有符号长型


有符号二进制整数


4 个字符


UL – Unsigned Long 无符号长型


无符号二进制整数,长度 32 比特


4 个字符


AT – Attribute Tag


属性标签


16 比特无符号整数的有序对,数据元素的标签


4 个字符


FL – Floating Single 单精度浮点


单精度二进制浮点数字


4 个字符


FD – Floating Point Double


双精度二进制浮点数字


双精度二进制浮点数字


8 个字符


OB – Other Byte String


其他字节字符串


字节的字符串(“其他”表示没有在VR中定义的内容)


OW – Other Word String


其他单词字符串


16 比特(2 字节)单词字符串


OF – Other Float String


其他浮点字符串


32 比特(4 个字节)浮点单词字符串


SQ – Sequence Items


条目序列


条目的序列


UN – Unknown


未知


字节的字符串,其中内容的编码方式是未知的


3. DICOM TAG分类和说明

Patient Tag


Group Element Tag Description 中文解释


VR
0010


0010


Patient’s Name 患者姓名


PN
0010


0020


Patient ID 患者ID


LO
0010


0030


Patient’s Birth Date 患者出生日期


DA
0010


0032


Patient’s Birth Time 患者出生时间


TM
0010


0040


Patient’s Sex 患者性别


CS
0010


1030


Patient’s Weight 患者体重


DS
0010


21C0


Pregnancy Status 怀孕状态


US


Study Tag


Group Element Tag Description 中文解释 VR
0008


0050


Accession Number:

A RIS generated number that identifies the order for the Study.

检查号:


RIS的生成序号,用以标识做检查的次序.


SH
0020


0010


Study ID


检查ID.


SH


0020


000D


Study Instance UID:


Unique identifier for the Study.


检查实例号:


唯一标记不同检查的号码.


UI


0008


0020


Study Date:

Date the Study started.

检查日期:


检查开始的日期.


DA
0008


0030


Study Time:

Time the Study started.

检查时间:


检查开始的时间.


TM
0008


0061


Modalities in Study 一个检查中含有的不同检查类型.


CS
0008


0015


Body Part Examined 检查的部位.


CS
0008


1030


Study Description 检查的描述.


LO
0010


1010


Patient’s Age 做检查时刻的患者年龄,而不是此刻患者的真实年龄.


AS


Series Tag

Group Element Tag Description 中文解释 VR
0020 0011 Series Number:

A number that identifies this Series.

序列号:

识别不同检查的号码.

IS
0020 000E Series Instance UID:

Unique identifier for the Series.

序列实例号:

唯一标记不同序列的号码.

UI
0008 0060 Modality 检查模态(MRI/CT/CR/DR) CS
0008 103E Series Description 检查描述和说明 LO
0008 0021 Series Date 检查日期 DA
0008 0031 Series Time 检查时间 TM
0020 0032 Image Position (Patient):

The x, y and z coordinates of the upper left hand corner of the image, in mm.

图像位置:

图像的左上角在空间坐标系中的x,y,z坐标,单位是毫米. 如果在检查中,则指该序列中第一张影像左上角的坐标.

DS
0020 0037 Image Orientation (Patient):

The direction cosines of the first row and the first column with respect to the patient.

图像方位: DS
0018 0050 Slice Thickness:

Nominal slice thickness, in mm.

层厚. DS
0018 0088 Spacing Between Slices 层与层之间的间距,单位为mm DS
0020 1041 Slice Location:

Relative position of exposure expressed in mm.

实际的相对位置,单位为mm. DS
0018 0023 MR Acquisition CS
0018 0015 Body Part Examined 身体部位. CS


Image Tag


Group Element Tag Description 中文解释


VR
0008


0008


Image Type:

Image identification characteristics.


CS
0008


0018


SOP Instance UID SOP实例UID.


0008


0023


Content Date:

The date the image pixel data creation started.

影像拍摄的日期.


DA
0008


0033


Content Time 影像拍摄的时间.


TM
0020


0013


Image/Instance Number:

A number that identifies this image.

图像码:


辨识图像的号码.


IS
0028


0002


Samples Per Pixel:

Number of samples (planes) in this image.

图像上的采样率.


US
0028


0004


Photometric Interpretation:

Specifies the intended interpretation of the pixel data.

光度计的解释,对于CT图像,用两个枚举值


MONOCHROME1,MONOCHROME2.


用来判断图像是否是彩色的,


MONOCHROME1/2是灰度图,


RGB则是真彩色图,还有其他.


CS
0028


0010


Rows: Number of rows in the image. 图像的总行数,行分辨率.


US
0028


0011


Columns: Number of columns in the image. 图像的总列数,列分辨率.


US
0028


0030


Pixel Spacing:

Physical distance in the patient between the center of each pixel.

像素间距.


像素中心之间的物理间距.


DS
0028


0100


Bits Allocated:

Number of bits allocated for each pixel sample. Each sample shall have the same number of bits allocated.

分配的位数:


存储每一个像素值时分配的位数,每一个样本应该拥有相同的这个值.


US
0028


0101


Bits Stored:

Number of bits stored for each pixel sample. Each sample shall have the same number of bits stored.

存储的位数:有12到16列举值.


存储每一个像素用的位数.每一个样本应该有相同值.


US
0028


0102


High Bit:

Most significant bit for pixel sample data. Each sample shall have the same high bit.

高位.


US
0028


0103


Pixel Representation:

Data representation of the pixel samples. Each sample shall have the same pixel representation.

Enum: 0000H=unsigned integer,

0001H=2’s complement.

像素数据的表现类型:


这是一个枚举值,分别为十六进制数0000和0001.


0000H = 无符号整数,


0001H = 2的补码.


US
0028


1050


Window Center 窗位.


DS
0028


1051


Window Width 窗宽.


DS
0028


1052


Rescale Intercept:

The value b in relationship between stored values (SV) and the output units.

Output units = m*SV + b.

Required if Modality LUT Sequence (0028, 0030) is not present.

截距:


如果表明不同模态的LUT颜色对应表不存在时,则使用方程


Units = m*SV + b,计算真实的像素值到呈现像素值。


其中这个值为表达式中的b。


DS
0028


1053


Rescale Slope:

m in the equation specified by Rescale Intercept (0028,1052).

Required if Rescale Intercept is present.

斜率.


这个值为表达式中的m。


DS
0028


1054


Rescale Type:

Specifies the output units of Rescale Slope (0028,1053) and Rescale Intercept (0028,1052).

Enum: US=Unspecified Requried if Photometric Interpretation is MONOCHROME2, and Bits Stored is greater than 1.

This specifies an identity Modality LUT transformation.

输出值的单位.


这是一个枚举值,


LO


医学图像SimpleITK去噪增强算法

医学图像常见三种图像去噪算法。

1、均值滤波

均值滤波是典型的线性滤波算法,它是指在图像上对目标像素给一个模板,该模板包括了其周围的临近像素(以目标像素为中心的周围8个像素,构成一个滤波模板,即去掉目标像素本身),再用模板中的全体像素的平均值来代替原来像素值。均值滤波本身存在着固有的缺陷,即它不能很好地保护图像细节,在图像去噪的同时也破坏了图像的细节部分,从而使图像变得模糊,不能很好地去除噪声点。我们使用MeanImageFilter()函数来对图像进行平滑去噪。参数设置就是统计均值计算的半径大小,这里可以xyz方向上都一样的半径大小,也可以设置成不同的半径大小,在这里我们设置成5,就意味着是10x10x10区域里计算均值滤波的结果。

image = sitk.ReadImage("srcdicom.mha")
np_image = sitk.GetArrayFromImage(image)

# mean
sitk_mean = sitk.MeanImageFilter()
sitk_mean.SetRadius(5)
sitk_mean = sitk_mean.Execute(image)
sitk.WriteImage(sitk_mean, 'sitk_mean.mha')

2、中值滤波

中值滤波的原理很简答,对一副图像上的某一点作为中值滤波器,必须先将预求的像素及其邻点内的像素值排序,确定出中值,并将中值赋予该像素点,让周围的像素值接近的真实值,从而消除孤立的噪声点,中值滤波对消除椒盐噪声非常有效。我们使用MedianImageFilter()函数来对图像进行中值滤波去噪。参数设置就是统计中值计算的半径大小,这里可以xyz方向上都一样的半径大小,也可以设置成不同的半径大小,在这里我们设置成5,就意味着是10x10x10区域里计算中值滤波的结果。
# median
sitk_median = sitk.MedianImageFilter()
sitk_median.SetRadius(5)
sitk_median = sitk_median.Execute(image)
sitk.WriteImage(sitk_median, 'sitk_median.mha')

3、高斯滤波

高斯滤波是一种线性平滑滤波,适用于消除高斯噪声,广泛应用于图像处理的减噪过程。我们使用SmoothingRecursiveGaussianImageFilter()函数来对图像进行高斯滤波平滑去噪。参数设置就是高斯核参数Sigma大小,这里可以xyz方向上都一样的大小,也可以设置成不同的大小,还有一个参数设置是是否要对高斯进行尺度归一化。
# gassuian
sitk_gassuian = sitk.SmoothingRecursiveGaussianImageFilter()
sitk_gassuian.SetSigma(3.0)
sitk_gassuian.NormalizeAcrossScaleOff()  # 是否要归一化高斯
sitk_gassuian = sitk_gassuian.Execute(image)
sitk.WriteImage(sitk_gassuian, 'sitk_gassuian.mha')

医学图像常见图像增强算法。

1、对数变换图像对数变换首先将图像从SimpleITK图像数据转成Numpy矩阵数据,然后采用Numpy的log1p()函数来计算数据的log(1+x)变换,由于1+x不能小于零,因此这里我们使用图像减去图像的最小值来计算对数变换结果。
image = sitk.ReadImage("srcdicom.mha")
np_image = sitk.GetArrayFromImage(image)
# log transform
np_log_image = np.log1p(np_image - np.min(np_image))
log_image = sitk.GetImageFromArray(np_log_image)
log_image.SetOrigin(image.GetOrigin())
log_image.SetDirection(image.GetDirection())
log_image.SetSpacing(image.GetSpacing())
sitk.WriteImage(log_image, "log_image.mha")

2、幂次变换

图像对数变换首先将图像从SimpleITK图像数据转成Numpy矩阵数据,然后采用Numpy的power()函数来计算数据的幂次变换,为了防止出现计算值溢出错误,因此这里我们使用图像减去图像均值再除以图像方差来计算图像幂次变换结果,,在这里我们计算图像3次幂变换。

# power transform
np_image_clone1 = np_image.copy()
np_image_clone1 = (np_image_clone1 - np_image.mean()) / np_image.std()
np_power_image = np.power(np_image_clone1, 3)
power_image = sitk.GetImageFromArray(np_power_image)
power_image.SetOrigin(image.GetOrigin())
power_image.SetDirection(image.GetDirection())
power_image.SetSpacing(image.GetSpacing())
sitk.WriteImage(power_image, "power_image.mha")

3、指数变换

图像指数变换首先将图像从SimpleITK图像数据转成Numpy矩阵数据,然后采用Numpy的exp()函数来计算数据的指数变换,为了防止出现计算值溢出错误,因此这里我们使用图像减去图像均值再除以图像方差来计算图像指数变换结果。

# exp transform
np_image_clone = np_image.copy()
np_image_clone = (np_image_clone - np_image.mean()) / np_image.std()
np_exp_image = np.exp(np_image_clone)
exp_image = sitk.GetImageFromArray(np_exp_image)
exp_image.SetOrigin(image.GetOrigin())
exp_image.SetDirection(image.GetDirection())
exp_image.SetSpacing(image.GetSpacing())
sitk.WriteImage(exp_image, "exp_image.mha")

4、直方图均衡化

我们使用函数AdativeHistogramEqualizationImageFilter()函数来实现图像的直方图均衡化,这个类函数需要人为设置三个参数:Alpha,Beta,Radius,其中Alpha参数是用来控制结果相对于经典直方图均衡化方法结果的相似程度,Beta参数用来控制图像锐化程度,Radius用来控制直方图统计时的区域大小。

# Histogram equalization
sitk_hisequal = sitk.AdaptiveHistogramEqualizationImageFilter()
sitk_hisequal.SetAlpha(0.9)
sitk_hisequal.SetBeta(0.9)
sitk_hisequal.SetRadius(3)
sitk_hisequal = sitk_hisequal.Execute(image)
sitk.WriteImage(sitk_hisequal, "sitk_hisequal.mha")

5、拉普拉斯图像锐化

我们使用LaplacianSharpeningImageFilter()函数来对图像进行拉普拉斯锐化。参数设置也比较简单,是否使用输入图像的Spacing来进行计算,在这里我们为了保持一致性,设置使用输入图像的Spacing。

# laplace sharpen
sitk_laplaciansharp = sitk.LaplacianSharpeningImageFilter()
sitk_laplaciansharp.UseImageSpacingOn()
sitk_laplaciansharp = sitk_laplaciansharp.Execute(image)
sitk.WriteImage(sitk_laplaciansharp, "sitk_laplaciansharp.mha")

ImageFilter类中预定义了如下滤波方法:

• BLUR:模糊滤波

• CONTOUR:轮廓滤波

• DETAIL:细节滤波

• EDGE_ENHANCE:边界增强滤波

• EDGE_ENHANCE_MORE:边界增强滤波(程度更深)

• EMBOSS:浮雕滤波

• FIND_EDGES:寻找边界滤波

• SMOOTH:平滑滤波

• SMOOTH_MORE:平滑滤波(程度更深)

• SHARPEN:锐化滤波

• GaussianBlur(radius=2):高斯模糊

>radius指定平滑半径。

• UnsharpMask(radius=2, percent=150, threshold=3):反锐化掩码滤波

>radius指定模糊半径;

>percent指定反锐化强度(百分比);

>threshold控制被锐化的最小亮度变化。

• Kernel(size, kernel, scale=None, offset=0):核滤波

当前版本只支持核大小为3×3和5×5的核大小,且图像格式为“L”和“RGB”的图像。

>size指定核大小(width, height);

>kernel指定核权值的序列;

>scale指定缩放因子;

>offset指定偏移量,如果使用,则将该值加到缩放后的结果上。

• RankFilter(size, rank):排序滤波

>size指定滤波核的大小;

>rank指定选取排在第rank位的像素,若大小为0,则为最小值滤波;若大小为size * size / 2则为中值滤波;若大小为size * size – 1则为最大值滤波。

• MedianFilter(size=3):中值滤波

>size指定核的大小

• MinFilter(size=3):最小值滤波器

>size指定核的大小

• MaxFilter(size=3):最大值滤波器

>size指定核的大小

• ModeFilter(size=3):波形滤波器

选取核内出现频次最高的像素值作为该点像素值,仅出现一次或两次的像素将被忽略,若没有像素出现两次以上,则保留原像素值。

LaTeX各种符号

arcsinfrac{L}{r}

根据左侧文章目录,快速定位想要的符号

声调

语法 效果 语法 效果 语法 效果
bar{x} bar{x} acute{eta} acute{eta} check{alpha} check{alpha}
grave{eta} grave{eta} breve{a} breve{a} ddot{y} ddot{y}
dot{x} dot{x} hat{alpha} hat{alpha} tilde{iota} tilde{iota}

函数

语法 效果 语法 效果
sintheta sin!theta costheta cos!theta
arcsinfrac{L}{r} arcsinfrac{L}{r} arccosfrac{T}{r} arccosfrac{T}{r}
sinh g sinh!g cosh h cosh!h
operatorname{sh}j operatorname{sh}j operatorname{argsh}k operatorname{argsh}k
operatorname{argch}l operatorname{argch}l operatorname{th}i operatorname{th}i
k’(x)=lim_{Delta xto 0}frac{k(x)-k(x-Delta x)}{Deltax} k'(x)=lim_{Delta xto0}!frac{k(x)-k(x-Delta x)}{Delta x} limsup S limsup S
max H max!H min L min!L
sup t sup t exp!t exp!t
lg X lg!X log X log!X
ker x ker x deg x deg!x
Pr x Pr x det x det!x
arg x arg x dim x dim x
tantheta tan!theta arctanfrac{L}{T} arctanfrac{L}{T}
tanh i tanh!i operatorname{ch}h operatorname{ch}h
operatorname{argth}m operatorname{argth}m liminf I liminf I
inf s inf s ln X ln!X
log_alpha X log_alpha!X gcd(T,U,V,W,X) !gcd(T,U,V,W,X)
hom x hom x lim_{tto n}T lim_{tto n}T

同余

语法 效果 语法 效果
pmod{m} pmod{m} a bmod b a bmod b

微分

语法 效果 语法 效果 语法 效果
nabla nabla partial x partial x mathrm{d}x mathrm{d}x
dot x dot x ddot y ddot y

集合

语法 效果 语法 效果 语法 效果 语法 效果 语法 效果
forall forall exists exists empty empty emptyset emptyset varnothing varnothing
in in ni ni notin notin notin notin subset subset
subseteq subseteq supset supset supseteq supseteq cap cap bigcap bigcap
cup cup bigcup bigcup biguplus biguplus sqsubset sqsubset sqsubseteq sqsubseteq
sqsupset sqsupset sqsupseteq sqsupseteq sqcap sqcap sqcup sqcup bigsqcup bigsqcup

逻辑

语法 效果 语法 效果 语法 效果 语法 效果
p p land land wedge wedge bigwedge bigwedge
bar{q} to p pagecolor{White} bar{q} to p lor lor vee vee bigvee bigvee
lnot lnot neg q pagecolor{White} neg q setminus setminus smallsetminus pagecolor{White} smallsetminus

根号

语法 效果 语法 效果
sqrt{3} sqrt{3} sqrt[n]{3} pagecolor{White}sqrt[n]{3}

关系符号

语法 效果
Delta ABCsimDelta XYZ Delta ABCsimDelta XYZ!
sqrt{3}approx1.732050808ldots sqrt{3}approx1.732050808ldots
simeq simeq
cong cong
dot= dot=
ggg ggg
gg gg
> >,
ge ge
geqq geqq
= =,
leq leq
leqq leqq
< <,
ll ll
lll lll
(x-y)^2equiv(-x+y)^2equiv x^2-2xy+y^2 (x-y)^2equiv(-x+y)^2equiv x^2-2xy+y^2
xnotequiv N xnotequiv N
xne A xne A
xneq C xneq C
tpropto v tpropto v
pm pm
mp mp

因为所以

begin{align}

because
begin{cases}
acute{a}x^2+bx^2+cgtrless0gtrlessgrave{a}x^2+bx^2+c
acute{a}>0>grave{a}
end{cases}

therefore
frac{-bpmsqrt{b^2-4acute{a}c}}{2acute{a}}{}_lessgtr^gtrlessx_lessgtr^gtrlessfrac{-bpmsqrt{b^2-4grave{a}c}}{2grave{a}}

end{align}

LaTeX各种符号

几何符号

特征 语法 效果
菱形 Diamond Diamond
正方形 Box Box
三角形 Delta Delta Delta!
图型 triangle triangle
角名 angleAlphaBetaGamma angleAlphaBetaGamma
角度 sin!frac{pi}{3}=sin60^operatorname{omicron}=frac{sqrt{3}}{2} sin!frac{pi}{3}=sin60^operatorname{omicron}=frac{sqrt{3}}{2}
垂直 perp perp

箭头符号

语法 效果 语法 效果 语法 效果
leftarrow leftarrow gets gets rightarrow rightarrow
to to leftrightarrow leftrightarrow longleftarrow longleftarrow
longrightarrow longrightarrow mapsto mapsto longmapsto longmapsto
hookrightarrow hookrightarrow hookleftarrow hookleftarrow nearrow nearrow
searrow searrow swarrow swarrow nwarrow nwarrow
uparrow uparrow downarrow downarrow updownarrow updownarrow
语法 效果 语法 效果 语法 效果 语法 效果
rightharpoonup rightharpoonup rightharpoondown rightharpoondown leftharpoonup leftharpoonup leftharpoondown leftharpoondown
upharpoonleft upharpoonleft upharpoonright upharpoonright downharpoonleft downharpoonleft downharpoonright downharpoonright
语法 效果 语法 效果 语法 效果
Leftarrow Leftarrow Rightarrow Rightarrow Leftrightarrow Leftrightarrow
Longleftarrow Longleftarrow Longrightarrow Longrightarrow Longleftrightarrow (or iff) Longleftrightarrow
Uparrow Uparrow Downarrow Downarrow Updownarrow Updownarrow

特殊符号

语法 效果 语法 效果 语法 效果 语法 效果 语法 效果 语法 效果
eth eth S S P P % % dagger dagger ddagger ddagger
star star * * ldots ldots smile smile frown frown wr wr
语法 效果 语法 效果 语法 效果
oplus oplus bigoplus bigoplus otimes otimes
bigotimes bigotimes times times cdot cdot
div div circ circ bullet bullet
bigodot bigodot boxtimes boxtimes boxplus boxplus
语法 效果 语法 效果 语法 效果 语法 效果
triangleleft triangleleft triangleright triangleright infty infty bot bot
top top vdash vdash vDash vDash Vdash Vdash
models models lVert lVert rVert rVert
语法 效果 语法 效果 语法 效果
imath imath hbar hbar ell ell
mho mho Finv Finv Re Re
Im Im wp wp complement complement
语法 效果 语法 效果 语法 效果 语法 效果
diamondsuit diamondsuit heartsuit heartsuit clubsuit clubsuit spadesuit spadesuit
Game Game flat flat natural natural sharp sharp

分数、矩阵和多行列式

LaTeX各种符号

上标、下标及积分等

功能 语法 效果
上标 a^2 pagecolor{White} a^2
下标 a_2 pagecolor{White} a_2
组合 a^{2+2} pagecolor{White} a^{2+2}
a_{i,j} pagecolor{White} a_{i,j}
结合上下标 x_2^3 pagecolor{White} x_2^3
前置上下标 {}_1^2!X_3^4 pagecolor{White} {}_1^2!X_3^4
导数HTML x' pagecolor{White} x'
导数(PNG x^prime pagecolor{White} x^prime
导数(错误 xprime pagecolor{White} xprime
导数点 dot{x} pagecolor{White} dot{x}
ddot{y} pagecolor{White} ddot{y}
向量 vec{c} pagecolor{White} vec{c}
overleftarrow{a b} pagecolor{White} overleftarrow{a b}
overrightarrow{c d} pagecolor{White} overrightarrow{c d}
widehat{e f g} pagecolor{White} widehat{e f g}
上弧(注: 正确应该用 overarc, 但在这里行不通。要用建议的语法作为解决办法) overset{frown} {AB} pagecolor{White} overset{frown} {AB}
上划线 overline{h i j} pagecolor{White} overline{h i j}
下划线 underline{k l m} pagecolor{White} underline{k l m}
上括号 overbrace{1+2+cdots+100} pagecolor{White} overbrace{1+2+cdots+100}
begin{matrix} 5050 overbrace{ 1+2+cdots+100 }end{matrix} pagecolor{White} begin{matrix} 5050 overbrace{ 1+2+cdots+100 } end{matrix}
下括号 underbrace{a+b+cdots+z} pagecolor{White} underbrace{a+b+cdots+z}
begin{matrix} underbrace{ a+b+cdots+z } 26end{matrix} pagecolor{White} begin{matrix} underbrace{ a+b+cdots+z } 26 end{matrix}
求和 sum_{k=1}^N k^2 pagecolor{White} sum_{k=1}^N k^2
begin{matrix} sum_{k=1}^N k^2 end{matrix} pagecolor{White} begin{matrix} sum_{k=1}^N k^2 end{matrix}
求积 prod_{i=1}^N x_i pagecolor{White} prod_{i=1}^N x_i
begin{matrix} prod_{i=1}^N x_i end{matrix} pagecolor{White} begin{matrix} prod_{i=1}^N x_i end{matrix}
上积 coprod_{i=1}^N x_i pagecolor{White} coprod_{i=1}^N x_i
begin{matrix} coprod_{i=1}^N x_iend{matrix} pagecolor{White} begin{matrix} coprod_{i=1}^N x_i end{matrix}
极限 lim_{n to infty}x_n pagecolor{White} lim_{n to infty}x_n
begin{matrix} lim_{n to infty}x_nend{matrix} pagecolor{White} begin{matrix} lim_{n to infty}x_n end{matrix}
积分 int_{-N}^{N} e^x, dx pagecolor{White} int_{-N}^{N} e^x, dx
begin{matrix} int_{-N}^{N} e^x, dxend{matrix} pagecolor{White} begin{matrix} int_{-N}^{N} e^x, dx end{matrix}
双重积分 iint_{D}^{W} , dx,dy pagecolor{White} iint_{D}^{W} , dx,dy
三重积分 iiint_{E}^{V} , dx,dy,dz pagecolor{White} iiint_{E}^{V} , dx,dy,dz
四重积分 iiiint_{F}^{U} , dx,dy,dz,dt pagecolor{White} iiiint_{F}^{U} , dx,dy,dz,dt
闭合的曲线、曲面积分 oint_{C} x^3, dx + 4y^2, dy pagecolor{White} oint_{C} x^3, dx + 4y^2, dy
交集 bigcap_1^{n} p pagecolor{White} bigcap_1^{n} p
并集 bigcup_1^{k} p pagecolor{White} bigcup_1^{k} p

字体

希腊字母

斜体小写希腊字母一般用于在方程中显示变量。

正体希腊字母
特征 语法 效果 注释/外部链接
大写字母 Alpha Beta Gamma Delta Epsilon Zeta EtaTheta AlphaBetaGammaDeltaEpsilonZetaEtaTheta! ΑΒ Γ ΔΕ Ζ ΗΘ
Iota Kappa Lambda Mu Nu Xi Omicron Pi IotaKappaLambdaMuNuXiOmicronPi! ΙΚ Λ ΜΝ Ξ ΟΠ
Rho Sigma Tau Upsilon Phi Chi PsiOmega RhoSigmaTauUpsilonPhiChiPsiOmega! ΡΣ Τ ΥΦ Χ ΨΩ
小写字母 alpha beta gamma delta epsilon zeta etatheta alphabetagammadeltaepsilonzetaetatheta!
iota kappavarkappa lambda mu nu xi omicronpi iotakappavarkappalambdamunuxiomicronpi!
rho sigma tau upsilon phi chi psiomega rhosigmatauupsilonphichipsiomega!
异体字母 Epsilonepsilonvarepsilon Epsilonepsilonvarepsilon
Thetathetavartheta Thetathetavartheta
Kappakappavarkappa Kappakappavarkappa
Pipivarpi Pipivarpi
Rhorhovarrho Rhorhovarrho
Sigmasigmavarsigma Sigmasigmavarsigma
Phiphivarphi Phiphivarphi,
已停用字母 digamma digamma Ϝ[1]
粗体希腊字母
特征 语法 效果
大写字母 boldsymbol{Alpha Beta Gamma Delta Epsilon ZetaEta Theta} boldsymbol{AlphaBetaGammaDeltaEpsilonZetaEtaTheta}
boldsymbol{Iota Kappa Lambda Mu Nu Xi OmicronPi} boldsymbol{IotaKappaLambdaMuNuXiOmicronPi}
boldsymbol{Rho Sigma Tau Upsilon Phi Chi PsiOmega} boldsymbol{RhoSigmaTauUpsilonPhiChiPsiOmega}
小写字母 boldsymbol{alpha beta gamma delta epsilon zetaeta theta} boldsymbol{alphabetagammadeltaepsilonzetaetatheta}
boldsymbol{iota kappa lambda mu nu xi omicronpi} boldsymbol{iotakappalambdamunuxiomicronpi}
boldsymbol{rho sigma tau upsilon phi chi psiomega} boldsymbol{rhosigmatauupsilonphichipsiomega}
异体字母 boldsymbol{Epsilonepsilonvarepsilon} boldsymbol{Epsilonepsilonvarepsilon}
boldsymbol{Thetathetavartheta} boldsymbol{Thetathetavartheta}
boldsymbol{Kappakappavarkappa} boldsymbol{Kappakappavarkappa}
boldsymbol{Pipivarpi} boldsymbol{Pipivarpi}
boldsymbol{Rhorhovarrho} boldsymbol{Rhorhovarrho}
boldsymbol{Sigmasigmavarsigma} boldsymbol{Sigmasigmavarsigma}
boldsymbol{Phiphivarphi} boldsymbol{Phiphivarphi}
已停用字母 boldsymbol{digamma}

黑板粗体

  • 语法mathbb{ABCDEFGHIJKLMNOPQRSTUVWXYZ}
  • 效果pagecolor{White}mathbb{ABCDEFGHIJKLMNOPQRSTUVWXYZ}

黑板粗体(Blackboardbold)一般用于表示数学和物理学中的向量或集合的符号。 备注:

  1. { ,花括号} ,中只有使用大写拉丁字母才能正常显示,使用小写字母或数字会得到其他符号。

正粗体

  • 语法mathbf{012…abc…ABC…}
  • 效果pagecolor{White}mathbf{0 1 2 3 4 5 6 7 8 9}pagecolor{White}mathbf{A B C D E F G H I J K L M N O P Q R S T U V W X Y Z}
  • 备注花括号{}内只能使用拉丁字母和数字,不能使用希腊字母如alpha等。斜粗体
  • 语法boldsymbol{012…abc…ABC…alpha betagamma…}
  • 效果pagecolor{White}boldsymbol{0 1 2 3 4 5 6 7 8 9}pagecolor{White}boldsymbol{a b c d e f g h i j k l m n o p q r s t u v w x y z}pagecolor{White}boldsymbol{A B C D E F G H I J K L M N O P Q R S T U V W X Y Z}pagecolor{White}boldsymbol{alpha beta gamma delta epsilon zeta eta theta iota kappa lambda mu nu xi o pi rho sigma tau upsilon phi chi psi omega}
  • 备注使用boldsymbol{}可以加粗所有合法的符号。

斜体数字

  • 语法mathit{0123456789}
  • 效果mathit{0123456789}!

罗马体

  • 语法mathrm{012…abc…ABC…}或mbox{}或operatorname{}
  • 效果mathrm{0123456789} mathrm{ABCDEFGHIJKLMNOPQRSTUVWXYZ} mathrm{abcdefghijklmnopqrstuvwxyz}
  • 备注罗马体可以使用数字和拉丁字母。

哥特体

  • 语法mathfrak{012…abc…ABC…}
  • 效果pagecolor{White} mathfrak{0 1 2 3 4 5 6 7 8 9}pagecolor{White} mathfrak{a b c d e f g h i j k l m n o p q r s t u v w x y z}pagecolor{White} mathfrak{A B C D E F G H I J K L M N O P Q R S T U V W X Y Z}
  • 备注哥特体可以使用数字和拉丁字母。

手写体

  • 语法mathcal{ABC…}
  • 效果mathcal{ABCDEFGHIJKLMNOPSTUVWXYZ}
  • 备注手写体仅对大写拉丁字母有效。

希伯来字母

  • 语法alephbethgimeldaleth
  • 效果alephbethgimeldaleth

括号

功能 语法 显示
不好看 ( frac{1}{2} ) ( frac{1}{2} )
好看了 left( frac{1}{2} right) left ( frac{1}{2} right )

您可以使用 left 和 right 来显示不同的括号:
LaTeX各种符号

备注:

  • 可以使用 big, Big, bigg, Bigg 控制括号的大小,比如代码
​Bigg ( bigg [ Big {biglangle left | | frac{a}{b} | right | big rangleBig}bigg ] Bigg )

显示︰

Bigg ( bigg [ Big {biglangle left | | frac{a}{b} | right | big rangleBig}bigg ] Bigg ) 

空格

注意TEX能够自动处理大多数的空格,但是您有时候需要自己来控制。

功能 语法 显示 宽度
2个quad空格 alphaqquadbeta alphaqquadbeta 2m
quad空格 alphaquadbeta alphaquadbeta m
大空格 alpha beta alpha beta frac{m}{3}
中等空格 alpha;beta alpha;beta frac{2m}{7}
小空格 alpha,beta alpha,beta frac{m}{6}
没有空格 alphabeta alphabeta 0
紧贴 alpha!beta alpha!beta -frac{m}{6}

颜色

  • 语法
    • 字体颜色︰{color{色调}表达式}
    • 背景颜色︰{pagecolor{色调}表达式}
  • 支持色调表
color{Apricot}text{Apricot} color{Aquamarine}text{Aquamarine} color{Bittersweet}text{Bittersweet} color{Black}text{Black}
color{Blue}text{Blue} color{BlueGreen}text{BlueGreen} color{BlueViolet}text{BlueViolet} color{BrickRed}text{BrickRed}
color{Brown}text{Brown} color{BurntOrange}text{BurntOrange} color{CadetBlue}text{CadetBlue} color{CarnationPink}text{CarnationPink}
color{Cerulean}text{Cerulean} color{CornflowerBlue}text{CornflowerBlue} color{Cyan}text{Cyan} color{Dandelion}text{Dandelion}
color{DarkOrchid}text{DarkOrchid} color{Emerald}text{Emerald} color{ForestGreen}text{ForestGreen} color{Fuchsia}text{Fuchsia}
color{Goldenrod}text{Goldenrod} color{Gray}text{Gray} color{Green}text{Green} pagecolor{Gray}color{GreenYellow}text{GreenYellow}
color{JungleGreen}text{JungleGreen} color{Lavender}text{Lavender} color{LimeGreen}text{LimeGreen} color{Magenta}text{Magenta}
color{Mahogany}text{Mahogany} color{Maroon}text{Maroon} color{Melon}text{Melon} color{MidnightBlue}text{MidnightBlue}
color{Mulberry}text{Mulberry} color{NavyBlue}text{NavyBlue} color{OliveGreen}text{OliveGreen} color{Orange}text{Orange}
color{OrangeRed}text{OrangeRed} color{Orchid}text{Orchid} color{Peach}text{Peach} color{Periwinkle}text{Periwinkle}
color{PineGreen}text{PineGreen} color{Plum}text{Plum} color{ProcessBlue}text{ProcessBlue} color{Purple}text{Purple}
color{RawSienna}text{RawSienna} color{Red}text{Red} color{RedOrange}text{RedOrange} color{RedViolet}text{RedViolet}
color{Rhodamine}text{Rhodamine} color{RoyalBlue}text{RoyalBlue} color{RoyalPurple}text{RoyalPurple} color{RubineRed}text{RubineRed}
color{Salmon}text{Salmon} color{SeaGreen}text{SeaGreen} color{Sepia}text{Sepia} color{SkyBlue}text{SkyBlue}
pagecolor{Gray}color{SpringGreen}text{SpringGreen} color{Tan}text{Tan} color{TealBlue}text{TealBlue} color{Thistle}text{Thistle}
color{Turquoise}text{Turquoise} color{Violet}text{Violet} color{VioletRed}text{VioletRed} pagecolor{Black}color{White}text{White}
color{WildStrawberry}text{WildStrawberry} pagecolor{Gray}color{Yellow}text{Yellow} color{YellowGreen}text{YellowGreen} color{YellowOrange}text{YellowOrange}

*注︰输入时第一个字母必需以大写输入,如color{OliveGreen}

  • 例子
 {color{Blue}x^2}+{color{Brown}2x} -{color{OliveGreen}1}
   $${color{Blue}x^2}+{color{Brown}2x} -{color{OliveGreen}1}$$

- ```latex
     x_{color{Maroon}1,2}=frac{-bpmsqrt{{color{Maroon}b^2-4ac}}}{2a}
    $$x_{color{Maroon}1,2}=frac{-bpmsqrt{{color{Maroon}b^2-4ac}}}{2a}$$

颜色小型数学公式

当要把分数等公式放进文字中的时候,我们需要使用小型的数学公式。

  • 苹果原产于欧洲和中亚细亚。哈萨克的阿拉木图与新疆阿力麻里有苹果城的美誉。中国古代的林檎、柰、花红等水果被认为是中国土生苹果品种或与苹果相似的水果。苹果在中国的栽培记录可以追溯至西汉时期,汉武帝时,10的f(x)=5+frac{1}{5}是2。上林苑中曾栽培林檎和柰,当时多用于薰香衣裳等,亦有置于床头当香熏或置于衣服初作为香囊,总之一般不食用。但也有看法认为,林檎和柰是现在的沙果,曾被误认为苹果,真正意义上的苹果是元朝时期从中亚地区传入中国,当时只有在宫廷才可享用。✗并不好看。
  • 苹果原产于欧洲和中亚细亚。哈萨克的阿拉木图与新疆阿力麻里有苹果城的美誉。中国古代的林檎、柰、花红等水果被认为是中国土生苹果品种或与苹果相似的水果。苹果在中国的栽培记录可以追溯至西汉时期,汉武帝时,10的begin{smallmatrix} f(x)=5+frac{1}{5} end{smallmatrix} 是2。上林苑中曾栽培林檎和柰,当时多用于薰香衣裳等,亦有置于床头当香熏或置于衣服初作为香囊,总之一般不食用。但也有看法认为,林檎和柰是现在的沙果,曾被误认为苹果,真正意义上的苹果是元朝时期从中亚地区传入中国,当时只有在宫廷才可享用。LaTeX各种符号好看些了。

可以使用

begin{smallmatrix}...end{smallmatrix}

或直接使用 模板。

{{Smallmath|f=  f(x)=5+frac{1}{5} }}

强制使用PNG

假设我们现在需要一个PNG图的数学公式。

  1. 若输入 2x=1 的话:

LaTeX各种符号

这并不是我们想要的。

  1. 若你需要强制输出一个PNG图的数学公式的话,你可于公式的最后加上 , (小空格,但于公式的最后是不会显示出来)。若输入 2x=1 ,的话:2x=1,
    2𝑥=1,
     

    是以PNG图输出的。你也可以使用 ,!,这个亦能强制使用PNG图像。

clamav linux杀毒工具 开源centos ubuntu linux server系统杀毒工具

ClamAV 杀毒是Linux平台最受欢迎的杀毒软件,ClamAV属于免费开源产品,支持多种平台,如:Linux/Unix、MAC OS X、Windows、OpenVMS。ClamAV是基于病毒扫描的命令行工具,但同时也有支持图形界面的ClamTK工具。ClamAV主要用于邮件服务器扫描邮件。它有多种接口从邮件服务器扫描邮件,支持文件格式有如:ZIP、RAR、TAR、GZIP、BZIP2、HTML、DOC、PDF,、SIS CHM、RTF等等。ClamAV有自动的数据库更新器,还可以从共享库中运行。命令行的界面让ClamAV运行流畅。

clamav的官方网站是 http://www.clamav.net, 可以从

http://www.clamav.net/downloads

常用命令

# 扫描全盘
clamscan -r --bell -i /

# 扫描单个文件
clamscan /path/to/your/file

# 扫描整个目录
clamscan -r /path/to/directory

# 自动删除检测到的病毒
clamscan --remove -r /path/to/directory

# 为扫描结果生成报告
clamscan -r /path/to/directory > scanreport.txt

# 在扫描时显示病毒被发现的信息
clamscan -r --bell -i /path/to/directory

一、centos7系统安装clamav

1.yum安装

[root@server ~]# yum install epel-release
[root@server ~]# yum -y install clamav clamav-milter

ubuntu 安装

###############################################
ubuntu 20.04
安装
# 一、更新数据源列表
apt-get update

# 二、安装clamav
apt install -y clamav
安装守护进程
apt-get install clamav-daemon


# freshclam 自动运行,有守护进程,不需要手动更新病毒库
# 更新病毒库(可忽略此步骤)
 freshclam

# 三、扫描
clamscan -r /etc --max-dir-recursion=5 -l /root/etcclamav.log

# -r:迭代目录
# -l:指定日志路径
# --max-dir-recursion:指定目录深度

# 扫描结果
----------- SCAN SUMMARY -----------
Known viruses: 8667807
Engine version: 0.103.8
Scanned directories: 209
Scanned files: 755
Infected files: 0
Data scanned: 4.01 MB
Data read: 1.76 MB (ratio 2.28:1)
Time: 34.203 sec (0 m 34 s)
Start Date: 2023:06:01 09:57:56
End Date:   2023:06:01 09:58:31

# 扫描结果 百度翻译
-----------扫描摘要-----------
已知病毒:8667807
发动机版本:0.103.8
扫描目录:209
扫描文件:755
受感染的文件:0
扫描数据:4.01 MB
数据读取:1.76 MB(比率2.28:1)
时间:34.203秒(0米34秒)
开始日期:2023:06:01 09:57:56
结束日期:2023:06:01 09:58:31


# 没有病毒,如果有病毒可以看一下日志

 Ubuntu Linux平台安装方法如下:

        sudo  apt  update

        sudo  apt  install  clamav  

        安装完成后,首次使用需要手动更新病毒库。手动更新病毒库之前,需要将停止clamav守护进程,否则会报错,无法更新病毒库。需要输入以下命令:

        sudo  service  clamav-freshclam  stop      #停止守护进程

        然后,手动更新病毒库,输入以下命令:

        sudo  freshclam

        首次,更新病毒库需要较长时间。更新完毕后,需要重启守护进程,使系统以后自动更新病毒库。输入以下命令:          

        sudo  service  clamav-freshclam  restart

        完成更新病毒库后,就可以采用clamav扫描某个目录,检测病毒了。

2、更新病毒库

clamav安装好后,不能马上使用,需要先更新一下病毒特征库,不然会有告警信息。更新病毒库方法如下:

[root@master ~]# freshclam

保证服务器可以上网,才能下载到病毒库。

(base) ai@ai-MS-7E06:~$ sudo systemctl stop clamav-freshclam
(base) ai@ai-MS-7E06:~$ sudo freshclam
Sun Feb 25 16:00:38 2024 -> ClamAV update process started at Sun Feb 25 16:00:38 2024
Sun Feb 25 16:00:38 2024 -> daily database available for download (remote version: 27195)
Time:  1m 03s, ETA:    0.0s [========================>]   59.97MiB/59.97MiB
Sun Feb 25 16:01:42 2024 -> Testing database: '/var/lib/clamav/tmp.06498b25df/clamav-da578704808f28f8419e2536e3f36aaa.tmp-daily.cvd' ...
Sun Feb 25 16:01:45 2024 -> Database test passed.
Sun Feb 25 16:01:45 2024 -> daily.cvd updated (version: 27195, sigs: 2054013, f-level: 90, builder: raynman)
Sun Feb 25 16:01:45 2024 -> main database available for download (remote version: 62)
Time: 15m 49s, ETA:    0.0s [========================>]  162.58MiB/162.58MiB
Sun Feb 25 16:17:37 2024 -> Testing database: '/var/lib/clamav/tmp.06498b25df/clamav-f25aa8ac58aeec71babb5f49ef3d3371.tmp-main.cvd' ...
Sun Feb 25 16:17:40 2024 -> Database test passed.
Sun Feb 25 16:17:40 2024 -> main.cvd updated (version: 62, sigs: 6647427, f-level: 90, builder: sigmgr)
Sun Feb 25 16:17:40 2024 -> bytecode database available for download (remote version: 334)
Time:    3.7s, ETA:    0.0s [========================>]  285.12KiB/285.12KiB
Sun Feb 25 16:17:43 2024 -> Testing database: '/var/lib/clamav/tmp.06498b25df/clamav-e7dee435a333f1be4e9c39c653831a62.tmp-bytecode.cvd' ...
Sun Feb 25 16:17:43 2024 -> Database test passed.
Sun Feb 25 16:17:43 2024 -> bytecode.cvd updated (version: 334, sigs: 91, f-level: 90, builder: anvilleg)
Sun Feb 25 16:17:43 2024 -> !NotifyClamd: Can't find or parse configuration file /etc/clamav/clamd.conf

3、clamav的命令行使用

clamav有两个命令,分别是clamdscan和clamscan,其中,clamdscan命令一般用yum安装才有,需要启动clamd服务才能使用,执行速度较快;而clamscan命令通用,不依赖服务,命令参数较多,执行速度稍慢。推荐使用clamscan。

执行下面命令 可获得使用帮助信息

clamscan -h

clamscan常用的几个参数含义如下:

>  -r/--recursive[=yes/no] 所有文件
>  --log=FILE/-l FILE  增加扫描报告
>  # clamscan -l /var/log/clamscan.log /
>  --move [路径] 移动病毒文件至..
>  --remove [路径] 删除病毒文件
>  --quiet  只输出错误消息
>  --infected/-i 只输出感染文件
>  --suppress-ok-results/-o 跳过扫描OK的文件
>  --bell   扫描到病毒文件发出警报声音
>  --unzip(unrar) 解压压缩文件扫描

胸部CT图肺实质分割与3D模型重建

从CT图像中分割肺部,展示了多种分割方法,最终获取mask。通过多方查找相关的教程,将我们组的课程任务完成情况总结记录如下:

任务说明
肺癌手术治疗的关键是尽可能少的切除感染部位并保留大部分健康的肺组织。传统的计算机手术辅助系统在PC屏幕上显示病人的CT图像。但这种辅助系统不是真正的三维系统,不能很好地向外科医生展示患者肺血管和气管的位置。
为了更好的显示患者的肺部三维结构,我们通过对患者的肺部CT数据进行分析和处理,实现对肺部的分割提取并对提取的肺部数据进行模型创建,尽可能准确的还原肺部的结构。

技术方案
原始数据为某人的肺部CT图,我们需要对CT图数据进行处理,然后根据处理过的数据分割获取肺部组织的结构进行模型重建。

肺部实质分割
处理CT数据的时候,我们需要获取肺部的mask来实现肺部结构的提取。我们主要采用了阈值分割、图像形态学、图像连通域等方法来进行肺部的分割。

肺部模型重建
通过对每一张CT切片进行肺部实质分割,我们得到每一张CT切片中的肺部结构图(以数组的方式存储),多张切片组合成一个三维数组。然后,我们可以通过marching_cubes方法计算三维数据中的曲面并使用matpoltlib和matlab分别显示肺部的的三维模型。

环境介绍
编程语言:Python
主要使用的第三方库:skimage、matplotlib、mayavi
(1)Python
Python 是一种面向对象、解释型、弱类型的脚本语言,它也是一种功能强大而完善的通用型语言。
相比其他编程语言,Python代码非常简单,上手非常容易。比如我们要完成某个功能,如果用Java需要100行代码,但用Python可能只需要20行代码,这是Python具有巨大吸引力的一大特点。
同时,Python具有完备的语言生态,有很多可用的第三方库,且第三方库的安装和使用非常方便,极大的简化了Python程序的编写。
(2)skimage
skimage的全称是scikit-image SciKit (toolkit for SciPy) ,它对scipy.ndimage进行了扩展,提供了更多的图片处理功能。它是由python语言编写的,由scipy 社区开发和维护。skimage库由许多子模块组成,各个子模块提供不同的功能。主要子模块有:
■ filters——图像增强、边缘检测、排序滤波器、自动阈值等
■ draw——操作于numpy数组上的基本图形绘制,如线条、矩形、圆等
■ transform——几何变换或其它变换,如旋转、拉伸和拉式变换等
■ morphology——形态学操作,如开闭运算、骨架提取等
■ exposure——图片强度调整,如亮度调整、直方图均衡等
■ feature——特征检测与提取等
■ measure——图像属性的测量,如相似性或等高线等
(3)matplotlib
matplotlib是Python中最常用的可视化工具之一,可以非常方便地创建海量类型的2D图表和一些基本的3D图表,可根据数据集自行定义x、y轴,绘制图形(线形图,柱状图,直方图,密度图,散布图等),能够满足大部分的需要。matplotlib中最基础的模块是pyplot。
(4)mayavi
Mayavi2完全用Python编写,因此它不但是一个方便实用的可视化软件,而且可以方便地用Python编写扩展,嵌入到用户编写的Python程序中,或者直接使用其面向脚本的API:mlab快速绘制三维图。

技术实现
肺部实质分割
CT图中包含扫描区域的所有物体,包括床板、衣物、人体组织等等,首先需要做的便是将肺部实质提取出来,去除所有其他我们不关注的数据信息。以一张CT切片为例,整个流程如下所示:

(1)二值化
由于CT值的范围是-1000~+1000,所以可以根据不同组织或者结构的CT值对CT图进行二值化操作。对与肺部CT而言,一般以空气的CT值(-300)为界,将大于-300的位置置为1,小于-300的位置置为0。这样就可以将数据分为外部空气、内部空气、躯干组织。如下图所示:

binary

(2)处理边界
边界处理是为了将轮廓外的1值清除,达到删除其他杂物的目的,获得的图像结果如下所示:

AfterClear

(3)标记连通区域
在二值图像中,如果两个像素点相邻且值相同(同为0或同为1),那么就认为这两个像素点在一个相互连通的区域内。而同一个连通区域的所有像素点,都用同一个数值来进行标记,这个过程就叫连通区域标记。我们使用label方法对边界处理过后的图像结果做连通区域划分。
(4)保留最大的两个连通区域
对于一张CT图而言,去除了其他杂物和组织之后,剩余的部分中肺部组织占据了最大的面积。因此,对于标记了连通区域后的图像,我们仅保留最大的两个连通区域,即左肺和右肺。遍历所有的连通区域,将除了最大两个连通区域以外的所有其他位置全部置为0,获得的结果如下所示:
keeplungs
(5)腐蚀和闭包操作
通过腐蚀和闭包操作,处理肺部组织中的细节,结果如下所示:
erosion_closing
(6)填充形成mask
将腐蚀和闭包操作之后的结果做填充完整作为最终的mask结果,最终得到的肺部mask结果如下所示:
mask
(7)肺部分割结果
对每一张切片而言,对切片处理获得对应的肺部mask结果,然后将原始切片的非mask区域置为0,仅保留肺部组织即可。最终的到的分割结果如下所示:

mask

这里只以单张CT图的处理过程为例讲解肺部分割提取的结果,我们对于每一张的CT图都做相同的操作获取到每一个切片的肺部组织数据,用于最终的建模。这里给出单张CT图的肺部分割代码:

# 绘制图片结果
def printImage(image,imgName):
    plt.title(imgName)
    plt.imshow(image,cmap="gray")
    plt.show()
 
# 该函数用于从给定的2D切片中分割肺
def get_segmented_lungs(im, spacing, threshold=-300):
    # 步骤1: 二值化
    binary = im < threshold # 显示二值化 # printImage(binary,"binary") # 步骤2: 清除边界上的斑点 cleared = clear_border(binary) # printImage(cleared,"AfterClear") # 步骤3: 标记联通区域 label_image = label(cleared) # 保留两个最大的联通区域,即左右肺部区域,其他区域全部置为0 areas = [r.area for r in regionprops(label_image)] areas.sort() if len(areas) > 2:
        for region in regionprops(label_image):
            if region.area < areas[-2]: for coordinates in region.coords: label_image[coordinates[0], coordinates[1]] = 0 binary = label_image > 0
    # printImage(binary,"keep lungs")
 
    # 腐蚀操作
    selem = disk(2)
    binary = binary_erosion(binary, selem)
    # 闭包操作
    selem = disk(10)
    binary = binary_closing(binary, selem)
    # printImage(binary,"erosion and closing")
 
    # 填充操作
    edges = roberts(binary)
    binary = ndi.binary_fill_holes(edges)
    # printImage(binary,"mask")
    # 返回最终的结果
    return binary
 
#读取图片,一张CT切片的路径
path = "F:/data/631165.dcm"
data = sitk.ReadImage(path)
spacing = data.GetSpacing()
scan = sitk.GetArrayFromImage(data)
# 获取当前CT切片的mask
mask = np.array([get_segmented_lungs(scan.copy().squeeze(0), spacing)])
# 将mask以外的值置为0,仅保留肺部结构
scan[~mask] = 0
# 显示分割结果
plt.imshow(scan[0],cmap="gray")
plt.show()

肺部模型重建
肺部模型的重建工作基于对每一张CT切片的处理结果之上,将所有的切片数据做肺部组织的分割和提取,然后构成三维坐标数据,最后根据提取的三维坐标进行模型重绘。
首先,我们使用skimage库中measure子模块中的marching_cubes方法根据提取的三维坐标计算曲面;然后,我们采用了matplotlib的3D绘图和mayavi中的mlab分别进行三维图形的绘制;最后,我们使用3D Slicer软件对肺部进行精细化建模,将三者进行对比。
(1)使用matplotlib绘制三维模型
设置好3D绘图的属性后,对分割结果进行绘制,绘制函数编写如下:

# 使用matplotlib绘图
def plot_3d_with_plt(image, threshold=-150):
    p = image.transpose(2,1,0)
    print(image.shape)
    verts,faces,_,_ = measure.marching_cubes(p, threshold)
    # plt绘制
    fig = plt.figure(figsize=(10, 10))
    ax = fig.add_subplot(111, projection='3d')
    # Fancy indexing: `verts[faces]` to generate a collection of triangles
    mesh = Poly3DCollection(verts[faces], alpha=0.1)
    face_color = [0.5, 0.5, 1]
    mesh.set_facecolor(face_color)
    ax.add_collection3d(mesh)
 
    ax.set_xlim(0, p.shape[0])
    ax.set_ylim(0, p.shape[1])
    ax.set_zlim(0, p.shape[2])
 
    plt.show()

绘制结果如下所示:
matplotlib
(2)使用mlab绘制三维面模型
使用mlab进行绘制的函数比较简单,但是绘制结果图的显示效果优于matplotlib绘制的结果,代码如下所示:

# 使用mlab绘图
def plot_3d_with_mlab(image, threshold=-150):
    p = image.transpose(2,1,0)
    print(image.shape)
    verts,faces,_,_ = measure.marching_cubes(p, threshold)
    verts = verts.T
    mlab.triangular_mesh([verts[0]], [verts[1]], [verts[2]], faces)
    mlab.show()

绘制结果如下所示:
mlab

(3)与3D Slicer的建模结果对比
我们使用了3D Slicer进行了更加精细化的建模,该软件的建模需要手动标注用于区分不同的组织。尤其是对于气道这样的组织,可以通过对多张CT图和不同视图的标记帮助软件更好的对肺部进行建模。我们使用该软件对给定的CT数据进行建模的结果如下所示:
3d
完整的代码如下所示:

from optparse import Values
from skimage.segmentation import clear_border
from skimage.measure import label,regionprops, perimeter
from skimage.morphology import ball, disk, dilation, binary_erosion, remove_small_objects, erosion, closing, reconstruction, binary_closing
from skimage.filters import roberts, sobel
from scipy import ndimage as ndi
import scipy.ndimage
import numpy as np
from skimage import measure, feature
from mpl_toolkits.mplot3d import Axes3D
from mpl_toolkits.mplot3d.art3d import Poly3DCollection
from skimage import measure
import os
import SimpleITK as sitk
import matplotlib.pyplot as plt
from mayavi import mlab
 
# 该函数用于从给定的2D切片中分割肺
def get_segmented_lungs(im, spacing, threshold=-300):
    # 步骤1: 二值化
    binary = im < threshold # 步骤2: 清除边界上的斑点 cleared = clear_border(binary) # 步骤3: 标记联通区域 label_image = label(cleared) # 保留两个最大的联通区域,即左右肺部区域,其他区域全部置为0 areas = [r.area for r in regionprops(label_image)] areas.sort() if len(areas) > 2:
        for region in regionprops(label_image):
            if region.area < areas[-2]: for coordinates in region.coords: label_image[coordinates[0], coordinates[1]] = 0 binary = label_image > 0
    # 腐蚀操作,分割肺部的细节
    selem = disk(2)
    binary = binary_erosion(binary, selem)
    # 闭包操作
    selem = disk(10)
    binary = binary_closing(binary, selem)
 
    edges = roberts(binary)
    binary = ndi.binary_fill_holes(edges)
    # 返回最终的结果
    return binary
 
# 提取主要部分,选取不符合肺部实质特征的部分进行过滤
def extract_main(mask, spacing, vol_limit=[0.68, 8.2]):
    voxel_vol = spacing[0]*spacing[1]*spacing[2]
    label = measure.label(mask, connectivity=1)
    properties = measure.regionprops(label)
    for prop in properties:
            if prop.area * voxel_vol < vol_limit[0] * 1e6 or prop.area * voxel_vol > vol_limit[1] * 1e6:
                mask[label == prop.label] = 0           
    return mask
 
# 显示ct切片的分割结果
def plot_ct_scan(scan, num_column=4, jump=1):
    num_slices = len(scan)
    num_row = (num_slices//jump + num_column - 1) // num_column
    f, plots = plt.subplots(num_row, num_column, figsize=(num_column*5, num_row*5))
    for i in range(0, num_row*num_column):
        plot = plots[i % num_column] if num_row == 1 else plots[i // num_column, i % num_column]        
        plot.axis('off')
        if i < num_slices//jump:
            plot.imshow(scan[i*jump], cmap=plt.cm.bone) 
 
# 使用matplotlib绘图
def plot_3d_with_plt(image, threshold=-150):
    p = image.transpose(2,1,0)
    print(image.shape)
    verts,faces,_,_ = measure.marching_cubes(p, threshold)
    # plt绘制
    fig = plt.figure(figsize=(10, 10))
    ax = fig.add_subplot(111, projection='3d')
    # Fancy indexing: `verts[faces]` to generate a collection of triangles
    mesh = Poly3DCollection(verts[faces], alpha=0.1)
    face_color = [0.5, 0.5, 1]
    mesh.set_facecolor(face_color)
    ax.add_collection3d(mesh)
 
    ax.set_xlim(0, p.shape[0])
    ax.set_ylim(0, p.shape[1])
    ax.set_zlim(0, p.shape[2])
 
    plt.show()
 
# 使用mlab绘图
def plot_3d_with_mlab(image, threshold=-150):
    p = image.transpose(2,1,0)
    print(image.shape)
    verts,faces,_,_ = measure.marching_cubes(p, threshold)
    verts = verts.T
    mlab.triangular_mesh([verts[0]], [verts[1]], [verts[2]], faces)
    mlab.show()
# 存放数据的文件夹
root = 'F:/data'
paths = os.listdir(root)
tem = np.empty(shape=(0,512,512))
for path in paths:
    # 读取CT图,对每一张进行分割提取
    data =sitk.ReadImage(os.path.join(root,path))
    spacing = data.GetSpacing()
    scan = sitk.GetArrayFromImage(data)
    mask = np.array([get_segmented_lungs(scan.copy().squeeze(0), spacing)])
    scan[~mask] = 0
    tem = np.append(tem, scan, axis=0)
 
print(tem.shape)
scan = tem[::-1]                #读取文件的顺序和实际模型颠倒,所以这里做一个逆序
plot_3d_with_plt(scan)          #绘制建模结果
plot_3d_with_mlab(scan)         #绘制建模结果

结果分析
通过对结果的分析和比较,我们发现自己使用的分割和重建方法难以对肺部组织和气道进行明显的区分。虽然,我们可以通过调节相应的参数获取不带有气道的完整肺部结构,但是比较难以将气道和肺部组织进行分离,尤其是在肺部和气道的交界处。如何使用CT图中的数据特征更加准确的区分肺部组织和气道组织是一个可以进一步深入研究的课题。

python运行YOLOv8推理详解及部署实现

参考文档:github.com/ultralytics/

代码仓库的名字不再沿用 yolovx 而是使用 ultralytics, 而这个名字正是创建该项目的公司的名字,之所以如此,一方面是该公司想要创建一个 CV 的通用仓库,使其能够支持大部分的 CV 任务,如 物体检测与跟踪、实例分割、图像分类和姿态估计等,以区分于之前只是检测任务使用的 yolovx。第二方面,估计有想提升公司知名度的意味,故命名为自己公司的名字。

 一,基本核心代码

from ultralytics import YOLO

model = YOLO("xxxx.pt")# 或者(用于训练): model = YOLO("yolov8x.yaml")

image = "xxx.jpg"# 或者图片文件夹

model.predict(image, save=True)# 返回image的预测结果

# 训练:model.train(data="数据集路径.yaml", epochs=200, batch=16)
# 训练数据集类型看yolov8训练流程

二,代码扩展案例

1,训练

from ultralytics import YOLO

model = YOLO("./weights/yolov8n.pt")

data = "./dataset/car/mydata.yaml"

model.train(data=data, epochs=100, batch=1)

2,预测
2.1单图

from ultralytics import YOLO

save_path = './'
image_path = './dataset/fire_smoke/000010.jpg'
model = YOLO('./weights/best.pt')

# 单图预测
results = model.predict(image_path)
for r in result[0]:
if r.boxes.cls.item()==0.0:
print('有火')
elif r.boxes.cls.item()==1.0:
print('有烟')

2.2多图文件夹

from ultralytics import YOLO
from pathlib import Path

save_path = './'
images_path = './dataset/fire_smoke/images'
model = YOLO('./weights/best.pt')

for path in Path(images_path).glob('*.*'):
results = model.predict(str(path))
for result results: 
for r in result:
if r.boxes.cls.item()==0.0:
print('有火')
elif r.boxes.cls.item()==1.0:
print('有烟')

2.3 图片路径文件

from ultralytics import YOLO
from pathlib import Path

save_path = './'
txt_path = './xxx.txt'# txt内容是图片路径
model = YOLO('./weights/best.pt')

# 图集推理
with open(txt_path, 'r', encoding='utf-8') as f:
lines = f.readlines()
for path in lines:
results = model.predict(path[:-1])
for r in result[0]:
if r.boxes.cls.item()==0.0:
print('有火')
elif r.boxes.cls.item()==1.0:
print('有烟')

2.4网络摄像头

from ultralytics import YOLO
import cv2

save_path = './'
video_url = 0# 网络摄像头路径,0表示本机摄像头
model = YOLO('./weights/best.pt')

cap = cv2.VideoCapture(video_url)
while True:
ret, frame = cap.read()
results = model.predict(frame, save=True)
img = cv2.imread('./predict/image0.jpg')
cv2.imshow('img', img)
if cv2.waitKey(1) == ord('q'):
break
for r in results[0]:
# if r.boxes.conf.item()>5.0:# 置信度阈值
if r.boxes.cls.item()==0.0:
print('有火')
elif r.boxes.cls.item()==1.0:
print('有烟')

Python yolov8 介绍

介绍 Ultralytics YOLOv8 YOLOv8 基于深度学习和计算机视觉领域的尖端技术,在速度和准确性方面具有无与伦比的性能。其流线型设计使其适用于各种应用,并可轻松适应从边缘设备到云 API 等不同硬件平台。

探索YOLOv8 文档,这是一个旨在帮助您了解和利用其特性和功能的综合资源。无论您是经验丰富的机器学习实践者还是该领域的新手,hub ,旨在最大限度地发挥YOLOv8 在您的项目中的潜力。

根据官方描述,Yolov8是一个SOTA模型,它建立在Yolo系列历史版本的基础上,并引入了新的功能和改进点,以进一步提升性能和灵活性,使其成为实现目标检测、图像分割、姿态估计等任务的最佳选择。其具体创新点包括一个新的骨干网络、一个新的Ancher-Free检测头和一个新的损失函数,可在CPU到GPU的多种硬件平台上运行。

此外,Yolov8还有一个特点就是可扩展性,ultralytics没有直接将开源库命名为Yolov8,而是直接使用”ultralytics”,将其定位为算法框架,而非某一个特定算法。这也使得Yolov8开源库不仅仅能够用于Yolo系列模型,而且能够支持非Yolo模型以及分类分割姿态估计等各类任务。

总而言之,Yolov8是Yolo系列模型的最新王者,各种指标全面超越现有对象检测与实例分割模型,借鉴了Yolov5、Yolov6、YoloX等模型的设计优点,在全面提升改进Yolov5模型结构的基础上实现,同时保持了Yolov5工程化简洁易用的优势。


YOLO:简史
YOLO(You Only Look Once)是一种流行的物体检测和图像分割模型,由华盛顿大学的约瑟夫-雷德蒙(Joseph Redmon)和阿里-法哈迪(Ali Farhadi)开发。YOLO 于 2015 年推出,因其高速度和高精确度而迅速受到欢迎。

2016 年发布的YOLOv2 通过纳入批量归一化、锚框和维度集群改进了原始模型。
2018 年推出的YOLOv3 使用更高效的骨干网络、多锚和空间金字塔池进一步增强了模型的性能。
YOLOv4于 2020 年发布,引入了 Mosaic 数据增强、新的无锚检测头和新的损失函数等创新技术。
YOLOv5进一步提高了模型的性能,并增加了超参数优化、集成实验跟踪和自动导出为常用导出格式等新功能。
YOLOv6于 2022 年由美团开源,目前已用于该公司的许多自主配送机器人。
YOLOv7增加了额外的任务,如 COCO 关键点数据集的姿势估计。
YOLOv8是YOLO 的最新版本,由Ultralytics 提供。YOLOv8 YOLOv8 支持全方位的视觉 AI 任务,包括检测、分割、姿态估计、跟踪和分类。这种多功能性使用户能够在各种应用和领域中利用YOLOv8 的功能。


Yolov8的改进之处有以下几个地方:

  • Backbone:使用的依旧是CSP的思想,将YOLOv5中的C3模块被替换成了C2f模块,实现了进一步的轻量化,同时YOLOv8依旧使用了YOLOv5等架构中使用的SPPF模块;
  • PAN-FPN:YOLOv8依旧使用了PAN的思想,不同的是YOLOv8将YOLOv5中PAN-FPN上采样阶段中的卷积结构删除了,同时也将C3模块替换为了C2f模块;
  • Decoupled-Head:这一点源自YOLOX;分类和回归两个任务的head不再共享参数,YoloV8也借鉴了这样的head设计。
  • Anchor-Free:YOLOv8抛弃了以往的Anchor-Base,使用了Anchor-Free的思想;
  • 损失函数:YOLOv8使用VFL Loss作为分类损失,使用DFL Loss+CIOU Loss作为分类损失;
  • 样本匹配:YOLOv8抛弃了以往的IOU匹配或者单边比例的分配方式,而是使用了Task-Aligned Assigner匹配方式。

yolov8是个模型簇,从小到大包括:yolov8n、yolov8s、yolov8m、yolov8l、yolov8x等。模型参数、运行速度、参数量等详见下表:

模型 尺寸
(像素)
mAPval
50-95
速度
CPU ONNX
(ms)
速度
A100 TensorRT
(ms)
参数
(M)
FLOPs
(B)
YOLOv8n 640 37.3 80.4 0.99 3.2 8.7
YOLOv8s 640 44.9 128.4 1.20 11.2 28.6
YOLOv8m 640 50.2 234.7 1.83 25.9 78.9
YOLOv8l 640 52.9 375.2 2.39 43.7 165.2
YOLOv8x 640 53.9 479.1 3.53 68.2 257.8
  • mAP 值是基于单模型单尺度在 COCO val2017 数据集上的结果。
    通过 yolo val detect data=coco.yaml device=0 复现
  • 速度 是使用 Amazon EC2 P4d 实例对 COCO val 图像进行平均计算的。
    通过 yolo val detect data=coco128.yaml batch=1 device=0|cpu 复现

显然,A100上使用 TensorRT 加速确实快,但我更需要的是在比较弱的 GPU 上的 速度指标。

从上面的指标可以看出,yolov8 相比 yolov5-7.0, mAP 全部都更高, 但是 n/s/m 模型的参数更多,对应 speed 也更慢,l/x 的参数量更少,推理速度却更慢。但是,更高的性能,牺牲点参数量和 speed,我觉得也是可以接受的。可能该仓库的目的也不在此,更多的是让 ultralytics 变成一个算法框架,这是许多人都需要的东西。